Difference between revisions of "User:Delta/Aesthetics"
(Rewrite of WIP) |
m (Preparing for a write up) |
||
| Line 1: | Line 1: | ||
This is a page where experimental aesthetics things i found are documented and somewhat made into a guide. Most of these will end up on https://implyingrigged.info/wiki/Blender_tutorials<br> | This is a page where experimental aesthetics things i found are documented and somewhat made into a guide. Most of these will end up on https://implyingrigged.info/wiki/Blender_tutorials<br> | ||
For questions or help contact me on Discord: Delta#7052 | For questions or help contact me on Discord: Delta#7052 | ||
= Trophy model editing PES19= | |||
This is a guide to change the trophy model and big victory stand model where the trophy is lifted. These models are used for the cup lifting scene that teams get when they win a cup/league. | |||
WIP | |||
= Loading models using boot slots = | = Loading models using boot slots = | ||
Revision as of 22:23, 16 July 2021
This is a page where experimental aesthetics things i found are documented and somewhat made into a guide. Most of these will end up on https://implyingrigged.info/wiki/Blender_tutorials
For questions or help contact me on Discord: Delta#7052
Trophy model editing PES19
This is a guide to change the trophy model and big victory stand model where the trophy is lifted. These models are used for the cup lifting scene that teams get when they win a cup/league.
WIP
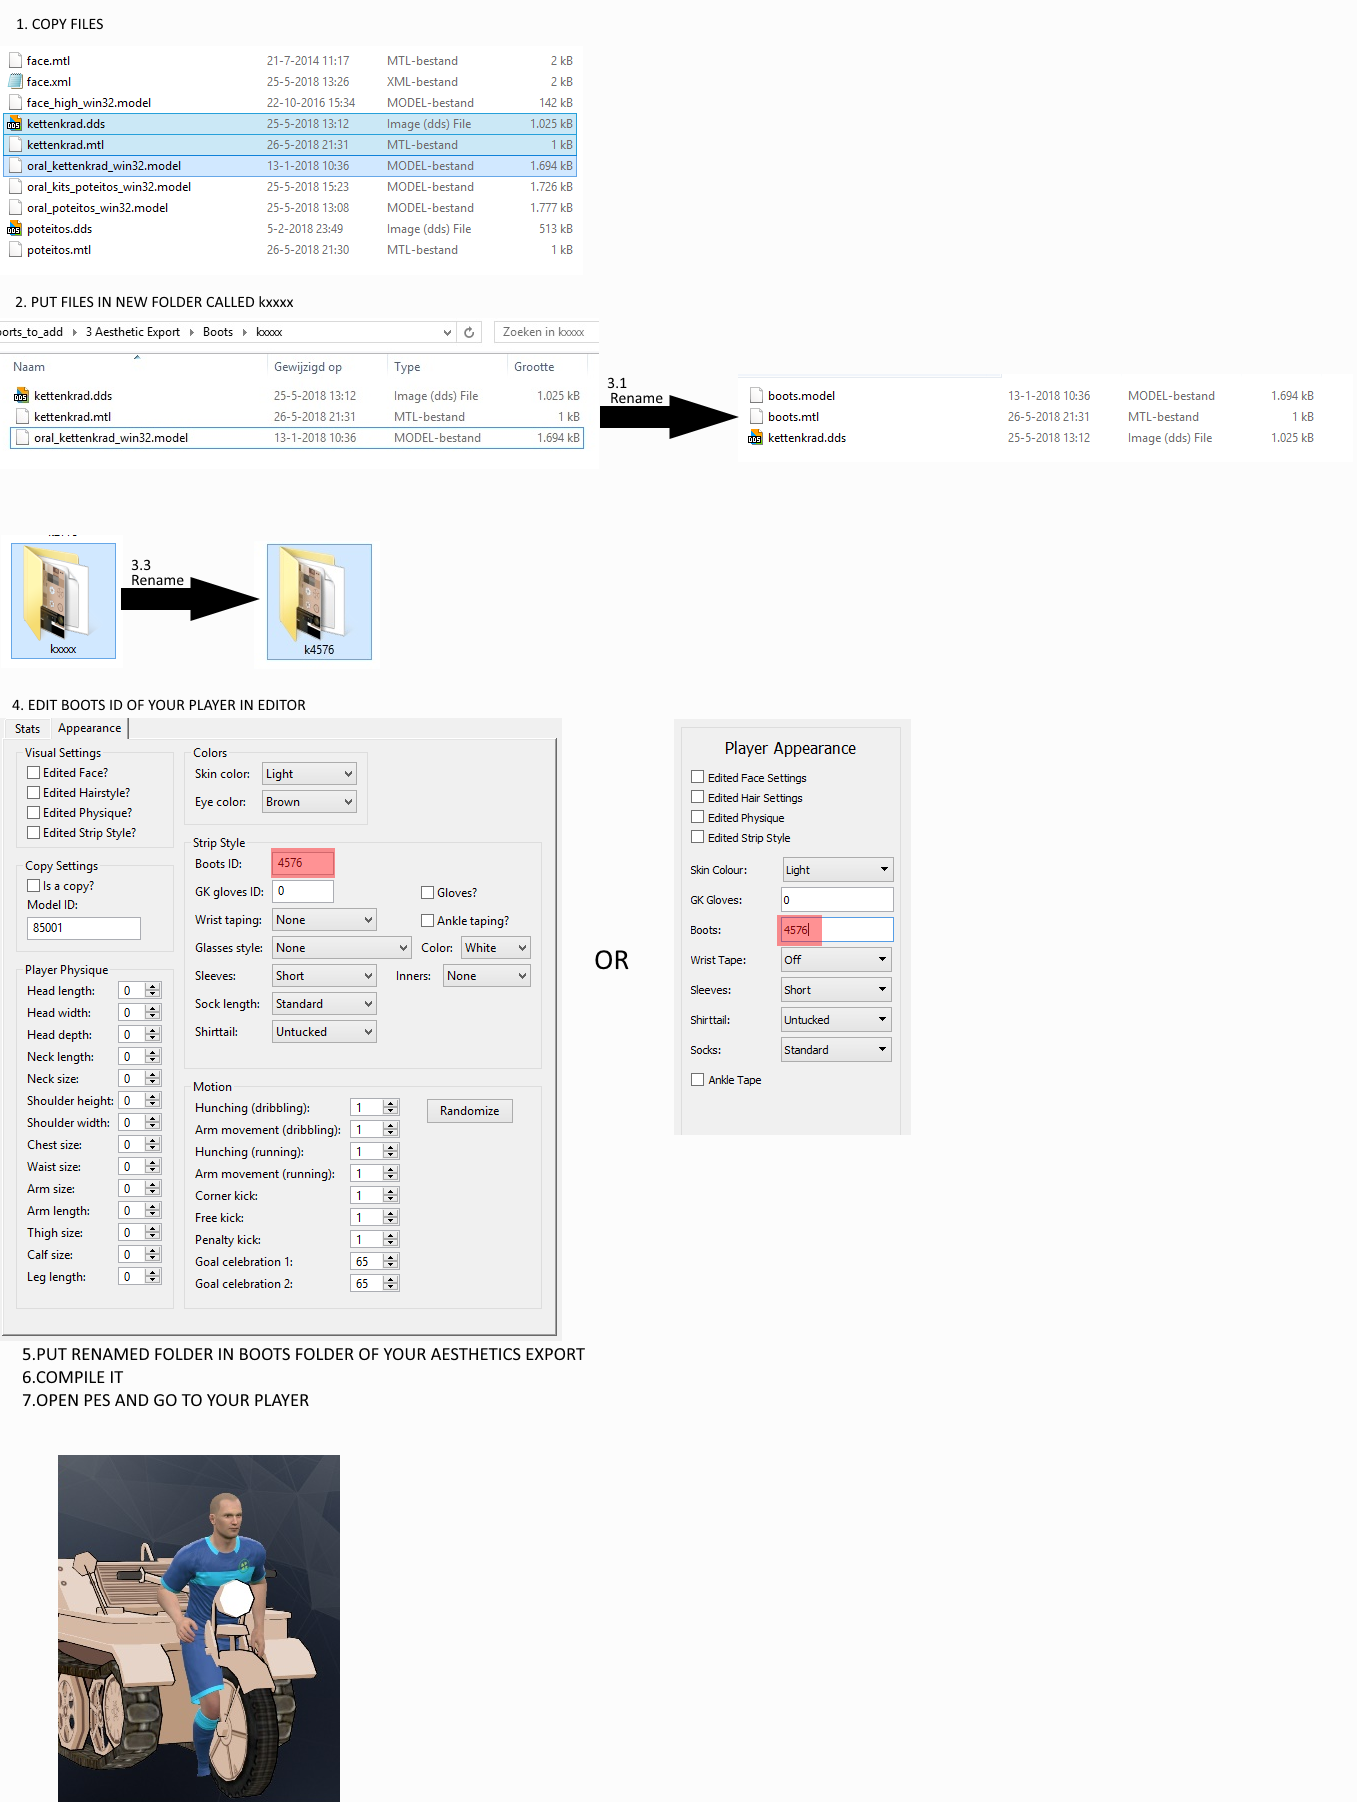
Loading models using boot slots
This is a guide to load models using boot slots.
By using this methode you can give faces made ingame models or even swap aesthetics for players between matches.
First you need your model, texture and its mtl. Copy those files and put them in a new folder called kxxxx. Rename the .model file to boots.model and the .mtl to boots.mtl Then use this page:link to search for yourteams allocated boot slots and rename your folder to that number. So kxxxx becomes k4576 for example. Put this folder in the boots folder in your aesthetics export and compile it. Open then a Save editor and change the boots ID of the player you want the model on. If you open PES now and go to that player your model should show up.
Picture guide using the kettenkrad model from /u/ and invitational 20 player 85001
Pictureguide
Loading models from kit config
This is a guide to load models using the kit config.
Required reading: https://implyingrigged.info/wiki/Blender_tutorials#Custom_Models_as_Kits_-_The_Special_Scenario
Now we know that we can use the collar slots to load in models. However we can abuse the kit config further and load in more models.
Currently the following models can be used from the kit config file:
-Short sleeve model
-Pants model
-Summer collar model
-Winter collar model
Sleeve model
To use a custom model in the short sleeve slot you need to edit offset 00 in the config and give the model the following name: short_sleeve_xxx.model where xxx is the slot number you use.
The players needs to use short sleeves in order for this model to show up and to be safe set the kitconfig to loose.
Currently there is now way to use the long sleeve slot.
Pants model
To use a custom model in the pants slot you need to edit offset 05 in the config and give the model the following name: pants_xxx.model where xxx is the slot number you use.
Collar model
To use a custom model in the collar slot you need to edit offset 14 and 15 and give the model the following name: collar_xxx.model where xxx is the slot number you use.
Using offset 14 gives you the summer collar and using offset 15 gives you the winter collar. Why is this important? You can slot in 2 different models to use ingame. You need to use the ingame strip settings to use these. Short sleeves gives you the summer collar and using long sleeves gives you the winter collar.
All the offset editing had to be done with a hexeditor. Normal PES kitconfig editors cant set the value to what we need.
https://i.imgur.com/K7Osdoj.png
Above picture shows what offsets we need to edit.
All the model files goes in: \common\character0\model\character\uniform\nocloth
The kit config goes in your kit config folder of the AET
So in the end we have:
1 slot that is shared with all players: Pants model
1 slot that can use 2 models: Collar model
1 slot that only shows up under correct settings: Short sleeve model
Using this system to the fullest means that you can give short sleeve players 3 additional shared uniform models and long sleeve players 2 additional shared uniform models.