User:Delta/Aesthetics
This is a page where experimental aesthetics things i found are documented and somewhat made into a guide. Most of these will end up on https://implyingrigged.info/wiki/Blender_tutorials
For questions or help contact me on Discord: Delta#7052
Trophy model editing PES19
This is a guide to change the trophy model. This guide uses the ACL trophy that is used for the VGL.
For this guide the following programs are used:
-Blender
-Image editor that can handle DDS files
-DpFileList
The first step is to make a new folder. This will be your work folder for this project. Name it something easy and recognizable.
Open CriPackedFileMaker
Go to your \Pro Evolution Soccer 2019\Data and drag dt12_g4 into the open CriPackedFileMaker window. Now click "extract content files from CPK" just below the big X button. Now select the folder you made in the first step and then click OK. Click Yes/OK/etc.. to start extracting. Because this is a large file it may take a while. Click OK when its done and close CriPackedFileMaker.
Now open your folder. Open the common folder inside, then open the demo folder. Now select the anime, fixdemo, fixdemoobj, light and mob folders and delete them. These are not needed for this guide. Now open the prop folder and delete everything except the cup_afc_cl_hi folder. With these steps we delete everything that was not needed.
Next we are going to prepare the files for editing. First the images. Open Ftextool and go to \common\demo\prop\cup_afc_cl_hi\#windx1. Drag and drop all the files into Ftextool and dds files will appear.
Next is the model. Go to \common\demo\prop\cup_afc_cl_hi\#Win and copy cup_afc_cl_hi.fpk. Bring this file to the same folder where Gzstool.exe is located. Open a cmd window by typing cmd in the location bar. In the cmd window type in gzstool.exe cup_afc_cl_hi.fpk and press enter. This will create a folder called cup_afc_cl_hi.fpk and a file called cup_afc_cl_hi.fpk.xml. Open the folder all the way until \cup_afc_cl_hi_fpk\Assets\pes16\demo\prop\cup_afc_cl_hi and you will see the fmdl.
Open 2 Blender model. Open the trophy fmdl into one and your new model into the other. As example for a new model I took a random export from Summer 2021 and took a FBM from it. Delete all vertex groups and skeleton from your new model if it has those. In your trophy window move the model in edit mode to the side and delete mesh_id 1 since its not needed, unless you use multiple meshes for 1 fmdl then you can use it. Now copy your new model in object mode and paste it into the window of the trophy model whilst in object mode. Position your model the way you want it and then in object mode click your new model and then shift click the trophy model and press control j. Now your models are fused. Go to edit mode and use B to select to trophy model you moved earlier, make sure its orange and delete it so that only your new model remains. In the same edit mode select your model completely. Go to the data tap on the right, select the only vertex group sk_prop and click assign. Check in weight paint mode that the model is fully painted to that group. You can now export the fmdl. If the export is complete you can close the Blender windows.
Now that we have exported a new model we need to pack the model back in. Open a cmd window in the folder where Gzstool.exe is located. Type in the cmd window gzstool.exe cup_afc_cl_hi.fpk.xml and press enter. Now we will see a new cup_afc_cl_hi.fpk appear in the gzstool folder. Copy the fpk now and bring it to \common\demo\prop\cup_afc_cl_hi\#Win and replace the original fpk.
Next are the image files. Go to \common\demo\prop\cup_afc_cl_hi\#windx11 and open the dds files in your image editor. Open the image from your new model and use this file to replace cup_afc_cl_hi_bsm.dds. The other files in the folder can be reduced to 4x4 texture unless you know how those work. Save all files as dds and with mipmapes.
Now open Ftextool and go to common\demo\prop\cup_afc_cl_hi\#windx11 and drag and drop the dds files into Ftextool. The original ftex files will be replaced.
Now to get these files into PES. Open CriPackedFileMaker and drop your work folder into it. Click on build CPK file, confirm the setting that pop-up and press Start to build. A new CPK has been build. Copy the CPK file and drop it into \Pro Evolution Soccer 2019\download. Now open DpFileList Generator, find your new CPK on the left list, select it. The right list should list all the 4cc and vgl CPKs in the numbered order. Make sure your new CPK is at the bottom. Click Generate DpFileList.bin and a new bin file will be made.
Open PES and load your league cup file from before the final. To get this you need to play the Cup mode so prepare yourself for it. After loading your cup file start the final, make your team win and see them lift your new trophy.
Loading models using boot slots
This is a guide to load models using boot slots.
By using this methode you can give faces made ingame models or even swap aesthetics for players between matches.
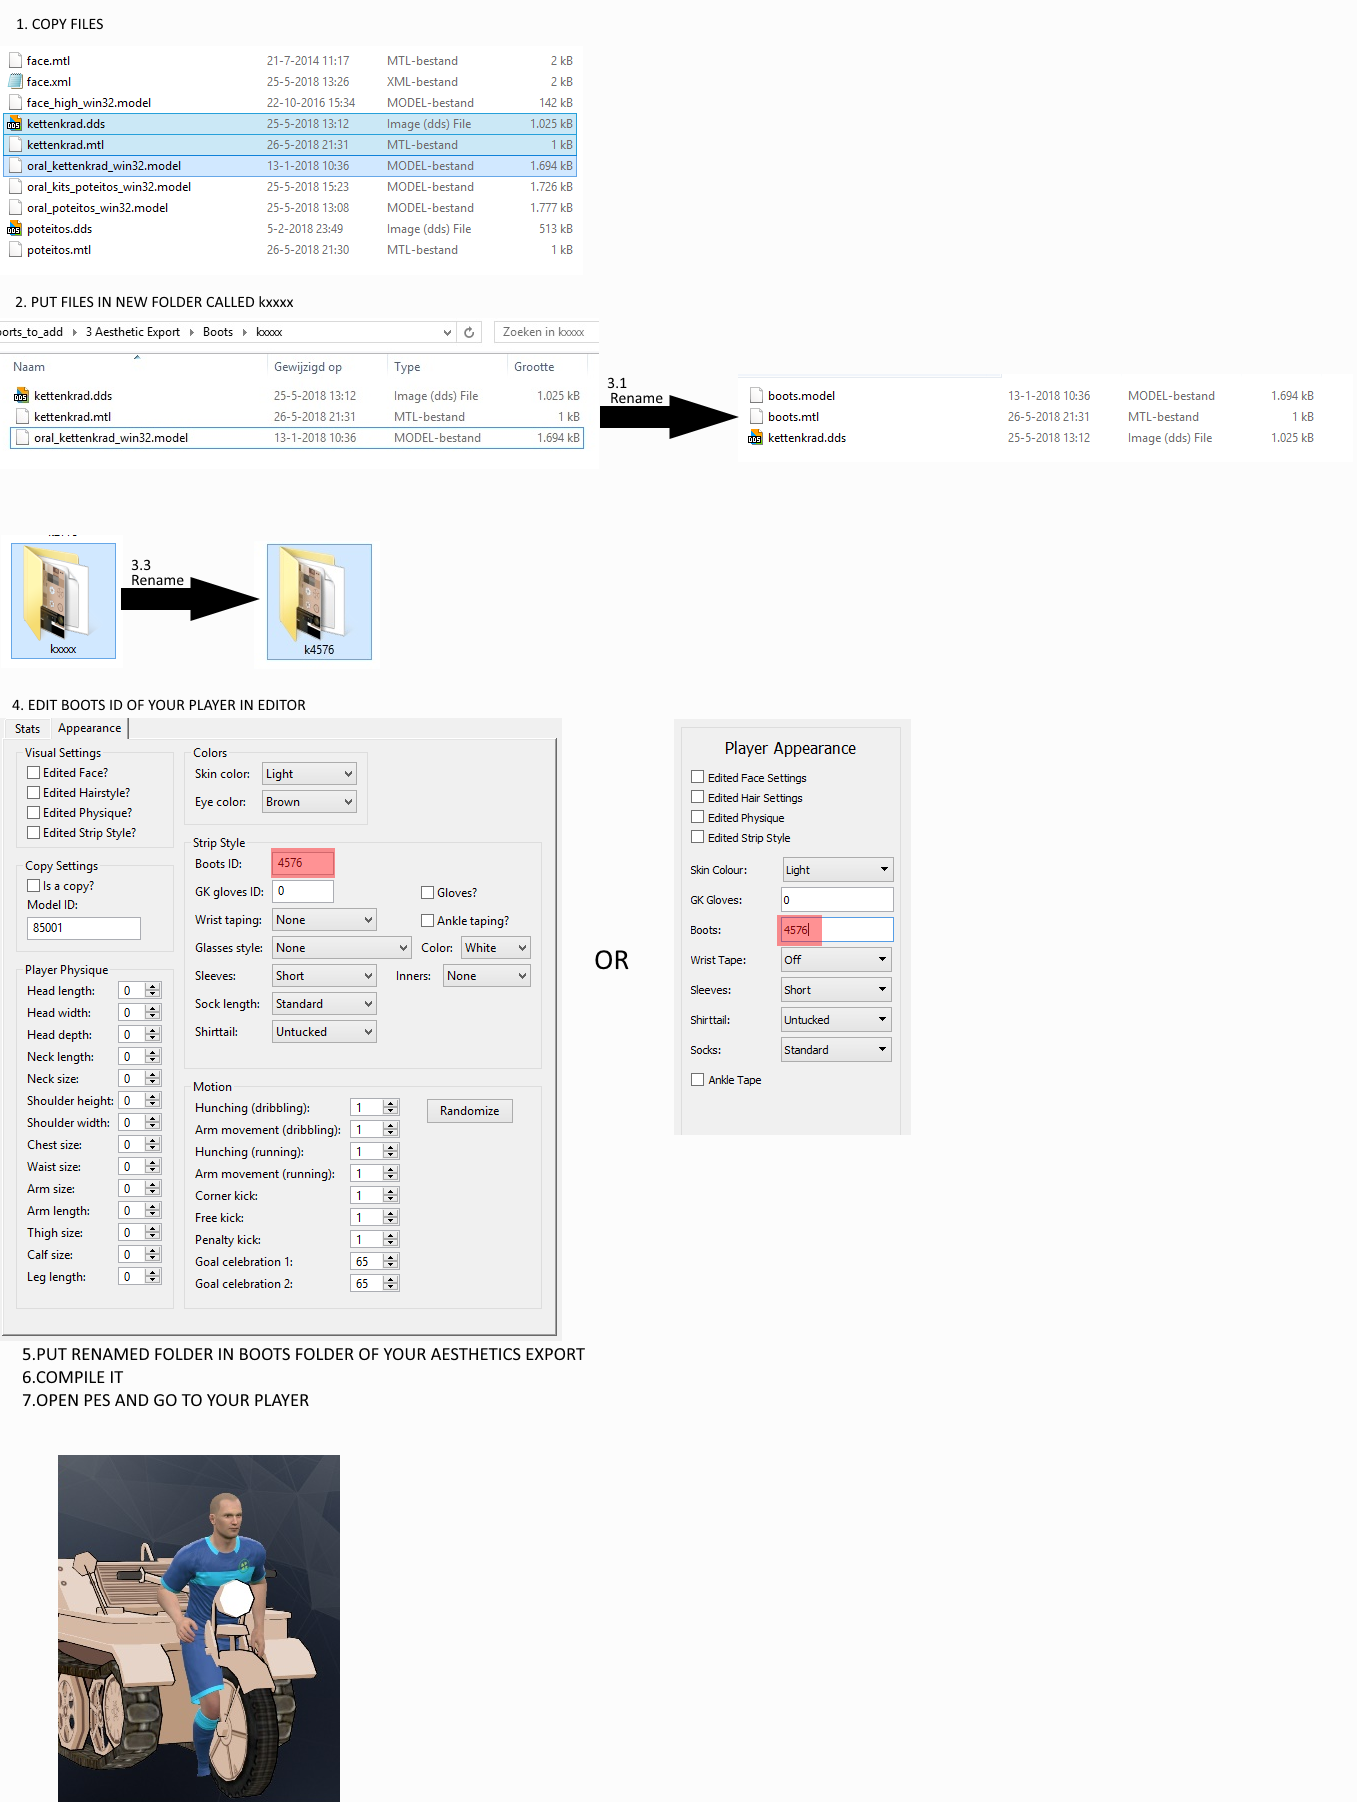
First you need your model, texture and its mtl. Copy those files and put them in a new folder called kxxxx. Rename the .model file to boots.model and the .mtl to boots.mtl Then use this page:link to search for yourteams allocated boot slots and rename your folder to that number. So kxxxx becomes k4576 for example. Put this folder in the boots folder in your aesthetics export and compile it. Open then a Save editor and change the boots ID of the player you want the model on. If you open PES now and go to that player your model should show up.
Picture guide using the kettenkrad model from /u/ and invitational 20 player 85001
Pictureguide
Loading models from kit config
This is a guide to load models using the kit config.
Required reading: https://implyingrigged.info/wiki/Blender_tutorials#Custom_Models_as_Kits_-_The_Special_Scenario
Now we know that we can use the collar slots to load in models. However we can abuse the kit config further and load in more models.
Currently the following models can be used from the kit config file:
-Short sleeve model
-Pants model
-Summer collar model
-Winter collar model
Sleeve model
To use a custom model in the short sleeve slot you need to edit offset 00 in the config and give the model the following name: short_sleeve_xxx.model where xxx is the slot number you use.
The players needs to use short sleeves in order for this model to show up and to be safe set the kitconfig to loose.
Currently there is now way to use the long sleeve slot.
Pants model
To use a custom model in the pants slot you need to edit offset 05 in the config and give the model the following name: pants_xxx.model where xxx is the slot number you use.
Collar model
To use a custom model in the collar slot you need to edit offset 14 and 15 and give the model the following name: collar_xxx.model where xxx is the slot number you use.
Using offset 14 gives you the summer collar and using offset 15 gives you the winter collar. Why is this important? You can slot in 2 different models to use ingame. You need to use the ingame strip settings to use these. Short sleeves gives you the summer collar and using long sleeves gives you the winter collar.
All the offset editing had to be done with a hexeditor. Normal PES kitconfig editors cant set the value to what we need.
https://i.imgur.com/K7Osdoj.png
Above picture shows what offsets we need to edit.
All the model files goes in: \common\character0\model\character\uniform\nocloth
The kit config goes in your kit config folder of the AET
So in the end we have:
1 slot that is shared with all players: Pants model
1 slot that can use 2 models: Collar model
1 slot that only shows up under correct settings: Short sleeve model
Using this system to the fullest means that you can give short sleeve players 3 additional shared uniform models and long sleeve players 2 additional shared uniform models.