User:Noteperson
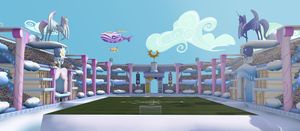
I made a stadium for /mlp/, the Cirrus Maximus. Some people seem to like it.
If you'd like to talk about custom stadium design, feel free to contact me on Skype.
Personal Information
Trip: Noteperson !!OaxI+wTW5//
Skype: Noteperson
Stadium Export Tutorial
Follow these steps to export a stadium file from Blender using the PES Blender Stadium Export (BSE) tool by Suat CAGDAS 'sxsxsx', which can be found here.
Initial setup:
- Place pes_temp folder in Blender install directory
- Place BSE python script (pes_stad_exp.py) in Blender Appdata scripts addons folder (e.g.: .../Blender/2.71/scripts/addons)
- Enable the add-on in Blender options
New stadium setup:
- I'll refer to the folder into which you extracted the Blender Stadium Export tool as $BSE_UNZIP
- Make a copy of $BSE_UNZIP/BSEv18_pes15/pes15_stads/ to edit for your new stadium (This directory I'll refer to as $PES16_STADS)
- Create a $STADIUM subfolder in it
- Edit $PES15_STADS/build_cpk.bat:
- Change test_stadium to $STADIUM
- Put in the correct path to the PES download directory ($PES16_DOWNLOAD)
- Copy $BSE_UNZIP/BSEv18_pes15/game_files/database_files/common to $STADIUM
- Copy $BSE_UNZIP/BSEv18_pes15/game_files/game_files/common to $STADIUM and merge with existing
- Create a $STAD_BLENDER folder in $PES16_STADS
- Copy $BSE_UNZIP/BSEv18_pes15/useful_files_pics/pes15_template.blend to $STAD_BLENDER
- Rename it as desired
In Blender:
- Open the blender file in $STAD_BLENDER
- Select the PITCH object
- Under the Scene tab of the Properties panel, go the the PES 2015 BSE area
- In the Stadium ID Changer, set the common folder field to $STADIUM/common
- In the Stadium ID Changer, set Old to stxxx and New to desired $STADID, e.g. st002
- (A list of stadium IDs can be found in $BSE_UNZIP/BSEv18_pes15/useful_files_pics/)
- Then press 'Change ID'
- In bottom row of Changer, set first field to the 'New' stad ID, and second field to desired stadium name
- Press 'Change Name'
- Go to $STADIUM/common/bg/model/bg/bill/config/ and edit config.xml
- If your stadium ID isn't already listed there, copy a line (e.g. the st007 line) and edit it to have your stadium's ID in the first and last entries (e.g. '2', 'st002')
- In the first panel of the PES 2015 BSE dropdown, press the 'Create Main Parts' button
- Select the shadow_plane object, go into edit mode, and Save as Image (into $STAD_BLENDER with RGB, no alpha) the field_shadow.png
- Switch to the lightmap UV, Save as Image the field_AO (again, no alpha)
- Select the pitch15_mesh, and go to the BSE Export Menu box
- Choose desired time/weather mode from the combobox (e.g. DAY FINE)
- Set the directory field to $STADIUM/common/bg/model/bg/stadium/$STADID/
- Set Stad ID field to $STADID
- In the Build CPL File box, set the directory field to $PES16_STADS/build_cpk.bat
Stadium editing in Blender:
- Select the shadow_plane
- In edit mode, paint field_shadow white
- Once your stadium model is complete, you will bake shadows to this image
- Save it
- Switch to lightmap UV
- Paint field AO off-white (bluish)
- Once your stadium model is complete, you will bake AO to this image
- Save it
- In Object mode, create/add an object to the model
- In Object mode Properties (N), under Shading, ensure Multitexture is selected and Shadeless enabled
- In the BSE active object panel
- Select a parent for the new object from the drop down
- Press the SET button to assign the parent
- Press the Add UVs button to create the base and lightmap UV layers for the object
- Enter edit mode and create a color texture for the object
- Save as Image to $STAD_BLENDER as *_color.png
- Switch to lightmap UV layer
- Create texture (can be of a smaller size), Save as Image (no alpha) to $STAD_BLENDER as *_lmap.png
Exporting your model:
- Toggle on the Blender console to see conversion output messages
- In BSE 'DDS Convert-Export Textures' box:
- Press Export DDS Textures button
- In BSE 'Export Menu' box:
- Press Export Model Files button
- In BSE 'Build CPK Files' box:
- Press Build CPK button
- Generate DpFileList.bin including your generated CPK last in the list in PES15 download folder
- Can use DpFileListGenerator application, for example
NOTE that you must export once for each desired time/weather condition (DAY/FINE, DAY/RAINY, NIGHT/FINE, NIGHT/RAINY)
Run PES16 and enjoy the fruits of your labor!
