|
Congratulations /mlp/! | 
|
|---|---|---|
| Winners of the 2024 4chan Spring Babby Cup |
Difference between revisions of "Pro Evolution Soccer 2015/Kits"
| Line 88: | Line 88: | ||
<br> | <br> | ||
[[File:km15-1.png|none]] | [[File:km15-1.png|none]] | ||
Unlike the PES14 kit config file configurators neither of the 2 PES15 tools can make new kit config files so you'll have to use an existing one as base. Under Tools you can download original kit config files for your team. For this guide we will use /4ccc/ (Team ID: 1330) as example again. So if we want to modify the first player kit we'll browse to ''common\character0\model\character\uniform\team\1330'' and open ''1330_DEF_1st_realUni.bin''. This should lead to: | Unlike the PES14 kit config file configurators neither of the 2 PES15 tools can make new kit config files so you'll have to use an existing one as base. Under Tools you can download original kit config files for your team. For this guide we will use /4ccc/ (Team ID: 1330) as example again. So if we want to modify the first player kit we'll browse to ''common\character0\model\character\uniform\team\1330'' and open ''1330_DEF_1st_realUni.bin''. This should lead to: | ||
<br> | <br> | ||
[[File:yay.png|none]] | [[File:yay.png|none]] | ||
and | and | ||
<br> | <br> | ||
[[File:km15-2.png|none]] | [[File:km15-2.png|none]] | ||
Now you can edit all settings you want. When you're done and happy with your new settings just go to File and press Save (as). | |||
<br> | |||
Julian Cames' Kit Configurator almost works the same way as Kit Manager. Download it from under Tools, extract it anywhere and run ''CamesKitConfigurator_V2.exe''. Then go to file and open your kit config file. You should get something like the following window: | |||
<br> | <br> | ||
Now you can edit all settings you want | [[File:kc15-1.png|none]] | ||
Now you can edit all settings you want again. When you're done and happy with your new settings just go to File and press Save (as). | |||
<br><br> | |||
Below are several sections that contain more (and sometimes important) info about each setting in Kit Manager. It will refer to Kit Configurator where necessary. | |||
<br> | <br> | ||
===Shirt model=== | ===Shirt model=== | ||
Although the tool gives 256 possible shirt models, only shirt models 144 and 160 work. So it's advised to just never change this number when you load a kit config file. The only reason why you would want to change this is because you want special Long Sleeves and Short Sleeves Types who only work with Shirt model 144. This is explained again later. | |||
===(Winter) Collar=== | ===(Winter) Collar=== | ||
Here you can select the special collar you want for your kit. The winter collar is used when you play in Winter (stadium setting). The Kit Manager tool gives previews of the collars when you select either one of them. If you want close-ups and better previews of the collar models use Julian Cames' Kit Configurator. When you use a special collar the template as given under 'Making kits' can slightly change because of extra parts like buttons. If you want to find kits that have the same collar so you can use those textures as examples and references, please contact Tony and he will find (all) kits for you that have the same collar. | |||
===Tightness=== | ===Tightness=== | ||
This setting should be obvious, either enable or disable tightness for your kit. Both tools have previews for this. | |||
===Shirt pattern=== | ===Shirt pattern=== | ||
===Short model=== | ===Short model=== | ||
| Line 113: | Line 120: | ||
===Sleeves=== | ===Sleeves=== | ||
<br> | <br> | ||
==Naming kit config files== | ==Naming kit config files== | ||
While the kit textures have some freedoms regarding their names, the kit config files need to be named in a very specific way to have the game recognize them. Just like the kit textures this part will use /4ccc/ (team ID: 1330) as example. | While the kit textures have some freedoms regarding their names, the kit config files need to be named in a very specific way to have the game recognize them. Just like the kit textures this part will use /4ccc/ (team ID: 1330) as example. | ||
Revision as of 22:20, 10 March 2015
| ||||||||||
This page is slowly being updated and filled.
Introduction
This page will try to explain how to make kits and how to set them up in PES15. The first section after the Introduction will explain what textures are there in PES15 and how to make all these textures. The second section will explain how to install these kits in PES15, including both the Kit Config Files and the UniColor.bin. The Notes and Help section will contain various tips and tricks to keep in mind as well as some troubleshooting. The Tools section will contain links to almost every tool mentioned on this page.
Kit textures
This section will explain what textures are needed for a complete and working kit and how they can be made. The first section will explain what textures are needed and the second section will explain how these are made. The third section will explain how the kit textures are named.
Required textures
A complete normal kit set will consist of somewhere between 6 textures, although only 2 are really mandatory. These 6 textures are:
- The kit itself, this texture always needs to be there or else the kit will just be completely white (this texture is required)
- The kit mask, this texture defines some graphical effects on the kit, for example make logos have a different lighting effect compared to normal clothing (this texture is required)
- The name texture, the game uses this texture to spell the name on the back of the shirt (this texture is not required)
- The back number texture, the game uses this texture to texture the player number on the back of the shirt (this texture is not required)
- The chest number texture, the game uses this texture to texture the player number on the chest of the shirt (this texture is not required)
- The leg number texture, the game uses this texture to texture the player number on the shorts (this texture is not required)
A complete example kit set will look like this without the config file:
As one can see all the textures are in the DDS format, this is the only format PES15 will recognize for kit texture. However, there are multiple DDS settings when saving and choosing the wrong ones can make your kit or your game crash. In the list below the best (and/or smallest) DDS settings are listed for each texture (note: all textures below require MIP maps).
- The kit itself: DXT1 - No Alpha
- The kit mask: DXT1 - No Alpha
- The name texture: DXT5 - Interpolated Alpha
- The back number texture: DXT5 - Interpolated Alpha
- The chest number texture: DXT5 - Interpolated Alpha
- The leg number texture: DXT5 - Interpolated Alpha
While it is possible to use completely different names for the kits and textures than the system PES15 uses, we will still use this format for the kits in the 4cc. So for example the name texture of /4ccc/'s (ID 1330) first outfield kit will be u1330p1_name.dds. This will be explained in further detail later on.
All the kit textures are saved in \common\character0\model\character\uniform\texture.
Making textures
This section will help you make all the kit textures. It is divided in 4 sections corresponding with all 4 different kit textures (the 3 number textures are combined). Making a good kit may require some trial and error so you will have to put the kit into DLC several times to test and retry until you have something you like.
All textures have to be saved as DDS as explained above. Several programs can save as DDS including but not limited to Photoshop (requires plugin), GIMP and Paint.net. There are online tools that will also convert textures to DDS, but make sure they have the right settings. In the worst case you can always ask someone else to do it for you.
Main kit texture
The main kit texture is a 2048*2048 DXT1 no alpha DDS. It is advised to get a more extensive image editing program to make these kit textures. A PES15 kit template is given below to give you an idea where everything is. You can also check out some existing kit textures in the dt34.cpk\common\character0\model\character\uniform\texture with Jenkey's File Explorer or search online for examples. Under Tools a kit template in the Photoshop .PSD format is linked.
Kit mask
The kit mask texture is a 2048*2048 DXT1 no alpha DDS and allows you to give special shader effects to your kit. This texture is a bit harder to explain so I advise you to look at existing kit masks in dt34.cpk\common\character0\model\character\uniform\texture and see what it does in the game. If you want a part of a kit to not have any special effects just use the RGB color '151 130 0' (mustard like). Reflective parts like the crest get the RGB color '151 130 255' (purple). Elastic parts like the captain's armband get the RGB color '48 220 255' (light blue). If you want no special effects just fill the entire image with the RGB color '151 130 0'.
Name
The kit name texture is a 128*512 DXT5 interpolated alpha DDS texture and is used for the name on the back of the shirt. You can up the size of this texture to 256*1024 if you have a large name setting and want that extra detail in your texture. Obviously the game has a fixed UV map for this texture and each letter, however these exact UV maps are unknown. Therefore it is recommended to look at existing name textures and use those as base for your kit name textures. Like all the other kit textures these can be found in dt34.cpk\common\character0\model\character\uniform\texture.
Numbers
Each kit has 3 number textures, namely the chest, back and legs. The chest and leg kit numbers textures are 1024*64 DXT5 interpolated alpha DDS textures and is used for respectively the numbers on the front of the shirt and the numbers on the shorts. The back number texture is a 2048*128 DXT5 interpolated alpha DDS texture and is used for the number on the back of the shirt. Obviously the game has a fixed UV map for these texture and each number, however these exact UV maps are unknown. Therefore it is recommended to look at existing number textures and use those as base for your kit number textures. Like all the other kit textures these can be found in dt34.cpk\common\character0\model\character\uniform\texture.
Naming textures
While the kit textures can be named anything you want as long as the same names are in the kit config files, the 4cc will use the same system as PES15 itself uses to minimize the possibilities of name clashes. The name, mask and number textures are named the same as the main kit texture but with their own addition. Therefore this part will use the main kit texture as base and use /4ccc/ (team ID: 1330) as example.
u1330p1.dds
- The u defines the kit type. A 'u' means the kit is a default competition kit, a 'c' means it's a Champions League kit, an 'l' means it's a Libertadores kit, an 'a' means it's an AFC Champions League kit and an 's' means it's a Copa Sudamericana kit. For the 4cc we will only use the default, so 'u'.
- The 1330 is the team ID. This is always 4 numbers. A team with a team ID will have an extra 0 in front. So for example /mlp/ with team ID 118 will be '0118'.
- The p defines whether the kit is for an outfield player (p) or for the goalkeeper (g).
- The 1 defines whether the kit is the first (1), second (2), third (3) or fourth (4) kit.
- The .dds is obviously the file format.
As stated before the mask, name and numbers texture will use the main kit texture as base.
- The mask texture will have a '_mask' suffix.
- The (back) name texture will have a '_name' suffix.
- The leg (shorts) number texture will have a '_leg' suffix.
- The back number texture will have a '_back' suffix.
- The front number texture will have a '_chest' suffix.
So in the end you will have the following names for your kit textures, using /4ccc/ (team ID: 1330) first player kit as an example.
u1330p1.dds
u1330p1_mask.dds
u1330p1_name.dds
u1330p1_leg.dds
u1330p1_back.dds
u1330p1_chest.dds
Or something like the example kit texture set image under Required Textures on this page.
Configuring kits
Besides just the textures each kit also requires a kit config file that contains various settings, like the collar model and back name size. This will be explained in the first section. Each kit also requires an entry in the UniColor.bin. The game uses this to determine what kits each team has in the game as well as the colors for various things.
Kit config file
It is near impossible to make nor modify existing kit config files by hand/hex editor. Luckily 2 persons in the PES modding community made tools to modify this file with great ease. These 2 tools are Julian Cames' Kit Configurator and GOAL's Kit Manager PES2015. Both these programs can be downloaded from Tools at the bottom of this page. This guide however will use GOAL's tool because it's a whole lot more complete than Julian Cames' tool, although sometimes JC's tool has superior previews.
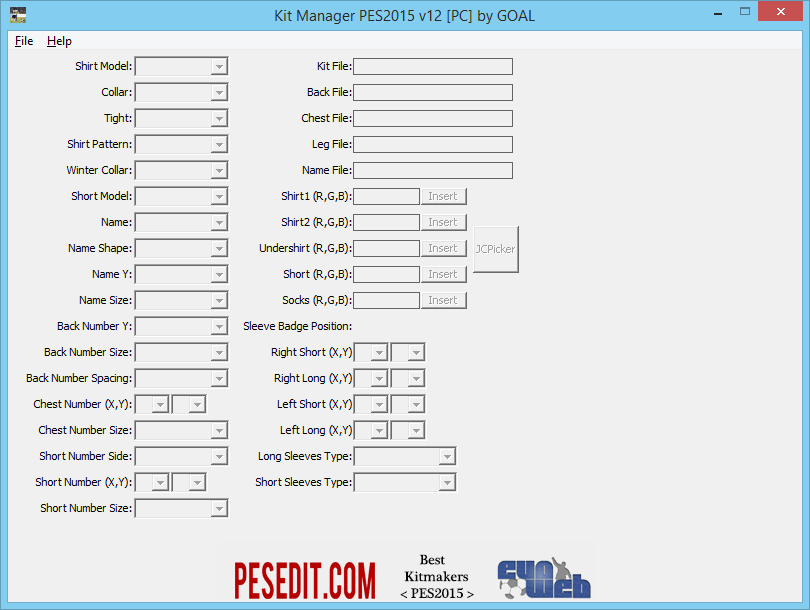
So download Kit Manager, unpack it anywhere, run KitManagerPes2015v12.exe and if done correctly you should get the following window.
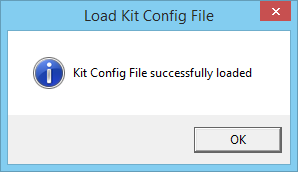
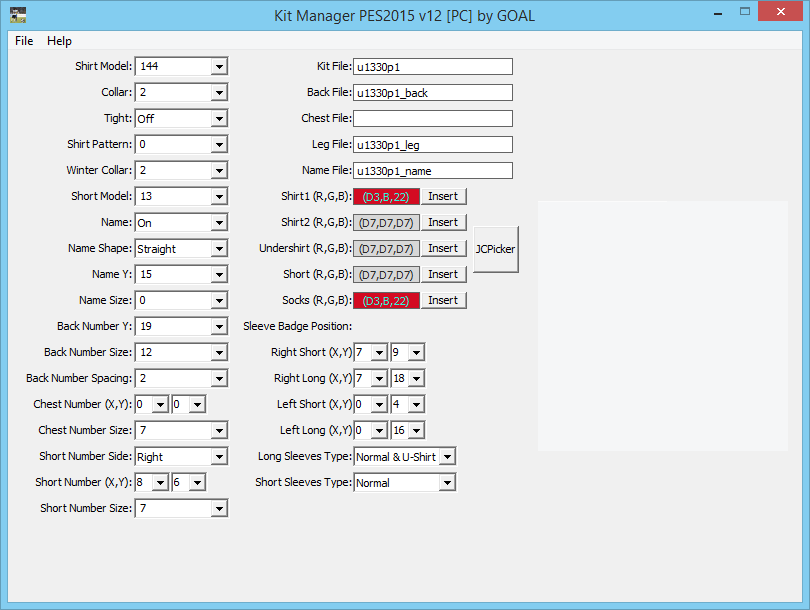
Unlike the PES14 kit config file configurators neither of the 2 PES15 tools can make new kit config files so you'll have to use an existing one as base. Under Tools you can download original kit config files for your team. For this guide we will use /4ccc/ (Team ID: 1330) as example again. So if we want to modify the first player kit we'll browse to common\character0\model\character\uniform\team\1330 and open 1330_DEF_1st_realUni.bin. This should lead to:
and
Now you can edit all settings you want. When you're done and happy with your new settings just go to File and press Save (as).
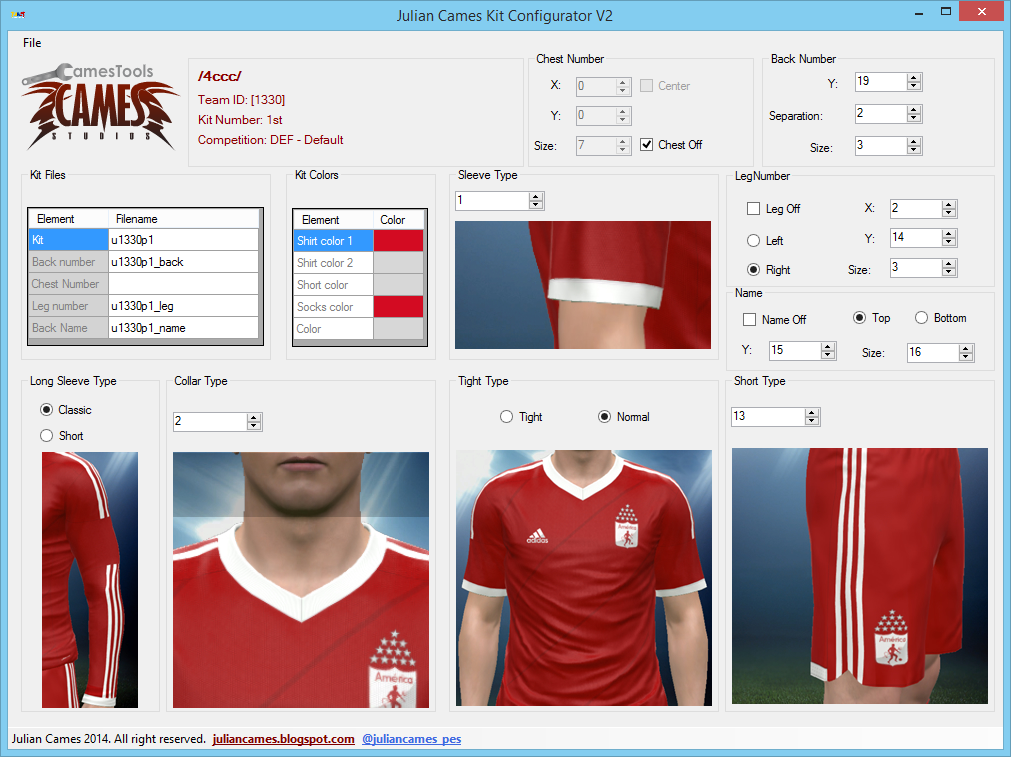
Julian Cames' Kit Configurator almost works the same way as Kit Manager. Download it from under Tools, extract it anywhere and run CamesKitConfigurator_V2.exe. Then go to file and open your kit config file. You should get something like the following window:
Now you can edit all settings you want again. When you're done and happy with your new settings just go to File and press Save (as).
Below are several sections that contain more (and sometimes important) info about each setting in Kit Manager. It will refer to Kit Configurator where necessary.
Shirt model
Although the tool gives 256 possible shirt models, only shirt models 144 and 160 work. So it's advised to just never change this number when you load a kit config file. The only reason why you would want to change this is because you want special Long Sleeves and Short Sleeves Types who only work with Shirt model 144. This is explained again later.
(Winter) Collar
Here you can select the special collar you want for your kit. The winter collar is used when you play in Winter (stadium setting). The Kit Manager tool gives previews of the collars when you select either one of them. If you want close-ups and better previews of the collar models use Julian Cames' Kit Configurator. When you use a special collar the template as given under 'Making kits' can slightly change because of extra parts like buttons. If you want to find kits that have the same collar so you can use those textures as examples and references, please contact Tony and he will find (all) kits for you that have the same collar.
Tightness
This setting should be obvious, either enable or disable tightness for your kit. Both tools have previews for this.
Shirt pattern
Short model
Name
Back number
Chest number
Short number
Texture file names
Kit colors
Sleeve badge
Sleeves
Naming kit config files
While the kit textures have some freedoms regarding their names, the kit config files need to be named in a very specific way to have the game recognize them. Just like the kit textures this part will use /4ccc/ (team ID: 1330) as example.
First of all the kit config files are sorted in folders by team ID in \common\character0\model\character\uniform\team\, so /4ccc/'s kit config files can be found in \common\character0\model\character\uniform\team\1330.
1330_DEF_1st_realUni.bin
- The 1330 is the team ID. Unlike the kit textures this does not have be 4 numbers. So for example /mlp/ with team ID 118 will be '118'.
- The DEF defines the kit type. 'DEF' means the kit is a default competition kit, 'CL' means it's a Champions League kit, 'LB' means it's a Libertadores kit, 'ACL' means it's an AFC Champions League kit, 'SDA' and 'SDN' mean it's a Copa Sudamericana (2014) kit. For the 4cc we will only use the default, so 'DEF'.
- The 1st refers to whether the kit is the first (1st), second (2nd), third (3rd) or fourth (4th) kit.
- The realUni means that the kit is a licensed kit. If this part is missing it's an unlicensed kit and the contents will also be different, therefore we'll always use 'realUni'.
- The .bin is obviously the file format.
The goalkeeper kit config file has a 'GK' prefix before the kit number. So the goalkeeper kit config file will be named:
1330_DEF_GK1st_realUni.bin
So in the end you will have the following names for your kit config files, using /4ccc/ (team ID: 1330) as an example with 4 outfield kits and 1 GK kit.
1330_DEF_1st_realUni.bin
1330_DEF_2nd_realUni.bin
1330_DEF_3rd_realUni.bin
1330_DEF_4th_realUni.bin
1330_DEF_GK1st_realUni.bin
And these files will go in: \common\character0\model\character\uniform\team\1330.
UniColor.bin
At the moment there are 2 tools for modifying the UniColor.bin, namely Julian Cames' Kit Allocator and zlac's PES 2015 Kit Studio. While both have their functionalities Julian Cames' is a whole lot easier in use than zlac's. Therefore this guide will use Julian Cames' Kit Allocator (JCKA) and can be downloaded under tools.
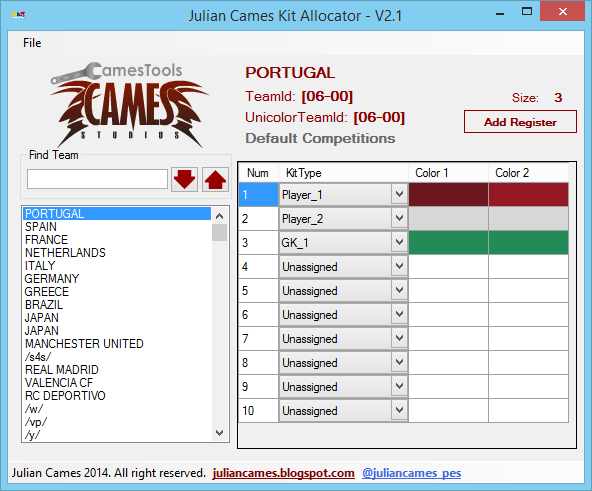
Unpack JCKA anywhere on your computer, run JulianCamesKitAllocator_V2.exe, go to file and load the UniColor.bin you want to edit and you should get something like this:
Now use the list on the left to find the team you want to edit. Now you can assign exactly the amount of kits and what kind of kits each team has. For the 4cc we will only use the Default KitType. So if your team for example has 3 normal kits and 1 GK kit change the first 3 KitTypes to Player_1, Player_2, Player_3 and change the fourth to GK_1. Then make the other 6 slots (5 to 10) all Unassigned. Make sure no (Euro) KitTypes are left behind for your team. Then you can change the colors to your 1 or 2 dominant color(s) on your kit. These colors will be used at several locations of the game like in the kit selection screen and as the player icon in the tactics view. There is no need to use the Register function on the top left and thus will not be explained. When you're done changing and updating all the teams just use Save under File.
At the moment you can only have 4 default outfield kits and 1 default goalkeeper kit. It is not known when the second goalkeeper gets used. If you do know how this works, please let it know.
Installing kit textures, kit config files and UniColor.bin
To test your new kits and config files you will have to put them into a .cpk-file. Please read Pro Evolution Soccer 2015/DLC on how to exactly do this. When rebuilding the folder tree use the following paths for the following files:
- PES15 kit textures go in common\character0\model\character\uniform\texture.
- PES15 kit config files go in common\character0\model\character\uniform\team\<team ID>.
- UniColor.bin goes in common\character0\model\character\uniform\team.
Notes and help
- Standard PES15 kit textures can be found in dt34.cpk\common\character0\model\character\uniform\texture.
- The standard PES15 kit config files can be found in dt34.cpk\common\character0\model\character\uniform\team or downloaded under Tools (these will be uploaded soon).
- UniColor.bin can also be found in dt34.cpk\common\character0\model\character\uniform\team, but it is advised to check all the DLC for the newest UniColor.bin.
- It is possible to assign kits to teams without licensed kits, but this is not explained on this page.
- Forgot your team ID? Check it here: Pro Evolution Soccer 2015/Team IDs.
- Although it is possible to assign Champions League kits to all the teams, we will only use the normal kits (uxxxxp1.dds).
- Only Shirt Models 144 and 160 work, anything else will break the kit.
Tools
- PES15 .PSD kit template: https://mega.co.nz/#!OMMgAZIT!MtZE7JqYZlLiTTR8XL4Clm9huXOGZiEcy-Gew_rvGdg
- PES 2013 Decrypter: https://drive.google.com/file/d/0B0TwHGHvKz8TcG5tb1cwZFpLUGs/view?usp=sharing
- Original kit config files for all teams in the cup: https://mega.co.nz/#F!fA0xBTxa!Bl4Wf2NjS0rSZg9P-Yv3xA
- Original DLC 3.00 UniColor.bin: https://mega.co.nz/#!jYFA0DbS!i2PZVohP677rEhfGP7AFevkzl49MVaTDjX7hKEUyKyE
- Julian Cames Kit Allocator: https://mega.co.nz/#!zEMkCQLT!HdHyJcaEI4jLhO26vaf9j8deVKOzykPIYtsBbEHa7fg
- GOAL's Kit Manager PES2015 v12: https://mega.co.nz/#!fAkHXR7R!lQwnPq22fLdsAAtq0DWC5VrAwMafgy4Iqo3ek-C9GDc
- Julian Cames Kit Configurator: https://mega.co.nz/#!OAtyhD7b!3vb4BpBUQTc6Zb14GOmIsFXaDndOC11Ocl-RoD5K-7c


