RigEx
While this page is basically done, there is a very big chance you can still run into problems. If you do please let it know so I can update this page accordingly to it. Or if you think something is missing or unclear.
RigEx (aka ABBA) are three addons originally for Blender 2.67 that will allow you to basically import any PES .model into Blender as well as exporting any mesh into a PES .model file. While they might look very similar, it is of great importance that you use the right addon for each task. The third tool allows you to import all .model files in a folder and its subfolders to check the amount of triangles a player has (for example). Do keep in mind that the tools have some limitations, so some things that you want to do might not be possible. The scripts are based on existing scripts of 'Suat 'sxsxsx' CAGDAS' and of course we give him the necessary credit for that.
The scripts can be downloaded from the bottom of this page. The tools require the files from the standard PES Face/Hair Mod Tool on the Faces page to work properly, so make sure you have it installed. If you don't have Blender installed yet, it's greatly recommended that you install the 2.71 version since it's the most up-to-date version these tools still work on. The current version of the addons is v0.9
These tools WILL NOT work on any Blender version greater than 2.71. Install this version if you need to use these tools
Installation
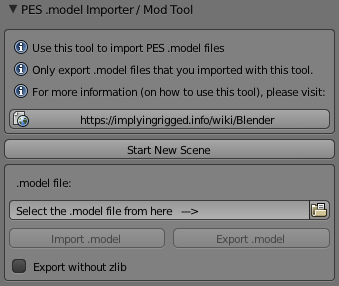
Download the scripts from the bottom of this page and copy the .py files to your Blender addons folder, for example AppData\Roaming\Blender Foundation\Blender\2.71\scripts\addons\. After that download the pes_temp archive from the bottom as well, extract it and copy the pes_temp folder to where your blender.exe is located, for example C:\Program Files\Blender Foundation\Blender\. With that done you can enable the scripts from File -> User Preferences, then Addons -> System. The importer is called PES .model Importer / Mod Tool, the exporter is PES .model Exporter and the mass importer is PES Mass .model Importer. Once enabled the tools should appear on the Properties tab below Scene with the same names. They should look like this:
PES .model Importer / Mod Tool
How do you use this tool
The main function of this tool is to import basically any .model of PES16 (and 14 and 15) into Blender (there are some files that cannot be imported, for examples files that have .cloth data). It also allows to export .model files you imported, but not those you made yourself, please use the PES .model Exporter for that. Considering it's just a slightly rewritten/recompiled Face/Hair tool, it has (kind of) the same limitations, too. You can for example only transform meshes and the UV maps, but not add or delete anything.
If you hit Start New Scene, Blender will reload the Start-Up file and basically reset itself. Use this in case you screwed up something and/or need a fresh start. With the folder icon you can browse to the .model file you want to open, after that press that Import .model to import it into Blender. When you are done editing you can press the Export .model to export the mesh(es) back as a .model file for PES. If Export without zlib is ticked, the mesh will be saved as a .model without zlib. This is handy if you want to know the actual filesize of the .model you exported.
When do you use this tool
- You want to change an existing .model that has skeleton data inside for use with a specific player with Pro Evolution Soccer 2016/Advanced Player Customization. Make sure to export it with the same tool again to retain the skeleton data.
- If the .model has no (relevant) skeleton data, you can also import the .model with it and then mod if freely to your wishes. However, you will need to use PES .model Exporter to export the mesh to a .model file. However, you will lose the second UV map data.
The tool however cannot do the following things
- Import the mesh names, but instead it names the separate meshes as Model_0, Model_1, etc. just like the hair models from the normal Face/Hair tool.
- Import second UV maps should meshes have them, it only imports the first UV map. The .model will still have the second UV map when you export the .model, you just cannot edit it.
- Import textures. So after importing the mesh will be textureless. This is because the textures depend on the .mtl files. And for now it's too much work to make Blender load the textures from the .mtl files. Because of this you will have to (unzlib and) apply all the textures yourself.
Extra instructions
- PES uses the same dimensions as in Blender, so 1 meter in Blender is 1 meter in PES.
- Make a backup of the file you are going to edit first, this in the case you screw up or the exporting goes wrong you won't lose everything because the .model will be completely corrupted.
- After importing the .model , make sure to not change the names of the meshes. This is because the tool will only export the data of the meshes that start with Model_. So also make sure before importing that there are no meshes in the scene already that start with Model_.
- When importing multiple .model files at the same time, make sure that the one you want to export again is imported last. Again make sure to rename all the other meshes to something that is not Model_ before importing the last.
- This also goes for if you decide to save your work halfway through as a .blend, quit Blender and continue later. It is advised to import the .model you were editing and delete it before loading the save/.blend. This way you make sure the right data is in the temporary files when exporting the finished .model.
- Again, like the Face/Hair tool, do not remove or add anything to the meshes and UV maps or you will corrupt the .model. If you do this anyway, you'll have to start all over. So also watch out with applying Modifiers to the object. Also do not flip normals.
- Do not try to export any meshes you made yourself with this tool, you will have to use the PES .model Exporter for that.
- Also watch out with working around imports of the Face/Hair tool, the Face/Hair tool transforms .model files when importing and exporting them. So you will risk making the exported .model too large, at the wrong position and with the wrong rotation.
- The tool might not generate a warning or error when the exported .model will end up corrupted when you did something that you should not have done. So it is still advised to make backups before you export.
- If you want to know the names of the meshes in the .model, export the file without zlib and open the file with a hex-editor. The last text at the bottom of the files are the names of the meshes in the file. The first mesh name will be Model_0, the second Model_1, etc.
- Watch out with extreme transforms of .model files that have skeleton data, because it might result in a very spooky stuff in PES. This includes moving, rescaling and rotating the imported .model around too much.
- Before exporting the data, make sure that all the meshes are visible and selectable otherwise the exported data will be corrupted.
PES .model Exporter
How do you use this tool
The main function of this tool is to export any Mesh in Blender to a .model in PES. Considering it's just a slightly rewritten/recompiled Stadium exporter tool, it has (kind of) the same limitations, too.
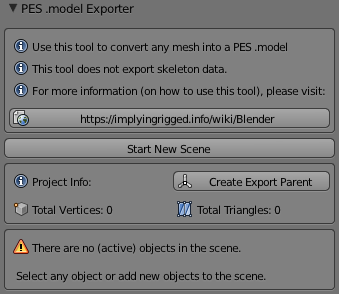
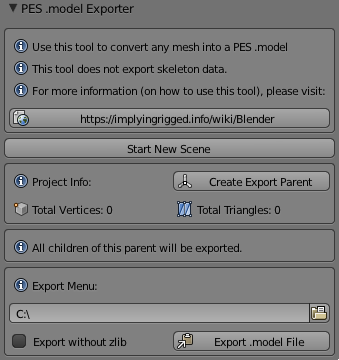
If you hit Start New Scene, Blender will reload the Start-Up file and basically reset itself. Use this in case you screwed up something and/or need a fresh start. The first thing you always want to do is to create the EXPORT Empty/Parent. The tool will later export only the children of this parent. Although you can already model the mesh you want to export if you want before you create the Parent. When you create the EXPORT Parent and select it, the menu should change to this:
You can now change the location of where the export.model will be saved. The exported .model will always be named this way, so you will have to rename the file yourself by hand afterwards. When you're happy with the location hit the Export .model File. If Export without zlib is ticked, the mesh will be saved as a .model without zlib. This is handy if you want to know the actual filesize of the .model you exported.
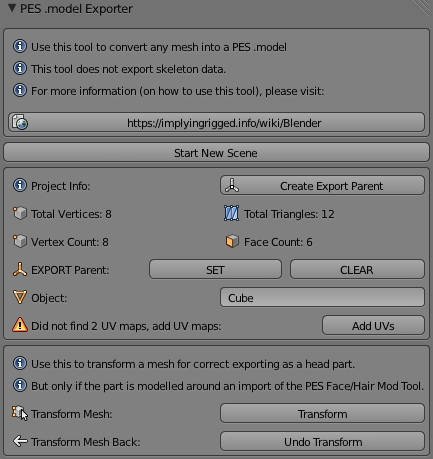
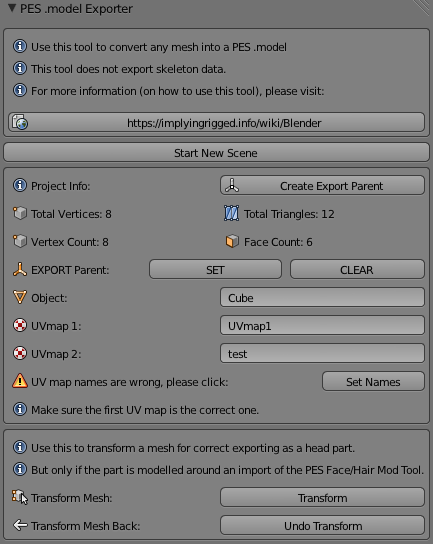
Now if you select a Mesh object the menu should change to this.
The left image is when a mesh is not yet completely set up correctly. The right image shows an almost correctly set up mesh. The first thing you want to do is to make the mesh a child of the EXPORT Parent, do this by just hitting the SET Button, provided you have already created the Parent. If for some reason you do not want to export a specific part, just hit the CLEAR button to detach the mesh from the Parent.
The name in the Object: box is the name of the mesh, but it will also become the name of the mesh in PES itself. This is necessary when you need to make your own .mtl files.
Because the tool is compiled from the Stadium Exporter for PES, every mesh needs 2 UV maps before it can be exported. So just hit the button to add a second UV map. If you have done some baking or something else and the second UV map is the proper UV map, make sure that the first UVmap will become the correct one. The second UVmap will not be exported, but it is still required for the tool to work correctly for now.
The bottom box has two buttons that automatically transforms a mesh that was modeled around an import from the PES Face/Hair Mod Tool to the right size, position and rotation for use ingame. This is only when you have parts that will be attached to the head via the APC method. The values of the position for the part has been tested to within a range of a few mm, so it is still possible that exported head parts are very slightly off. The part will become a whole lot smaller, this is because imports from the PES Face/Hair Mod Tool are resized by 10 and also moved. So just select the mesh you need to transform and hit the button with Transform, make sure to hit it only once. If you want to undo this transformation, select the mesh again and hit the button Undo Transform. Please make sure to not export the imports from the PES Face/Hair Mod Tool as well.
When do you use this tool
- You want to export any mesh to a .model in PES and do not care whether the model had a skeleton or not.
- You want to add extra head parts to a player via the APC method.
The tool however cannot do the following things
- Export second UV maps. So if you imported a .model that has 2 UV maps and you export it with this, you will lose the data of the second layer.
- Export .mtl files. After you have created a .model file, you will need to make the .mtl file yourself that assigns shaders and textures to the exported .model files.
Extra instructions
- Do not try to export a .model that originally had skeleton data with this tool if you want to retain the original skeleton data.
- You can export multiple meshes in a single .model, just attach them all to the EXPORT parent. Each mesh in the .model will have the name you assigned to it in Blender.
- Do not try to export anything that is not a mesh, the tool should create an error if you try to do it anyway.
- If your model has any Modifiers, the tool should export the mesh as if it had no Modifiers attached to it. So make sure to apply (or remove) modifiers before exporting.
- If you have a mesh that should not be exported, you can safely ignore all the warnings by the tool that it is not yet set up correctly.
- The EXPORT parent cannot be created while in Edit Mode.
- There is a maximum amount of verts/faces per exported mesh with this tool. This limit is somewhere above 15.000. Blender will create a USHRT_MAX error if you have too many verts/faces in a single mesh.
PES Mass .model Importer
How do you use this tool
The main function of this tool is to import all (PES14/15/16) .model files from a folder and subfolders into Blender at the same time. This can be used to check the total amount of triangles of a single player. Just like the normal PES .model Importer there are some files that cannot be imported, for examples files that have .cloth data.
If you hit Start New Scene, Blender will reload the Start-Up file and basically reset itself. Use this in case for a fresh start so you can check another single player. With the folder icon you can browse to the folder you want to check all the .model files inside of. When you have selected a folder press that Import .model files to import all .model files in the folder and subfolders into Blender.
When do you use this tool
- You use this tool to import multiple .model files in a single folder (and its subfolders) into Blender to check the amount of triangles a player (or stadium if you want) has.
The tool however cannot do the following things
- Considering it's just a slightly edited PES .model Importer / Mod Tool it has the same limitations.
- The tool can also not export. It's sole intended purpose is to check the amount of triangles a player has.
- Also don't try to export anything you imported with any of the other tools.
Extra instructions
- If your player has a high amount of triangles and your PC is not the fastest the importing might take a while, so just be patient.
- If Blender crashes or generates a warning during the importing, one of your .model files is probably corrupt.
Setting up .model files for use in PES
Most of the time a .model file is part of a larger set of files. Usually an .xml file that points to the .model file as well as the .mtl file. The .xml is actually the most important file most of the time to get stuff to work in PES as PES looks for this file instead of separate .model and .mtl files. The .mtl file is another .xml file that assigns all the shaders and texture (settings) to .model files in PES itself. An incorrectly set up .xml or .mtl file will result in PES not rendering the .model in game or applying no texture to it. For more information on how to set up .model files, please read:
Troubleshooting
- model_data.bin not found according to Blender
- You're missing the pes_temp folder, download it from below and move it to where your blender.exe is.
Downloads
- RigEx scripts (v0.9): https://drive.google.com/file/d/1FZW6ychd8SYdzIlV5Bx7XP1SaAstL2x8/view?usp=sharing
- RigEx PES Mass .model Importer (v0.9): https://drive.google.com/file/d/1Vc1UWGlrOe2w3pUmNASSkIZxHMoQQiM2/view?usp=sharing
- pes_temp: https://drive.google.com/file/d/19nIRxUgVWGfOIRI_hVkR7MOv2yWN2l2N/view?usp=sharing
