User:BasedSmugleaf/benis productions
Converting Aesthetics to PES16
Getting Started
As you'll know, The 2016 4chan Winter Cup will be held on PES16, meaning all the aesthetics will need to be converted.
This guide is to provide and help you convert PES15 aesthetics to PES16.
Note: Don't worry about not knowing much about aesthetics, almost all if it is merely changing filenames.
Essentials
- You'll need to have completed your PES16 tactical export.
- You'll need your PES15 aesthetics, so download this megapack and find your team's aesthetics: Summer 15/Autumn 15 Aesthetics
- You'll need to download the PES16 Kit Manager, which can be downloaded from here: Kit Manager.
- You'll need to know your team's new ID, as it will be part of the new filenames for kits and faces, which you can find it in the list below.
| Team | Team ID |
|---|---|
| 701 | |
| 702 | |
| 703 | |
| 704 | |
| 705 | |
| 706 | |
| 707 | |
| 708 | |
| 709 | |
| 710 |
| Team | Team ID |
|---|---|
| 711 | |
| 712 | |
| 713 | |
| 714 | |
| 715 | |
| 716 | |
| 717 | |
| 718 | |
| 719 | |
| 720 |
| Team | Team ID |
|---|---|
| 721 | |
| 722 | |
| 723 | |
| 724 | |
| 725 | |
| 726 | |
| 727 | |
| 728 | |
| 729 | |
| 730 |
| Team | Team ID |
|---|---|
| 731 | |
| 732 | |
| 733 | |
| 734 | |
| 735 | |
| 736 | |
| 737 | |
| 738 | |
| 739 | |
| 740 |
| Team | Team ID |
|---|---|
| 741 | |
| 742 | |
| 743 | |
| 744 | |
| 745 | |
| 746 | |
| 747 | |
| 748 | |
| 749 | |
| 750 |
| Team | Team ID |
|---|---|
| 751 | |
| 752 | |
| 753 | |
| 754 | |
| 755 | |
| 756 | |
| 757 | |
| 758 | |
| 759 | |
| 760 |
Faces
Converting Faces is just a matter of renaming a few folders, so we'll start with them.
We'll do a step-by-step guide of converting a face, to make sure we cover everything clearly.
For the guide, we'll be using /gd/'s Kerning as the example.
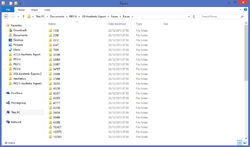
Firstly, we go into the /gd/ Faces folder and see we have a bunch of folders only labelled by numbers, so it's not clear which folder belongs to Kerning.
The folder names are actually PES15 Player IDs, so we'll need to find out Kerning's PES15 ID to find the matching folder.
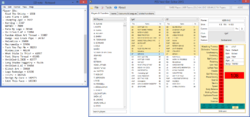
To do this, we'll look at the GD Note.txt in the main folder of the GD Aesthetics Export and we can find a list of IDs to pinpoint Kerning's. If your Aesthetics Export does not have a Note.txt or doesn't contain any IDs, you can find them by using the PES15 Editor with the latest save.
By doing this, we've found out that the folder labelled 4347 belongs to Kerning.
We can now move this to another location (so it doesn't get mixed up with the rest), and we can continue on to update the name to match Kerning's PES16 player ID.
To find out the player's new PES16 ID is actually quite simple, all you need to know if your Team ID and have a completed tactical export.
In PES16, the player ID's will be 5 digits long, in the form of 'XXXYY'.
- 'XXX' - Your team's ID
- 'YY' - The player's position in the export
Since the example is Kerning, the 'XXX' will be 720 as that is /gd/'s team ID. Obviously, this is the same for all other /gd/ players.
To figure out the 'YY' part, we need to take a look at the team export in the PES Edit Player menus.
If you open up the image on the right, you'll see that I've labelled all the players with a number, and this number is the 'YY' part of their ID, simply numerical order counting from the top down.
So now we have the 'XXX' value of 720 and the 'YY' value of 11, we've found out that Kerning's PES16 ID is 72011.
Now we have the ID, all we need to do now is rename two folders and we're done with that player.
As mentioned earlier, Kerning's ID was 4347 on PES15 and we found and relocated the folder elsewhere not to get mixed up with old PES15 folders.
All we need to do is convert to PES16 is rename Both the folders named 4347 to 72011. We can find the second folder if we go into the first one, and keep opening the folders inside until you get to it, as you can see in the image to the right.
Once the two folders have been renamed to match the PES16 ID, the player is successfully converted to PES16. Just rinse and repeat for any other faces still to be converted.
Kits
Kits are almost the same as converting faces, with mostly just renaming files instead of folders.
We'll only need to briefly use an application for editing configs.
Textures
We'll need to start with renaming the textures before we can get to the configs, and again we'll use /gd/ as the example.
The textures are very simple, as you can see to the right we open the /gd/ kit texture folder and there are a bunch of files, the quantity of files my vary between teams but that's not an issue.
The files all have a four digit it number on it, which will have been the team's PES15 ID, so all we need to do to change it is edit that four digit to match the PES16 ID.
As we know from earlier, /gd/'s team ID is 720, so we need to edit the filenames and replace the old four digit number to 0720. The 0 at the start is important, so don't forget to add that in.
Once we've done that for all the files in the texture folder, textures are complete and we can move onto the configs.
Configs
Moving on to the configs, this is the only part of the tutorial that you will need to do something other than just renaming files, but fortunately it's not a complicated process.
You'll need to download the Kit Manager that was linked earlier in order to set up your configs.
To get started, we'll open up the kit config folder and rename the folder called XXX to the team ID, so /gd/'s will be 720 (It doesn't need the extra 0 this time).
Once we've done that, we can open up said folder and there will be some generic kit configs. Again, rename the XXX part of the config names to the Team ID.
Now we can get into editing the configs so that they'll load in the kits in PES16.
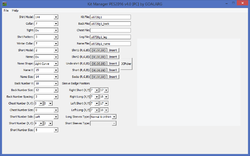
Open up the Kit Manager, and find your folder with the kit configs, then open up your first config.
Most options you won't want to mess around with because it can cause graphical glitches if the wrong ones are selected, but the important parts are linking the kit filenames and fixing the colours.
When the file is opened in the Kit Manager, you'll see in the top right corner that it's loading in kits for team 0720, which is /gd/. You'll want to change the 0720 to your own team's four digit ID.
Important: For goalkeeper configs, the 'p' in the filenames must be changed to 'g'. For outfield players, 'p' is the correct letter to be there.
To edit the colours, you will need to copy a six digit colour Hexcode, for example: #333333 (without the hashtag), into your cache and press the insert button. For some reason the Kit Manager doesn't like you editing in your own numbers, so you'll need to do it this way or it'll break.
To easily find the Hexcode you want, you can open your kit texture .dds in an application such as Paint.net, and use the colour picker tool and copy the hexcode it gives you.
Once that is done, save and re-open just to double check the file saved correctly, as the Kit Manager is prone to breaking.
If all is fine, repeat the process for the rest of your configs.
Note: If you only have, for example, two outfield kits, you'll only need two configs, just delete the rest. If you have more kits than configs provided, just duplicate a config and rename it appropriately until you have the right amount.
With both the textures and configs set up, kits are fully converted to PES16.
Stadiums
Stadiums don't actually need any changes to be converted to PES16, and if any future changes are found to be made, Tony will probably get in contact with you about it, or fix it himself.
Other
I can't quite think of anything else to convert other than custom boots (which only /gd/, /mlp/ and soon to be /m/ use), but if anything appears that you think might need converted, contact Tony about it.


