| The logo competition for the 2025 4chan Winter Cup is now taking submissions. | ||
| The deadline is January 6th, 23:59 UTC. Logos will be placed in this gallery to facilitate discussion. This will be followed by a polling period to determine which logo will be used. Please send all submissions to Potatotron. You must supply a high-res PNG file (5000x5000 limit) and the original multi-layer source file. | ||
| Cloverleaf logo: .png .svg |
|
Cloverball logo: .ai .png .svg |
Difference between revisions of "Pro Evolution Soccer 2015/Gloves"
m |
(→Notes and Help: typo) |
||
| Line 55: | Line 55: | ||
=Notes and Help= | =Notes and Help= | ||
* To test your gloves you don't have to necessarily make a new entry in the ''Glove.bin''. Just overwrite an existing pair of gloves but make sure to update all the IDs afterwards for the [[Pro Evolution Soccer 2015/AET| | * To test your gloves you don't have to necessarily make a new entry in the ''Glove.bin''. Just overwrite an existing pair of gloves but make sure to update all the IDs afterwards for the [[Pro Evolution Soccer 2015/AET|Aesthetic Export]]. | ||
* .mtl files can be opened with Notepad. | * .mtl files can be opened with Notepad. | ||
* When the textures are missing but the gloves are there, make sure that the filenames in the .mtl file also have the correct glove ID. | * When the textures are missing but the gloves are there, make sure that the filenames in the .mtl file also have the correct glove ID. | ||
Revision as of 10:35, 17 March 2015
| ||||||||||
Introduction
This page will explain how custom GK gloves can be created and imported into PES15. The first section will contain where the gloves and their textures are located and how these textures are built up. The second section will contain information on how new gloves are put ingame. The third section is the Notes and Help section. The fourth section is the Tools/Download section. The fifth and last section is a list with allocated slots for new and existing gloves.
Making your gloves
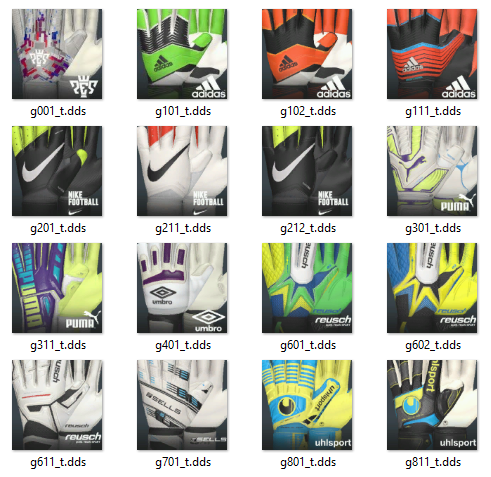
All gloves in PES15 are located in (dt33.cpk)\common\character0\model\character\glove. Newer gloves can be found at the same location in the DLC (at this moment there are no new gloves in the DLC). All gloves have their own folder. Because it is (still) impossible to model your own gloves you'll have to use existing gloves to work from. So go into the game and try to find the gloves you like and want to use as base for your new gloves. Now remember the preview image and look for it in the image below.
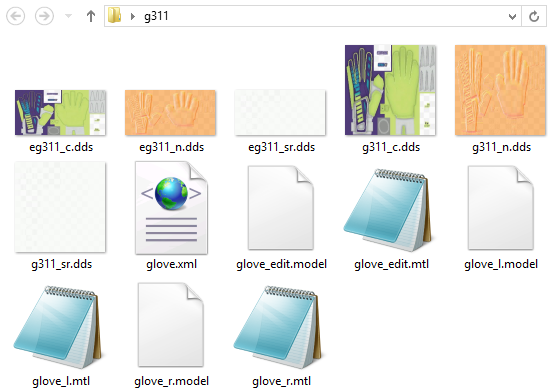
Remember the first 4 characters of the filename and look for the gloves folder with the same name starting with the newest DLC (not necessary at this moment). As soon as you have found the folder, make a new folder somewhere and copy all the files from the original glove folder into the new folder. However, all files are probably still compressed after copying, so unzlib them with PES 2013 Decrypter under Tools. In the end your new folder should look something like this, using g311 as example for this page. (it's also how a normal complete gloves folder looks like):
All glove folders have the same files:
- glove.xml: Contains texture, model, type and level assignments.
- glove_r.model: The right glove model used on the player.
- glove_r.mtl: Contains texture and shader info for the glove_r.model.
- glove_l.model: The left glove model used on the player.
- glove_l.mtl: Contains texture and shader info for the glove_l.model.
- glove_edit.model: The gloves model used for the preview in the Edit menu.
- glove_edit.mtl: Contains texture and shader info for the glove_edit.model.
- g<ID>_c: Diffuse map for the glove_r.model and glove_l.model.
- g<ID>_n: Normal map for the glove_r.model and glove_l.model.
- g<ID>_sr: Specular map for the glove_r.model and glove_l.model.
- eg<ID>_c: Diffuse map for the glove_edit.model.
- eg<ID>_n: Normal map for the glove_edit.model.
- eg<ID>_sr: Specular map for the glove_edit.model.
Now you are free to change all the textures to your wishes. Keep in mind all textures have an alpha map. It is advised to use the eg<ID>_x.dds textures for modifications and resize them afterwards for the g<ID>_x.dds textures. To get the perfect textures it will require some trial and error. Various logos and names are spreaded over the textures. When you are done save all textures as .DDS DXT 5 Interpolated Alpha.
Then you can rename all filenames with the glove ID to the correct ID. It's always a 3-digit ID, so 44 will actually be g044. So make sure to change the name of the folder, the 6 textures and everything in the .mtl files.
Getting the gloves into the game
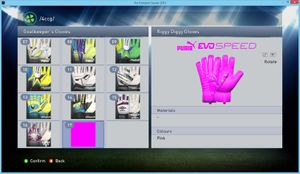
The image below is used as guide for the sections 'Previews' and 'Glove.bin'. It should also look something like this ingame when you're done.
Previews
Although preview images are not a requirement it is still advised to make them to help yourself and others find it ingame. The glove preview images can be found in (dt15.cpk)\common\render\thumbnail\glove. Newer gloves can be found at the same location in the DLC (not at this moment). Unlike the glove models all the preview images are in one big folder. Each pair of gloves has 2 preview images. g<ID>_t.dds is the image for the list on the right. g<ID>_l.dds is the image for the (brand) logos at the top on the right. This should all be fairly obvious.
Glove.bin
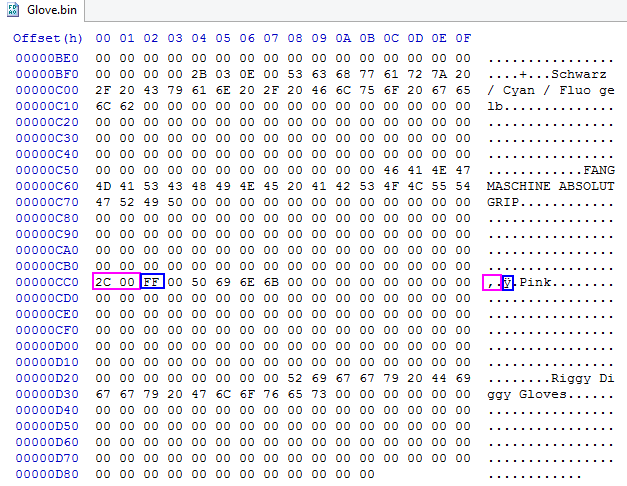
The Glove.bin is the file that contains all the gloves in the game. Each pair of gloves has an entry in this file with the glove ID, slot, name and color. The Glove.bin can be found in (dt10.cpk)\common\etc\pesdb. Newer Glove.bin can be found at the same location in the DLC (not at this moment). When you want to compile gloves always look for and use the newest Glove.bin you can find. To modify the Glove.bin file you will need to use a hex editor. You might have to unzlib the Glove.bin first. When you have opened the Glove.bin it will look something like this below.
The bytes in the pink squares is the glove ID in little-endian. Make sure that a new pair of gloves does not overwrite an existing pair, please use the 'Allocated gloves' section for this. The byte in the blue squares is the ingame slot of the glove, this is not exact slot of the glove in the game. Because in this example it uses slot FF/255, but it is glove 17 ingame. The higher the slot, the lower it will be in the Edit menu. Again make sure it does not overwrite an existing slot. The pink in the example Glove.bin is the color of the gloves. The 'Riggy Diggy Gloves' is the actual name of the pair of gloves. The offset of these 4 things is always the same.
It is advised that when you want to add a new pair of gloves in the Glove.bin to just copy an existing pair and paste it at the end to make sure all the offsets are correct. When you are done just save the Glove.bin.
Installing the gloves
To test your new gloves you'll have to put them into DLC to test them. For more information on how to install DLC please read Pro Evolution Soccer 2015/DLC. When you have done all steps above correctly you should have various files divided over 3 folders. These will go to the following locations:
- Glove models, textures and the .mtl files will go into: \common\character0\model\character\glove\g<ID>.
- Glove preview images will go into: \common\render\thumbnail\glove.
- Glove.bin will go into: \common\etc\pesdb.
Now just pack everything into a .cpk and go ingame to test it.
Notes and Help
- To test your gloves you don't have to necessarily make a new entry in the Glove.bin. Just overwrite an existing pair of gloves but make sure to update all the IDs afterwards for the Aesthetic Export.
- .mtl files can be opened with Notepad.
- When the textures are missing but the gloves are there, make sure that the filenames in the .mtl file also have the correct glove ID.
Tools
- PES 2013 Decrypter: https://drive.google.com/file/d/0B0TwHGHvKz8TcG5tb1cwZFpLUGs/view?usp=sharing
- Jenkey's File Explorer: https://drive.google.com/file/d/0B0TwHGHvKz8TM2JVTkRkMGdaZjA/view?usp=sharing
Allocated gloves
This table is based on the Glove.bin in dt33.cpk.
| Ingame slot | Glove ID | Team |
|---|---|---|
| 1 | 101 | Standard PES |
| 2 | 102 | Standard PES |
| 3 | 111 | Standard PES |
| 4 | 201 | Standard PES |
| 5 | 211 | Standard PES |
| 6 | 212 | Standard PES |
| 7 | 301 | Standard PES |
| 8 | 311 | Standard PES |
| 9 | 601 | Standard PES |
| 10 | 602 | Standard PES |
| 11 | 611 | Standard PES |
| 12 | 701 | Standard PES |
| 13 | 801 | Standard PES |
| 14 | 811 | Standard PES |
| 15 | 401 | Standard PES |
| 16 | 001 | Standard PES |
| 255 | 042 |


