
|
The content of this page or section is incomplete because we're a bunch of lazy fucks. Feel free to help out.
|
Introduction
This page tries to put all the important Blender tutorials in one place instead of having them scattered all over. Contributions are very welcome since most of this will always be based on personal workflows and as such other ways of doing things will exist as well.
Keep in mind, if you're stuck at any point you can always join the /aesco/ Discord or ask in /4ccg/ and someone who went through the same steps once will help.
Note that the PES16/17 tutorials are not always compatible with PES18+ and vice versa.
Tools and Requirements
These are the general things you'll need for pretty much everything. More specialized tools and files will be linked at the beginning of their specific tutorial.
For Windows
Blender
This is your most important tool. The most used versions are 2.67, 2.71, 2.78 and 2.79. Getting 2.79b is probably the safest bet but as you get more used to Blender in general it all comes down to personal preference.
If at some point you want to use RigEx, you'll need 2.71 for that.
Pick your versions here
An Image Editor
Again, one of the basic aesthetics tools that's all down to your personal preference. Only requirement is the ability to handle the DDS image format. Most used programs are Paint.NET, GIMP and Photoshop.
- GIMP and gimp-dds, the plugin you need for importing/exporting DDS in GIMP, read the readme. The GIMP UI was slightly redesigned after 2.8 so if 2.10 feels weird going back to 2.8.22 is recommended.
- If you want to use Photoshop you probably already have it, otherwise sail the seven seas it should be easy to find.
Blender Plugins and Config
All PES versions
- Blender Starter Pack - Complete all-in-one pack of scripts and settings for a cup-standard installation. Use this if you have just installed blender or if you want to have the recommended settings and layout.
This pack includes the plugins listed below.
PES16/17
- pes-model-importer - A model importer for PES16/17, has some helpful features (like keeping vertex group names on import) which make it a better option than the regular 16/17 importer/exporter for porting purposes.
Move to AppData\Roaming\Blender Foundation\Blender\2.79\scripts\addons and remember to enable in Blender's user preferences.
PES18+
- pes-fmdl - The main import/export plugin from PES18 onwards.
Move to AppData\Roaming\Blender Foundation\Blender\2.79\scripts\addons and remember to enable in Blender's user preferences.
Tutorials
PES16/17
Porting PES18+ to PES17-
This will be a very large section, attempting to cover the porting process of most if not all types of PES18/19/21 models to PES16/17
For now this section will assume a basic understanding of blender, such as the most common keystrokes (G for Grab, X for Delete, S for Scale kind of level of difficulty) and how to find certain things (how to get into Edit Mode, where the Data tab / Vertex Groups list is). This is to try and keep things even a little concise. The eventual video covering porting will display keystrokes and serve as a visual aid for navigating around blender and thus will be much friendlier to complete beginners.
Click here to expand
Resources
- PES16 Model Templates - Has template folders and files for all the ports covered here
- Setting_up_.model_files - Has information about the contents and function of XML and MTL files. This will become less relevant when the plugin is able to handle MTL files in blender, but understanding them is still important and for now necessary
- Video Tutorial
The Basic Process
Most of the individual sections will end up being variants of this same basic process of porting, so it's going to be outlined here first. More specific sections will also refer back here to avoid needless repetition
This step-by-step also has accompanying images as a visual aid. Doing it this way is a bit clumsy but I think embedding images on the wiki is even clumsier. The images are numbered and match the (number) parts in the step-by-step
- Import the model you want to port into a blender window
- Import the relevant PES16/17 template model (medical_staff, face_high/hair_high, ball, stadium piece) into a different blender window, go into Edit Mode and move the reference model to the side so it's not going to be in the way when you paste in the model you're porting (1)
- Copy all the meshes you want to port into the secondary blender window with your 16/17 template model (2)
- If you only have one mesh: Select your mesh, then select the 16/17 template, press Ctrl+J to join your mesh to the template (3) and then in Edit Mode delete the template model (4)
- If you have multiple meshes: Select one of your meshes, then select the 16/17 template, press Ctrl+J to join your mesh to the template, in Edit Mode make sure all of your mesh is selected and none of the template mesh is selected and press P -> Separate by Selection (5). Repeat this for every mesh you want to port (6). Once all your meshes have gone through this join-separate process you can delete the template mesh (7). Accidentally joining a mesh you already joined into the template into it again doesn't ruin the whole process, but for ports with multiple meshes you might want to hide each mesh after joining it to and separating it from the template to make is easier to see which meshes are still remaining
- Once you're done, go to the Data tab and just above the Vertex Groups list there should be a section for PES .model Mesh Settings. For each mesh, make sure the Material field has a unique name, this matters for the MTLs later down the line (8). It helps to be descriptive here, something like body for the body, head for the head, etc. will work
- Once all your meshes have material names switch to the Scene tab where you imported the template model from and you should have an option to Export .model. Set the export path first to make sure you don't overwrite your template model (9). The filename does matter, here's a cheat sheet of common cases:
- If your FMDL is face_high.fmdl your .model should be face_high_win32.model
- If your FMDL is hair_high.fmdl your .model should be hair_high_win32.model
- If your FMDL is boots.fmdl, glove_l.fmdl or glove_r.fmdl your .model should be oral_<anything>_win32.model where <anything> really can be anything (reasonable, I haven't tested this very far other than you'll want to stay under 200 characters). An example would be oral_body_win32.model for the body and oral_hand_l_win32.model and oral_hand_r_win32.model for the hands. THE oral_ PART IS REQUIRED WHERE MENTIONED, PES WILL CRASH OTHERWISE
- If your FMDL is ball.fmdl your .model should be ball.model
- Stadiums are more complex and their naming scheme will be covered in their section, any other pieces like referees will be added later if possible
- After the model exports successfully you'll need to set up the XML and MTL(s). This part differs more between different model types and will be explained in more detail in the relevant subsections, but here's the very basics of this part as well:
- The easiest way to get started will always be copying an XML and MTL(s) from an existing player or from the templates linked at the top of this whole section
- To tell PES to load a .model file you need to add a <model /> tag to the XML (easiest done by copying an existing one) or edit an existing one
- So if you want to tell PES to load your FBM in oral_body_win32.model using body.mtl as the MTL file add a <model /> tag, change the type to be "parts" (more details on which type to use below), change the path to "./oral_body_win32.model" and change the material to "./body.mtl"
- To set up a material in an MTL you need to add or edit a <material /> tag and make sure for each mesh in the .model you have a <material /> where the <material />'s name field matches the Material field we set up in the Data tab in blender
- So if your .model has two meshes with Material names body and head in blender, your MTL needs to have two <material /> tags with name="body" and name="head". Shader types are discussed below
On XMLs and MTLs
Setting_up_.model_files, as linked above, has the detailed information on how these files work. This section will instead outline the most common settings and close analogues to PES19 values
- XMLs:
- Type:
- "face_neck" gives a model access to the facial skeleton, needs to be used if a model has working facial animations like mouth movement
- "handL" and "handR" give a model access to the respective hand skeletons, needs to be used for working hands
- "uniform" gives a model access to the kit texture of a team, but only the main kit textures (u0XXXpY.dds) located in the Kit Textures folder of an aesthetics export
- "parts" is the generic type and gives a model access to the full PES body skeleton, should be used for everything that doesn't require one of the more specific types
- Other notes:
- hair_high_win32.model will always be automatically loaded if it exists in a Face folder. It'll also always use hair.mtl as its MTL file
- Similarly, if a "face_neck"-type model isn't loaded PES will load a default one. A face.xml should always load at least the template invisible face_high_win32.model as type="face_neck"
- MTLs:
- Shader:
- "Basic_CNSR" is shaded and equivalent to blin in PES18+. The NSR part stands for access to Normal, Specular and Roughness texture maps
- "Overlay" is shadeless and equivalent to constant in PES18+. It doesn't need antiblur so if your FMDL has a mesh specifically for antiblur you can delete it
- There's plenty more and they're all defined in dt15_win/common/render/shader/surfaceShaders/. Some of the other useful ones that need a bit of extra effort to get working properly like Constant will be expanded upon later
Facemasks
Uses template "Facemasks"
Mostly follows the basic process. The difference is the template .model is actually two .models and it's split into 7 pieces. The goal here is to match pieces as closely as possible. Porting facemasks will have a lot of variance depending on how many meshes the .fmdl being ported has, but luckily most of the mesh matches are obvious (face should be joined to face, hair should be joined to hair, etc.). The two less clear parts are:
- Underneath the hair there will be a hair shell and possibly the back of the head. These two are similar, but the main visual difference and way to tell which one to join to is the hair shell (material hairTubeShader in the template .model) has sideburns, the back of the head (material head_phong) doesn't. Joining these incorrectly will cause the hair shell to use face.dds as its texture which will look bad and would need to be fixed in the MTL
- FMDL facemasks may not have the eyelashes (material eyelash_mat) and/or eye occlusion mesh (eyeocclusion_lambert). If these don't look too out of place with your FMDL face you can leave them in, otherwise you can delete them
For the Face folder in an aesthetics export you should copy face.xml, face.mtl and hair.mtl
Head Models with Facial Animations
Uses template "Facemasks"
Mostly follows the basic process. This section is about custom heads (as in, not originally from PES itself) that have facial bones and working facial animations in PES18/19/21. These are usually in one mesh and are easier to port than facemasks:
- Import face_high_win32.model and delete all meshes except the face (face_phong)
- Join your mesh to the template face mesh and delete the template face in Edit Mode
- If your source model has multiple meshes do the join-separate process described above
- Export, for the Face folder in an aesthetics export you only need to copy face.xml and face.mtl from the template folder. The default texture filename will be face.dds
Head Models
Uses template "Head Model"
Mostly follows the basic process. This section is for your basic head model with nothing fancy like facial animations.
- If your source model only has a face_high.fmdl import face_high_win32.model
- If your source model only has a hair_high.fmdl import hair_high_win32.model
- If your source model has both a face_high.fmdl and a hair_high.fmdl import both template .models
- You might want to do this in separate windows and one at a time to make things easier, so first import the face_high variants and port that, then import hair_high and port that
- If your source model has an oral.fmdl you can either include it in the porting process for either face_high or hair_high, or you can port it separately using hair_high_win32.model as the template but:
- With the exporting filename set to oral_head_win32.model instead
- With an extra <model /> tag in face.xml with type="parts" and path="./oral_head_*.model"
- For the Face folder in an aesthetics export you should copy:
- face.xml and face.mtl if your player DOESN'T have a hair_high_win32.model
- face.xml, face.mtl and hair.mtl if your player DOES have a hair_high_win32.model
- Default texture name is face.dds for face_high_win32.model, head.dds for hair_high_win32.model
- The template face.xml doesn't actually have a <model /> tag for hair_high_win32.model. This is because PES will automatically load this specific .model if it exists in the face folder, so there's no need to add a <model /> tag for it
FBMs
Uses template "FBM"
Follows the basic process. Import medical_staff.model. For the Face folder in an aesthetics export you should copy face.xml and medical.mtl, default texture name is body.dds
Outlines
Uses template "Head Model" for heads and "FBM" for FBMs
Mostly follows the basic process. The difference here is we need to make sure our outline mesh works correctly which means making sure our MTL has the correct settings
- Port your main mesh and outline just like you would any other model of their type
- Change your outline mesh's Material under PES .model Mesh Settings in the Data tab to be outline if you're using the template MTLs. The outline mesh will use the main mesh's texture by default
- If you're using your own MTLs or want to edit things by hand, make sure your outline mesh has a different Material than your main mesh and change twosided to 0 for the outline material in your MTL
Hands
Uses template "Custom Skin Colour and Hands/Hands"
Mostly follows the basic process, all you really need to do is add the correct <model /> tags to your XML after you're done exporting your hands
- For the left hand you need type="handL"
- for the right hand you need type="handR"
Kit-coloured FBMs
Uses template "FBM"
Mostly follows the basic process. There are two ways to do this:
- If your model uses the team's default kit textures (the textures that are in the Kit Textures folder):
- Set the kit model's <model /> entry to have type="uniform"
- While this means the .model won't use any of the <sampler /> tags (so, textures) in the relevant MTL, it WILL still use the <state /> tags like "twosided" and "alphablend" and so on
- Kit textures should be 2048x2048 exactly. Changing the dimensions can break or crash PES and likely WILL break or crash PES in the 4cc Elite and Babby Exhibition modes
- If your model uses textures in its own folder:
- The p0-style kit switching tech now works on PES16 as well if you have the EXE from the Resources section above. To do this you should:
- Rename any textures you want to switch based on the kit in PES to have u0XXXpY in their file name, XXX being your team ID and Y being your kit number
- So if your team ID is 882 your texture file names should have u0882p1, u0882p2, u0882p3 and so on in them for as many kits as your team has
- Your texture name only has to include the u0XXXpY part. This means examples of valid texture names include u0882p1.dds, body_u0882p1.dds, u0882p1_body.dds, etc
- In your MTL file in the relevant <material /> tag the texture filename should be u0XXXp0.dds, XXX again being your team ID
FBMs as Kits
Uses template "FBM"
Mostly follows the basic process. This is in fact different from above, this time we have two or more FBMs that we want to use as kits instead of having a single FBM change textures depending on which kit is selected in PES. The basic principle of this technique is:
- Each FBM kit should be visible for one of the PES kits and invisible for all others
To do this you should:
- Figure out how many FBM kits you will have. This example will assume three to better illustrate the point but you could do up to the PES maximum of nine if you wanted to
- Open the textures for all your FBMs that will be part of the kit FBM assembly in an image editor
- Assemble your textures in a way where each one has its own section in your image editor. For example, the texture for kit 1 could go in the top left corner, kit 2 in the top right, kit 3 in the bottom left. Make sure the kit textures are still in separate layers
- Export each kit texture layer separately. In our three-kit example we should end up with three images where each image has one corner occupied by a texture and the other three corners transparent
- In blender, UV map each FBM kit mesh to use these new one-corner-full three-corners-empty textures and then export the .model
Balls
Uses template "Ball"
4cc Balls Compiler - This will be useful for getting your ball into PES. Make sure to set fox_mode=0 in settings.txt
Follows the basic process. The only difference is using the balls compiler instead of the aesthetics compiler. The default textures are included in the template folder
Referees
Uses template "Referee"
4cc Refs Compiler - This will be useful for getting your ref into PES. Make sure to set fox_mode=0 in settings.txt
Follows the basic process. Turns out referees are just FBMs but put in a different location and through a different compiler. Once you're done porting your FBM copy the referee (note the lower case) folder from the template into the refs_to_add folder in the refs compiler, set up the referee/face folder like you would any FBM and do the necessary refs compiler setup like adding your referee to the referees list
THIS IS THE END OF THE PORTING SECTION
The headings get so small it's hard to tell. Everything below this is old and will be cleaned up / touched up / revisited later
Basic Head Model
This is the first thing anyone should learn about Blender and PES aesthetics. It's simply the process of taking an existing model and making it usable for PES, but thanks to how basic it is it functions as the foundation for all the other more advanced Blender stuff. Everything else simply adds extra layers on top of the basic process.
First download the base folder and then watch the video tutorial which should cover everything. The video tutorial is made for MMD anime heads but the process for any basic head replacement model is exactly the same so going by the video should be good enough.
Card/Box/Cube/Flatheads
A process even more basic than the Basic Head Model thanks to pre-existing templates and also one of the few tutorials that doesn't necessarily require Blender. You can also skip using the templates and instead go for some Blender practice by making your own heads, but for getting the job done quickly simply editing the clearly labelled textures in the templates is the way to go.
Expand
Click ->
As for making your own heads, simply go Add -> Mesh -> Cube in the bottom bar left corner in your Blender window for Boxheads and double-sided cardheads, or Add -> Mesh -> Plane for a cardhead with a normal front and a flipped back. Scale the new mesh to your liking with S (rememeber the axis-lock function of S, then X, Y or Z), create a UV map for the mesh (easiest way to get it right quickly is to position the camera directly in front of a face, select only that face and go U -> Project from View in Edit Mode and repeat for the other faces). Then just use the UV editor to fit your UVs to your texture, triangulate the mesh with CTRL+T and you're done.
If you want your self-made cardhead to only be visible from the front select the backside of it in Edit Mode and then press N while your cursor is in the 3D window which opens up the right sidepanel. Towards the bottom is a heading Normals with three boxes next to it, click the rightmost one which will show the normals of all faces. Small cyan lines will appear, in short these control which way the face is facing which helps PES decide if a face should be rendered or not when viewing from a certain angle. Make sure you've selected only the backside of your cardhead and press CTRL+Shift+N to flip the normals so they're pointing into the model and not out of it. If CTRL+Shift+N doesn't do the trick try CTRL+N to recalculate the normals, they may already be flipped for some reason. Now with the face normals flipped you can export your model and do a final finishing touch in the template files. Open hair.mtl in a text editor, go to the very bottom to the material named hairparts_htShader, look for the state twosided and set it to 0. This tells PES your model's normals are configured correctly and it can stop rendering them when they should be invisible and blame all possible fuckups on you instead.
Facemasks
A way to give human players a custom face without having to either use a cardhead or hunt for a model which most likely doesn't exist if you're considering facemasking. Also includes the added benefit of keeping the PES facial animations intact so your player can show emotion which with good facemasking work can make for an excellent-quality playermodel without tons of work.
Expand
Click ->
Basically how it works is you edit your player's face into a default PES face texture, align it with the template model and then pick the right hair model and texture files from a pre-made pack and recolour the hair textures if needed. Getting the process down is a bit of work but once you're familiar with it churning out facemasks is a simple and easy process.
- Facemask Template - A generic facemask template, very useful except you might want to swap the face texture depending on your source image
- Facemask Template Overlay Edition - Modified template to use the Overlay shader for sometimes better-looking results, explained in more detail in the actual tutorial
NOTE: This part is based on personal preferences and done entirely in GIMP, Photoshop at least should have a very similar process but mind the possible slight differences.
First off start by finding an image of the face you want to facemask. An ideal source image is a relatively high-res photo showing the face from a straight angle so you can cut out the entire face and a bit of spare skin as well. For example this is a very good source image.
For your first couple of facemasks the template folder is usually good enough, but generally it's worth the trouble to grab some of the default PES face folders by first extracting dt36_win.cpk from your PES Data folder and then extracting a bunch of the resulting face CPK files and finally unzlibbing them all to take a look at the textures. This will possibly save you a good bunch of trouble especially if your reference image is anything other than a brown-haired slav. Simply look for a face.dds that matches your source image at least in skin colour and copy that over to your working folder over the template face.dds. You don't need to worry about hair textures or the model files because the template ones are better for the job.
Now from the template folder open face.dds in an image editor, and copy-paste your source image into another window in the same image editor. Then with the Lasso/Free-select Tool select the entire face and as much skin around it as possible. Usually the best is to follow the jawline and after that the hairline, making sure to not include the ears and trying to include as little hair as possible. When you have your face ready to transplant, copy-paste it over to the face.dds window and scale and rotate it to fit the face. Setting the source face's layer to around 50% opacity helps a lot. Try to position at least the eyes and the mouth correctly, the nose might be a completely lost cause but getting it close enough is good if you can match the eyes and mouth perfectly. After you're happy with the positioning just mess with the sliders to try to match the skin colour and brightness of the PES face texture. Generally just using Brightness/Contrast and Lightness/Saturation in GIMP is enough to get an acceptable result. Once the colour kind of matches erase any rogue bits of skin that are overlapping hair or beard or generally out of place and finally start making the finishing touches and blending the edges of the source image into the PES face. For GIMP running the Healing Tool along the edges of the source face will usually do a good job, for more difficult blends the Clone Stamp is a good addition to the Healing Tool. Once you're happy with the texture it's time to move to Blender for some very final touches, the hard work is already done.
In Blender, import the face model from the template folder and set it to use your new face texture as the texture. Position and scale the UV to fit the texture, the mouth and the eyes are the most important as before, the nose is just kind of 50/50 depending on your luck. Once the positioning is OK and the model looks good in Blender you can just simply export the face model and move on to picking the perfect hair for your new player.
First you'll want to open PES, go to the Edit Menu, then choose a random player and go to Appearance -> Hairstyle, reset the settings if asked to and start re-creating your source's hair in PES. Getting it 100% is probably going to be impossible so don't stress about that, simply good enough will do just fine. After you have recreated the hair in PES, go to the PES17 Hairstyles folder and read the .rtf tutorial there. The only difference I'd recommend trying is if using Multiply as the mode doesn't give good results try out other modes as well, I've had better success with Grain Merge since Multiply tends to get a bit dark. Once you're done editing the hair textures do the final finishing touch of editing the hair in the face texture to fit the actual hair colour as well. Once that's done your facemask should be ready for use, compile and test out in PES.
If you're unhappy with how the facemask looks and the reason for it is too much detail like creases which make it hard to make out the features of the actual face it's supposed to be, first of all make sure face_normal.dds, face_normal_detail.dds and face_specular_roughness.dds are all white. If they're white and you still have the same problem open hair.mtl, look for hairparts_htShader and set its shader to be Overlay. Re-compile and see if the face looks better in PES, don't mind the fact that the neck is black we're going to fix that later. It it looks better read on for the Overlay trick, otherwise it's probably a problem with the texture or the UV alignment of the face model.
The Overlay trick is a modified hair_high_win32.model file that fuses a copy of the hair_1 mesh into the hair_0 mesh so that the back of the model's head doesn't turn black when using Overlay as the shader. If you want to use Overlay as the shader for your hair, copy all of the files from the Overlay template folder into your facemask's folder except for face.dds if you have already made your facemask texture. First of all open hair_col.dds in an image editor and copy-paste your face texture over the existing one and make sure to keep the right side of the texture transparent. Then import both face and hair into Blender and fit the face UVs into your texture as usual. Then open up a second Blender window and import the hair model you picked when re-creating the hairstyle in PES. Copy the hair_2 mesh and in your original Blender window select its hair_2, change to Edit Mode, select it all with A and move it aside. Back in Object Mode paste your copied hair_2 over to the original window, select it, select the original one and press CTRL+J to join them together. Change back to Edit Mode, select the entire original hair model you moved aside and delete it by pressing X and confirming deletion. Export your hair, compile and try it out in PES to see if it's any better compared to the default template. It might crash PES either in Edit Mode or in-game if something went wrong during the process in which case either try again from scratch or give up, it's a hassle to get right once it's gone wrong once.
CM3D2 Heads
For when you can't find a model for an anime character but really want them to have a model anyway. Lets you frankenstein your own anime girl from pre-existing pieces which you can then import to Blender and turn into a face model to get around the no MMDs problem.
Expand
Click ->
To begin with you will require the CM3D2 game in some form. Be warned before doing this, CM3D2 has an *extensive* selection of DLC. This means that with enough intuition and elbow grease you can effectively create any anime girl you want with the enormous variety of individual models available to you. This however also means a hefty initial download size and chunk of disc space taken that only increases with mods and, if you take the complicated route, extraction of the individual models and textures.
To download and learn about the game I would recommend visiting the CM3D2 /h/ thread as it by far the best resource and any guide I would make regarding installation would be just reiterating what is already written there. It also has numerous resources for mods and plugins.
Basic
- The simple and easy method involves converting a girl made in the actual CM3D2 game to MMD format with a tutorial that can be found here. (Be warned it is Deviantart tutorial and reads like the average shit you find there). Once converted simply follow the same steps as converting an MMD to PES model.
- The limitations of this method are the limitations of the CM3D2 character creator. While there is a vast selection of parts and numerous mods available to expand further the truth is that even with all that there is no guarantee you will be able to make something that accurately looks like the girl you want. In addition to this CM3D2 textures have a look that can be considered inaccurate and sometimes ugly, especially concerning the garish hair shading.
Advanced
- To make some of the more complex (or ludicrous) anime girl designs from your favourite trash you will probably have to use a more complicated method of extracting and importing individual model parts from the game instead of importing one whole girl. This can be a painful and time consuming process but will also allow for models that look much more similar to the source material and allow you to stitch together different parts in a way CM3D2 itself does not allow.
- Tutorial for this will come soon(tm). It's gonna be a big one.
Balls
Maybe a little out-of-place in the midst of nothing but player aesthetics tutorials, but balls are Blender work as well so might as well have them here.
Expand
Click ->
This is one of the tutorial's you'll need RigEx for, so boot up your Blender 2.71. First of all open and prepare the model you want to use as a ball. It should be cleaned and textured, ready for use in PES before you start working on actually making PES load it as a ball. Once your model is ready grab the ball template and dump it into your working folder. Using RigEx's PES Model Importer at the very bottom import unzlib_ball.model for reference and then copy the model you want to use as a ball into 2.71. Scale it so it's around the size of the reference ball and once you're happy with the size, delete the reference ball and start preparing the new ball model for export. First in the PES Model Exporter click Create Export Parent which will add a parent object every child of which will be exported into the final model. Select the folder to export to under Export Menu and then re-select your new ball in the 3D window. Back in the exporter click Set to assign it to the export parent, make sure the field next to Object has Ball as the mesh name and finally click Add UVs to add the UV Maps the exporter needs for the exporting process to work. Finally re-select the item called EXPORT in your top right corner and press Export .model File under Export Menu and your ball model will be exported. The exported model will always be called export.model so rename it to be ball.model instead. Copy your model's texture into the folder as well and replace ball_c.dds with it and your ball is done. One extra bit you might want to do is add this state <state name="twosided" value="1" /> to you ball.mtl under the samplers if you ball has any complexity to it and its normals aren't set up correctly. If any part of the ball is invisible from certain angles when testing this state will fix the problem. Finally change ball_016.dds to be your ball thumbnail in advance and move on to testing the ball in-game.
Testing the ball in-game takes a bit of effort. You'll need to build you own test CPK and possibly even edit the Ball.bin file if you want the ball's name to show up correctly on your end. The ball model, MTL and textures go to common\render\model\ball\ballXXX\ where XXX is a 3-digit ball ID with leading 0s usually between 1 and 50 if you're using the 4cc ball pack, so for example 016 for ball ID 16. The thumbnail goes to common\render\thumbnail\ball\, don't forget to change the ID in its name to whatever ID you're using for your ball. Ball.bin goes to common\etc\pesdb\. If you want to edit the Ball.bin first of all extract your current 4cc_38_balls.cpk and grab the existing Ball.bin from there. Then simply open it in a hex editor, locate the name of the ball you're overwriting and change the name to your ball's name. Save the file and add it to your test CPK. However please don't submit a modified Ball.bin if you're submitting a ball to a tournament since the aesthetics compiler person will build a new one with all the balls for that cup anyway and extra files will just be extra hassle.
Static Models
A direct expansion on balls, static models are also done in RigEx and simply glide around the pitch. The method of making them is almost identical to balls and it's ideal for models like cars since they don't need to move in a specific manner, just gliding is enough. This tutorial will also be good XML and MTL editing practice since you need to load a whole new model and change an MTL to accommodate.
Expand
Click ->
The above template includes a face model and MTL that when used together completely hide the PES face/neck which is what we want for a static player. It also has a basic APC MTL included, keep this around as well since we'll need it for the static model. Torva is a random model I had handy that can be used as a scale in RigEx since both its scaling and origin values are different compared to BA's plugin. Kitmanager will be used later to make the default PES player disappear, it's needed in order to edit the kit configs without having to hex edit them.
Start by having your static model basically ready to be put into PES. Have it cleaned and textured just like in the balls tutorial and then open Blender 2.71. Using the importer import oral_torva_win32.model and then copy-paste your static model over to the 2.71 window. The reference model is very close to the size of a normal PES player so scale your model with that in mind and please keep the size reasonable. After you're done scaling you can delete the reference model and start setting up the exporting process. First of all in the Exporter press Create Export Parent and in the slightly changed window select the folder you want to export to. Re-select your static model in the 3D view and again in the Exporter click Set to assign it to the export parent, then either change the name next to Object to whatever you want to call the mesh or take a note of what the current name is and leave it unchanged, and finally press Add UVs to create the UV maps the exporter needs. Now select EXPORT in your top right corner and in the Exporter press Export .model File and you model will be exported. It'll be called export.model by default so rename it to oral_<model>_win32.model. The <model> part can be whatever you want as long as you have both the oral_ prefix and _win32 suffix.
Now it's time to set up your player's face folder so the static model is loaded correctly. First of all add the model's loading line to your XML <model level="0" type="parts" path="./oral_model_*.model" material="./apc.mtl"/> and remember to change oral_model_* to whatever your model's name is, replacing the win32 with *. Then open the apc.mtl included in the noface template and change the material name to be whatever you named the mesh before instead of skin_limb. After that also change the DiffuseMap path to point to your model's texture instead of a skin texture and your MTL is also set up. Now you can add the player to your aesthetics export and compile.
Before testing it out in-game we're also going to have to take a slight early peek at FPC to make the default player disappear so that the static model will be the only thing showing for the player. Read through the FPC page and then using Kitmanager set up your kit configs for FPC. After that set Left Wrist Tape for everyone on your team that shouldn't have the static model, and for the player with the static model set full FPC. Now you should be able to test the model in-game and it should only have your static model and none of the default PES player bits.
Full-body Models
For when the default PES body just isn't enough. Replacement of the entire default PES player with your own model that also moves like a player, or at least close enough. This tutorial talks about a complete body replacement but the same principles and techniques apply for replacing only certain bits of a player or adding extra stuff to a normal PES player model. These will have their own section but it's best to know the theory behind replacing a full body to help make smaller replacements and additions easier to understand.
Expand
Click ->
First of all read the pastebin guide by Shakes and download the template folder which contains the very useful medical_staff.model and the face files for hiding the player's face/neck. In addition reading up on FPC is greatly recommended to understand how to make the default players disappear, whereas reading up on APC is not as important but still a good idea if you want to understand the PES model loading process a bit more closely. The Kitmanager linked with the templates is used to modify the kit configs for FPC. The guide is very feature-packed but everything in it is a worthy read and gives you everything you need for working with FBMs. The only thing I'm going to add is my method for dealing with source models with no skeleton since having a skeleton is pretty rare outside of anime models, especially when dealing with rips and low-quality models.
The usual problem with skeletonless source models is the fact that it's not in the exact T-pose PES wants. The lack of a skeleton means you'll have to manually bend them to shape. There's several ways to do this and someone probably has a more efficient method but here's what I do regardless of the model and it's stance.
Usually the problem are the limbs as the torso is probably still in a relatively straight stance so I'll focus on limb-mending. The same process will work for a torso as well though. What you'll want to do is locate the uppermost spot (i.e shoulder) where the source model doesn't match the medical suit, then in Edit Mode select all the faces up to that point in the limb and then rotate along an axis by pressing R and then either X, Y or Z depending on which way you need to bend the limb. After you've bent it a bit, grab the faces with G and drag the limb around until the distortion caused by the rotation is smoothed out and the limb looks natural again. Rinse and repeat until that bit matches the limb of the medic suit and then start slowly making your way down the source model's limb, de-selecting one "ring" of faces at a time and rotating-grabbing-fixing until the entire limb matches the medical model's limb. During this process you can also shorten/lengthen the limbs smoothly as well since they'll need to be at least close to the length of the PES limbs for the painting to work optimally. Once you've done this a couple times you'll start getting a feel for how much you need to rotate the limb and along which axis to nail the transform first try.
Short & Simple
Smaller tutorials that are more like nifty tricks that enable you to do some cool stuff. Most are just layers on top of FBM and most also have very easy templates that do most of your work for you. This is also the point where you might want to read up on APC if you didn't do so already since all of these will assume you know how to add models to load into the XML and make sure the MTL they point to is correct.
Custom Skin
Custom skin means exactly what's on the tin, you're giving your player custom-coloured limbs, most likely to fit better with the head/neck. Also gives a decent intro into APC and some hints about FPC if you haven't had a look yet.
Custom human limbs is actually very easy thanks to the template. All you need to do is pick the correct files and put them in your player folder, edit skin_color.dds, copy the right lines from the .txt file in Config and PES will load custom-coloured limbs for your player. Remember to set invisible skin in an editor and you're all done.
Attaching Parts to Players
Also known as APC, it might seem a bit weird to have this only after learning how to do full-body models but most of this will actually require at least some understanding of weight painting so better have it here than before the weight painting tutorial. If you haven't learned how to weight paint yet take a look at Full-body Models first, you'll need both guide.txt and the template but you can apply the guide to your attachment piece instead of a proper full-body model just fine.
Expand
Click ->
This can all be boiled down to a single sentence: Do an FBM but instead of a full body it's just smaller bits. The process is entirely the same and if you handle FBMs perfectly then reading on won't reveal anything new but I'll write a short recap of the process anyway.
This is actually exactly the same technology that was used above in the custom skin tutorial except this time you'll be working on a custom model in blender instead of the default PES limbs that only need texture editing. What you'll need to do first is prepare the custom attachment you want, so clean it up, texture it properly and have it basically ready to be exported just like you'd have a normal head. After that open the medical_staff.blend from the FBM template into a new Blender window and copy it over to the window where your attachment is. Position the attachment to where you want it to be using the medical suit as a reference and if required bend it into shape as detailed in the FBM tutorial. After you're happy with the positioning transfer weights from the medical suit as detailed in the FBM tutorial. You can now hide or delete the medical suit and do whatever minor paint fixes the attachment might need. After you're happy with the result export the attachment like you'd export any FBM and it's time to make PES load it.
First you should add the loading line to the face.xml. The type for these kinds of attachments is usually parts unless you for some reason need a more specialized type, for example uniform for models using the kit texture as detailed a bit further into this page or handsL or handsR if you're working with hands and want the fingers to move. The model also needs to be named in a very specific way, oral_<name>_win32 where <name> can be anything but both the oral_ prefix and _win32 suffix need to be present so the model doesn't crash PES in Edit Mode. An example loading line looks like this <model level="0" type="parts" path="./oral_helmet_*.model" material="./apc.mtl"/>. Note that the win32 part gets changed to * in the loading line. After you've added the loading line you'll also need to set up an MTL. Grab a pre-existing one, for example medical.mtl from the FBM template folder works fine. Rename your MTL to apc.mtl or whatever your loading line has and then open it for checking and possible editing. Make sure the DiffuseMap sampler points to your attachment's texture, make sure the material's name is medic and finally check the states to make sure things like alphatest, alphablend and twosided are on/off depending on what you want. Both the XML and the MTL and some of the most common values are detailed over at Setting up Model Files. Once your model is added to the XML and its MTL is sorted you can add the player to your aesthetics export and compile to test in PES. If all went right your attachment should be in and move naturally with the bit it's attached to.
Custom Kit Textures
Same basic progress as custom skin except now a bit more complicated because of more files and the fact that we're dealing with a kit texture instead of a skin texture where just dumping a solid-colour paint bucket on it was enough.
Read the readme.txt inside, it's got all you need to do.
Boots and GK Gloves
For when the default PES selection just isn't good enough. Please note that this is simply for editing the textures of the default PES models, for custom models you should use APC.
Expand
Click ->
Boots/Gloves Template
Since it's just a texture edit everything's simple. Edit kXXXX_c.dds and/or gXXX_c.dds to your liking and your work is done, all you need to do is have PES load the boots. There's two ways of going about this, either having each player's face.xml load the boots/gloves separately, or actually adding them to the in-game list of PES boots/gloves which means you can just set them in an editor.
First of all I'll mention that the Aesthetics Compiler has a separate folder for both boots and gloves meaning it can do the hard work of getting them in-game for you. I'll still go through the manual methods here since it's always better to know what's going on under the hood, but if you just want the boots in-game the compiler is by far the fastest option. I'll also only refer to boots from now on unless there's a clear difference in a particular step so by default every step applies to both boots and gloves exactly the same.
Adding the boots to the face.xml is much simpler but can be a bit tedious to keep track of since every player will have to load those files. If you want to do this move the files to your player's face folder. Open the face.xml and add a loading line for boots.model using boots.mtl as type boots, like so <model level="0" type="boots" path="./boots.model" material="./boots.mtl"/>. For gloves it's a bit more complicated, you need lines for both gloves separately. First off delete one of glove_r.mtl and glove_l.mtl and then rename your remaining MTL to gloves.mtl, then load the left glove as type gloveL, right glove as gloveR both using gloves.mtl, so for example <model level="0" type="gloveL" material="./gloves.mtl" path="./glove_l.model"/>. Now compile and your boots should be in, remember to use an editor to hide your player's default boots. If you plan on having the same boots for multiple players reading up on the Aesthetics Export Common Folder is recommended, it makes keeping track of your boots a lot easier.
The other method requires you to build your own CPK for the boots, but after the initial effort using the boots becomes a lot easier since you can simply change your players to use them in an editor. Once your textures are edited you don't need to change any of the other files, simply move them to the correct locations. For boots this is common\character0\model\character\boots\kXXXX\ where XXXX is your boots ID with leading 0s, so for example 0050 for boots ID 50. For gloves the path is common\character0\model\character\glove\gXXX\ where in the same fashion XXX is the gloves ID, so 050 for gloves 50. Check PES16/Boots and PES16/Gloves to see which IDs you should use for your boots and gloves. You don't need to change any texture names or IDs inside the folder, the name of the folder is all that matters. Now simply compile the CPK and load it in your dpfilelist. Before you open PES to test them remember to set your player(s) to use the correct boots/gloves in an editor and you're ready to test. If all went right your players should have their custom-textured boots and gloves.
Using Kit Textures for Models
Making the model change colours depending on which kit is selected. Very useful for repping team colours and making FBM players look more like they belong on the team. In more extreme cases can be used to load a full custom model depending on which kit is selected.
Expand
Click ->
No templates for this as this will always be a case-to-case basis. What you'll want to do is grab one of your team's kit textures and import the model you want to use the kit's texture into Blender. Fit the model's UV into the kit texture however you want and re-export the model using the FBM exporting procedure of a second Blender window and joining to a medical model.
It's also fine to only have one part of the model use the kit texture. In these cases select the whole part in Edit Mode and go P -> Selection to separate the selected bit into its own mesh. Then map that mesh to the kit texture while keeping the rest of your model on its own texture and then export both meshes separately.
Once you have your kit-colour mesh exported, you need to add its loading line to face.xml. When adding the line have it's type be uniform instead of the usual parts. You can still use the MTL parameters like alphas and twosided but you can't give the model a diffuse map since that'll always be forced to the kit texture which is what we wanted anyway.
Custom Models as Kits
Expanding on the previous topic, custom models as kits are also accomplished by loading models with their type set to uniform. This time though the problem is that if you want to have a cloth kit and a custom kit or several custom kits then there needs to be some way to hide the other kit models while only the selected one is visible. This is accomplished by using alphatest in the MTLs for transparency and cramming all the textures for the custom kit models into the 2048x2048 area of the PES kit texture. NOTE: changing between custom and cloth kits doesn't work for keepers since they can only ever have a single kit.
Expand
Click ->
We'll cover the case of custom kit alongside a cloth kit first since that's the more difficult one and has the more comprehensive solution that will always be usable no matter your scenario. If you just want custom kits for every outfield player and no default cloth kits at all skip to the next section which deals with exactly that since it's a much simpler scenario thanks to the missing cloth kits. I'll assume you have the custom kit model ready already. First what you'll want to do is combine it's texture and your cloth kit's texture into a single 2048x2048 image just like you'd combine textures for any PES model. You should also grab a skin_color.dds from the Custom Skin Colour template and merge it into the new texture as well. Keep it handy since you'll need it later for hands. The combined texture will be your base image and it'll also help you keep track of where your UV maps are. Once the textures are combined load your custom model into Blender and scale its UV to fit its texture in the new combined texture. After that's done simply export your model and you're done setting up the easier one of the two models.
Now you need to resize the cloth kit's UV map to fit the new combined map. Grab all the kit bits you want in the custom kits template and place them into a folder. Start importing these into Blender and fitting their UVs to the new texture. Eventually you should have a shirt, pants, socks, collar, sleeves and pants_sub in a single Blender window with their UVs mapped to the cloth kit's part in the new texture. Now also grab arms and thighs, import to Blender and map to their part of the texture, your kit should now have skin-coloured limbs. Then select all of the meshes with A and then join them all together with CTRL+J. You now have a full PES kit in a single mesh. Next you should delete all vertex groups, open a new Blender window and open medical_staff.blend from the Full Body Template. Copy the medical model over and transfer weights from it into your cloth kit which will make it move almost perfectly in PES without having to worry about transfering and painting individual bits. Now delete the medical model and export your cloth kit like you'd export any FBM.
You'll still need hands and boots. Hands can't actually be loaded in as uniform which is what we would ideally want so either join them into your cloth kit and paint them entirely to their respective hand bones thus sacrificing finger movement or if your custom kit model covers up the PES hand models reliably you can leave them as-is and just deal with them once it's time to set up the XMLs. Boots can simply be imported into Blender and exported back again from the same window so I'll gloss over them, just add the boots texture to your combined texture and map the UV to it before re-exporting. If you want the hands to be hidden when your custom kit is loaded map them as well, join to your cloth kit model, paint to the hand bones and re-export your kit model. You can find a boots template under Boots and GK Gloves.
Finally you'll need to set up the whole thing so it loads the correct kit at the correct time. This is where making use of the Aesthetics Export's common folder is recommended. You can drop your boots, hands and all kit models along with their respective MTLs in there. Then set up a face.xml that first loads your custom kit as type uniform, then the cloth kit as uniform, boots as uniform and if you have always-visible hand models load them as handL and handR. The model path to use with the common folder is model/character/uniform/common/<yourteam>/, so for example model/character/uniform/common/rsg/oral_torva_*.model. Then set up an MTL for your custom kit model and make sure it has alphatest set to 1 and alpharef set to something moderate like 100 which tells PES to not render any pixels that have a transparency below the set value. Having it as 100 will make sure the fully-transparent bits stay unrendered but also gives you room to have some transparency in your actual texture. Now do the same setup for your cloth kit and move both MTLs to the common folder as well, the loading path for the MTL is the same as for models. Now copy the XML to the face folders of the players you want to use the custom kits for and move on to finishing touches.
Now create as many copies of the combined texture as you have kits and edit it so that for the custom kit you delete everything except the custom kit's texture and for the cloth kit you delete the custom kit's texture. Basically the kit texture should only have the texture of the kit model that uses it, everything else should be transparent. For more than one cloth kit texture you should replace the texture in the cloth kit spot in the combined texture since every non-custom kit will use the cloth kit model instead and that's where the cloth kit's UV is mapped. After you've deleted the extras from every kit texture you can move them to your aesthetics export to be your actual kit textures.
Make sure all of your kit configs are set up for FPC and make sure all the players who need to be wearing the custom kit are also full-FPC. Now you can compile and if everything went well you should be able to swap between the custom kit model and the cloth kits simply by changing kits in-game.
If you for some reason have a non-FBM player or players that shouldn't use the kit you'll basically have to give them their own FBM cloth kit body, so add another copy of your kit textures to vacant spots in all of your new custom combined textures, create a copy of the cloth kit model, import it to Blender, change the UV to use the second kit texture you just added in, export the model and change the player you want to keep cloth-only to use that version of the cloth kit instead and completely remove the custom kit from their XML. You also need to add some sort of a kit texture to the same spot in the custom kit's texture so the players will still have their cloth kit when everyone else is rocking their custom kits.
And with that you're finally done, custom kits and cloth kits for everyone with only a minor hassle.
If you want more than one custom kit simply add their textures to the big combined texture, add the model and MTL for them to common and change the XMLs to load them somewhere before the cloth kit. Once you've done all the work for adding one custom kit alongside a cloth kit adding more is no trouble at all.
Custom Models as Kits - The Special Scenario
The WAY easier scenario of the two where cloth kits don't exist and everyone can have the same custom kit models which lets you use the magic of collar slots.
Expand
Click ->
All the actual work you'll have to do here is unzlib all of your custom kit models, open them in a hex editor, search for "dsk" and look for a mesh name after the bone list. This will typically be medic for FBMs. Change this to be uni_shirts and save your model. With that you've done all the actual work, the rest is just loading models and moving files.
Rename all of your custom kits to be collar_XXX where XXX is a number between 107 and 255. Collar slots are not yet regulated so for now you can choose pretty much any number but be prepared to change it if using the collar slots becomes popular and more teams want their slots. After that if you want to test the kits in-game you'll need to build a test CPK the old-fashioned way. Move the collar models to common\character0\model\character\uniform\nocloth\, build your test CPK and add it to your DpFileList.
Now with your kits in-game you also need to edit your kit configs and textures. For the configs set up FPC except for collar model. Save your changes and then open the configs in a hex editor in order to change the collar model ID to point to your custom kits that are now officially collars. The bytes you want to change are 0x14 and 0x15, set these both to be the ID of the custom kit model you want to use for the specific kit you're editing. After that save the configs, replace your kit textures with the textures for the correct custom kits and you've completed setup as well.
Finally you need to set FPC to your liking so it fits with your custom kit models and if everything went right, they should be in-game and changeable by changing in-game kits.
The only problem is that by using the collar slots you're also forced to use the shirt shader and the PES default collar MTL, but this should generally not be too much of a problem. If it does look bad because of the shader or some default kit mapping texture, you can try adding your custom kits using the above method which will let you define your own preferred shader and such things.
Custom models from boots
A methode where boot slots are used to load in custom models. It may sound pretty hard but it is very easy.
Check PES16/Boots to see which IDs you should use for your boot. Make a new folder using the ID you found on the page so it becomes kxxxx. Copy your already made model with its mtl and texture and dump them into the folder. Then rename the .model to boots.model and the .mtl to boots.mtl. Make sure the texture name is the same as in the boots.mtl otherwise PES will give you a white texture on the model. If you have renamed everything in the map there should be 3 files: boots.model, boots.mtl and the .dds.
Now to get this into the game check AET/Boots to set them up correctly in the game. Then use a editor to give your player the Boots ID. If all went right the model should show up when you check your player.
Pictureguide
PES18+
Basic Head Model
This is a text based and illustrated .pdf guide that covers porting basic head models into PES. It assumes you have no prior knowledge of Blender and contains links to all the tools you'll need. The guide was made specifically for Source Filmmaker models, but can be applied to any model that Blender can open.
Porting Heads
Another tutorial for heads, likely repeating a lot of what the above one already covers. Pick whichever you prefer and stick with it and all should be well.
Click here to expand
Resources
Tutorial
Video Tutorial: https://drive.google.com/file/d/1SAOv0Dvo-8lGRMudEFL2FeGS-uIgDduc/view?usp=sharing
Make sure to grab the Base Model Pack from above as it will be used during this entire process
- Open two blender windows, have your model open in one and import hair_high.fmdl from the Base Model Pack into the other
- Copy the base model over to your model's blender window
- The base model is a default PES head all combined into a single model so it functions as a good reference point, hence why you definitely should use it
- Scale and position your own model around the template model. If you imported with PES model I/O the scale will automatically be correct but you may have to adjust the position of your model. If you imported with the older PES Mesh Tools you'll have to scale down to 0.1 and then re-position your model.
- Once you're happy with the size and position of your model, delete the template model from your primary window
- Swap over to the secondary blender window with only the template model for a moment
- Select the template model, change to Edit Mode, press A to select the entire template model and drag it aside. Make sure you get the entire model and be doubly sure to do this in Edit Mode
- Swap back to Object Mode and copy your own model into the secondary blender window with the now-moved template model in it
- With your model selected swap to the Data tab and next to the list of Vertex Groups press the black downwards triangle and select Delete All Groups
- Keep your model selected and with Shift held select the template model and press Ctrl+J to join the two together. This will make your model inherit all the useful properties and settings the template model has
- Swap back to Edit Mode, select the entirety of the template model while making sure no part of your model is selected and press X -> Vertices to delete the template model
- While still in Edit Mode and the Data tab, select your whole model with A, select sk_head in the list of Vertex Groups and under the list press Assign
- Swap to Weight Paint Mode, press T to bring out the left sidepanel and press Normalize All
- Swap back to the Scene tab, change the model filename to be hair_high.fmdl in the FMDL I/O section so it's named correctly for use in PES and you don't accidentally overwrite the template model and finally press Export fmdl
- Your model should be exported successfully. The texture the model uses is called head.dds and the texture the default chest/neck model face_high.fmdl uses is called face.dds. The Base Model Pack includes examples of both textures. These files are really the only things in the Base Model Pack you should change, everything else is ready by default. The functions of the rest of the template files are explained below but the blender part of the tutorial is done and you're free to test your model in PES
Base Model Pack Files
What the files in the Base Model Pack do and why they're included / why you might want to use them for your players
- hair_high.fmdl - The template head model used in the exporting tutorial. A default PES player's head fused together into one reference model with favorable properties ideal for template use
- face.dds - The texture used by face_high.fmdl
- face.fpk.xml - Required for the face folders in your aesthetics export, used to tell the compiler which model files to include for that player. This default one will include face_high.fmdl, hair_high.fmdl and face_diff.bin
- head.dds - The texture used by hair_high.fmdl and by extension any model ported with this method
- face_diff.bin - Controls the size and position of the default PES eyes and mouth. This one has them shifted deep underground so they'll never appear in play, perfect for custom head models where they would just be in the way
- face_high.fmdl - The default PES neck/chest model modified to work well with custom head models
- face_nrm/srm.ftex - Map textures used by both hair_high.fmdl and face_high.fmdl. Normal and Specular. These three are default blank maps giving your models a smooth and neutral appearance so using them without any changes is greatly recommended
Completely New Head Models
This time we have a model that has never been in PES before. Very similar process to porting old head models, to the point where this section is just going to be a slightly modified version of the porting guide, but worth having to avoid confusion. Video soontm
Click here to expand
Resources
Tutorial
Video Tutorial - Comprehensive version - Longer, slower paced and with more explaining
Video Tutorial - Compact version - Short and speedy, good if you just want the process and no long explanations
Make sure to grab the Base Model Pack from above as it will be used during this entire process
- Open two blender windows, have your model open in one and import hair_high.fmdl from the Base Model Pack into the other
- Copy the base model over to your model's blender window
- The base model is a default PES head all combined into a single model so it functions as a good reference point, hence why you definitely should use it
- Scale and position your own model around the template model, keeping in mind the template is the size of a normal PES head. Your model doesn't have to match the size or shape, the template is there simply for reference to make sure your model doesn't end up too big or too small or out of position
- Once you're happy with the size and position of your model, delete the template model from your primary window
- Swap over to the secondary blender window with only the template model for a moment
- Select the template model, change to Edit Mode, press A to select the entire template model and drag it aside. Make sure you get the entire model and be doubly sure to do this in Edit Mode
- Swap back to Object Mode and copy your own model into the secondary blender window with the now-moved template model in it
- With your model selected swap to the Data tab and next to the list of Vertex Groups press the black downwards triangle and select Delete All Groups
- Keep your model selected and with Shift held select the template model and press Ctrl+J to join the two together. This will make your model inherit all the useful properties and settings the template model has
- Swap back to Edit Mode, select the entirety of the template model while making sure no part of your model is selected and press X -> Vertices to delete the template model
- While still in Edit Mode and the Data tab, select your whole model with A, select sk_head in the list of Vertex Groups and under the list press Assign
- Swap to Weight Paint Mode, press T to bring out the left sidepanel and press Normalize All
- Swap back to the Scene tab, select a new location to save your model in in the FMDL I/O section so you don't accidentally overwrite the template model and finally press Export fmdl
- Your model should be exported successfully. The texture the model uses is called head.dds and the texture the default chest/neck model face_high.fmdl uses is called face.dds. The Base Model Pack includes examples of both textures. These files are really the only things in the Base Model Pack you should change, everything else is ready by default. The functions of the rest of the template files are explained below but the blender part of the tutorial is done and you're free to test your model in PES
Base Model Pack Files
What the files in the Base Model Pack do and why they're included / why you might want to use them for your players
- hair_high.fmdl - The template head model used in the exporting tutorial. A default PES player's head fused together into one reference model with favorable properties ideal for template use
- face.dds - The texture used by face_high.fmdl
- face.fpk.xml - Required for the face folders in your aesthetics export, used to tell the compiler which model files to include for that player. This default one will include face_high.fmdl, hair_high.fmdl and face_diff.bin
- head.dds - The texture used by hair_high.fmdl and by extension any model ported with this method
- face_diff.bin - Controls the size and position of the default PES eyes and mouth. This one has them shifted deep underground so they'll never appear in play, perfect for custom head models where they would just be in the way
- face_high.fmdl - The default PES neck/chest model modified to work well with custom head models
- face_nrm/srm.ftex - Map textures used by both hair_high.fmdl and face_high.fmdl. Normal and Specular. These three are default blank maps giving your models a smooth and neutral appearance so using them without any changes is greatly recommended
Porting FBMs
Click here to expand
Preparation
PES19 FBM Base Model Pack - The medical staff model and a couple default textures you'll need during this part
Tutorial
Video Tutorial: https://drive.google.com/file/d/1mXKQ7o7a_kHUqiF0bEYe_ZRrFvHe4rjI/view?usp=sharing
- Make sure you grab the Base Model Pack as you'll need the medic FMDL bundled in there
- Open two fresh blender windows
- Import medical_staff_boots_reweighted.fmdl from the shaded folder into one, import your FBM to the other with PES model I/O. Make absolutely sure you use the pes-model-importer linked on this page when importing the FBM you want to port as the rest of this tutorial assumes you're using that. PES Mesh Tools and RigEx WILL NOT WORK by default.
- Copy the medic suit to the same blender window as your model
- Scale and position your model to match the imported medic model. The scale will already be correct if you imported with the recommended PES model I/O, positioning is going to vary so you'll have to eyeball this one.
- Once you're happy with the size and position of your model swap over to the second blender window with the medic model in it and select it
- Switch to Edit Mode, select the entirety of the medic model with A and drag it to the side
- Swap back to your primary window, select your model and copy it over to the second blender window
- Select the medic model, swap to the Data tab and next to the list of Vertex Groups click the black downwards triangle and select Delete All Groups
- In Object Mode first select your model, then with Shift held select the medic and press CTRL+J to join the two together
- Swap back to Edit Mode, press A until everything is de-selected and then select the entire medic model and delete it. Make sure you get every part of it to avoid stray bits floating off to the side of your actual model in-game
- Thanks to this maneuver your model has inherited all the properties of the medic model. This is a nice base setup and honestly everything you need in most cases. Some possible things you might want to change are listed in a completely separate section at the bottom of this page
- Finally swap back to the Scene tab, select a location to export to in the plugin's panel, change the filename to be boots.fmdl and click Export FMDL.
- Your model should successfully export. The main texture the model uses is called body.dds and a reference texture you can overwrite with yours is included in the Base Model Pack. There are some useful settings like transparency and backface culling you might want to check out detailed at the bottom of this page in a separate section.
- Once your model if exported and your texture is done you can test it in PES and hope it got over in one piece. Good luck
Completely New FBMs
Click here to expand
Preparation
PES19 FBM Base Model Pack - The medical staff model and a couple default textures you'll need during this part
Tutorial
Video Tutorial
- Make sure you grab the Base Model Pack as you'll need the medic FMDL bundled in there
- Open two fresh blender windows
- Import medical_staff_boots_reweighted.fmdl from the shaded folder into one, have your own model in the other. The contents of the shadeless folder will be relevant in the video tutorial soontm and have to do with model shading which is a topic separate from the scope of this text tutorial
- Copy the medic suit to the same blender window as your model
- Scale and position your model to match the imported medic model
- Once you're happy with the size and position with your model you might notice the pose is different compared to the medical staff. This is one of the main time sinks when doing FBMs as your model has to be bent into the PES A-pose to work in-game without any clever weight painting tricks. There's two ways to go about this:
- If your model came with a skeleton, select your model in Object Mode, go to the Modifiers tab, add an Armature and in the Object box select your model's skeleton. Now you can select the skeleton itself in Object Mode and swap to Pose Mode to easily pose your model using the skeleton it came with
- If your model didn't come with a skeleton, you're going to have to manually deform the model to fit the PES A-pose. This process is really best explained on video, but the basic approach is selecting a section that is not in the right pose (arm, leg most of the time), rotating and grabbing that selection until the selected part is a bit more in the correct shape and slowly working down into a smaller and smaller selection until your entire original selection matches the pose of the medical staff counterpart, Again, better explained on video soontm
- Once you're done scaling/positioning/posing, take another look at your model and make extra sure you've done all you can to make it align with the medical staff. Any extra effort put into this part will save you trouble in the weight painting section
- Once you're happy with the size, scale and pose of your model, select it in Object Mode, go to the Modifiers tab and select Apply
- Swap to the Data tab and and next to the list of Vertex Groups click the black downwards triangle and select Delete All Groups
- Select the medical staff model, then with Shift held select your model and swap to Weight Paint mode
- Press T to bring out the left side panel, click Transfer Weights, scroll down to the bottom of the subsection that pops up and change Source to By Name
- Blender has now done its best to copy the medical staff's weight painting and apply it to your model. This is why scale, positioning and pose are so important. The closer you can get your source model to the medical staff in all three aspects, the better the resulting transferred weight paint data
- Even with a perfect match between medic and source, there's likely going to be a couple parts you have to adjust by hand. Always give your model a once-over in Weight Paint mode by scrolling through the list of vertex groups and making sure nothing looks too far out of place. Here are some common weight transfer hiccups to look for:
- The medical staff doesn't have a head, so your model's head will be painted to a combination of head, neck and maybe chest. Fix this by selecting the entire head in Edit Mode, selecting sk_head in the list of vertex groups and clicking the Assign button. As always with weight painting, remember to swap to Weight Paint mode and click Normalize All in the left side panel any time you do any modifications to the paint
- The medical staff doesn't have hands either. Custom hands with proper movement would make this tutorial too long so they're going to be a separate section. For this tutorial, the best that can be done about hands is selecting them completely in Edit Mode and assigning them to their respective vertex groups (sk_hand_l, sk_hand_r)
- If your model has some loose bits of clothing, there's a chance parts of it are going to be painted to completely incorrect bones. This often happens with wide or droopy sleeves and wide skirts in general. If a sleeve is painted partially to a thigh or a skirt to an arm, you'll need to manually fix the paint. You can either:
- Select the part you want to fix in Edit Mode, select the vertex group it's incorrectly painted to, click Remove and then go to Normalize All
- Change to Weight Paint mode, set the Blend to Substract and paint the incorrect groups away, again using Normalize All after each change
- Once you're happy with the weight paint and have confirmed there's nothing obviously wrong with any of the vertex groups and their paint levels, swap over to the second blender window with the medic model in it and select it
- Switch to Edit Mode, select the entirety of the medic model with A and drag it to the side
- Swap back to your primary window, select your model and copy it over to the second blender window
- In Object Mode first select your model, then with Shift held select the medic and press CTRL+J to join the two together
- Swap back to Edit Mode, press A until everything is de-selected and then select the entire medic model and delete it. Make sure you get every part of it to avoid stray bits floating off to the side of your actual model in-game
- Thanks to this maneuver your model has inherited all the properties of the medic model. This is a nice base setup and honestly everything you need in most cases. Some things you might want to change are listed in a separate section at the bottom of this page
- Finally swap back to the Scene tab, select a location to export to in the plugin's panel, change the filename to be boots.fmdl and click Export FMDL.
- Your model should successfully export. The main texture the model uses is called body.dds and a reference texture you can overwrite with yours is included in the Base Model Pack. There are some useful settings like transparency and backface culling you might want to check out detailed at the bottom of this page in a separate section.
- Once your model if exported and your texture is done you can test it in PES and hope it got over in one piece. Good luck
Porting Koikatsu Models
Click here to expand
Preparation
A modern Blender version - The KKBP github page will tell you the minimum version number of blender required. This revision of the tutorial uses 3.4.1
KKBP - What makes this all work, used for exporting our model from Koikatsu and processing it in blender
CATS Blender Plugin - Required by KKBP
Material Combiner Addon - Required by CATS
KK-HF Patch - Required by KKBP
Koikatsu to PES bone renaming cheatsheet - Useful if you want to preserve Koikatsu weights for you model in PES and don't want to use the addon below for some reason
[OPTIONAL] KoikatsuToPES - Consider installing and running this Blender addon in place of manually renaming/weight mixing vertex groups using the above cheat sheet to save time
NOTE: All the github pages linked above have their own very good installation instructions, so this page will not cover how to install KK-HF or CATS for example, except for the following notes:
- KK-HF: If you have an existing Koikatsu installation, you can just download and install the KK-HF patch and not worry about anything. The Koikatsu repack used in this tutorial is RX7 which is coming up on 2 years out of date but installing the patch worked just fine and didn't wipe any existing cards for example
- Material Combiner Addon: The addon will likely tell you to install a python module it depends on the first time you want to use it. This is very simple and only requires you to press a button and restart blender, but be aware that at some point during your first Koikatsu character port you'll likely have to start over very late into the process
Tutorial
Video Tutorial
Read the KKBP github page, it's well written and they've simplified the steps a lot from the last revision of this tutorial so there's no real point in trying to rewrite the whole thing on this page. Instead, here's some notes on the github steps from personal experience:
- Exporting from Blender steps 2 and 3: If you want to use the KK2PES vertex group renamer set the dropdowns for this section to No changes (FAST) and Generic FBX - No changes. This'll also be much faster in KKBP compared to the defaults
- Exporting instructions step 6: This is completely optional, you don't need both atlases so simply pick your style and generate whichever atlas you prefer the first time around
Once you've exported your FBX the rest is just a regular FBM porting process. Refer to the FBM tutorial if you haven't ported an FBM before or need a refresher.
Porting MMD Models
This isn't so much a tutorial as it is a blender addon that will make the process much easier, though there is some useful information in the Usage section of the GitHub page. If you lack some knowledge, see the tutorials for Completely New FBMs and Custom Hand Models.
Porting WWE2K Models
This guide assumes you have some knowledge of blender and the PES porting process, if there's anything you don't know then see the tutorial for Completely New FBMs and if you want articulated hands then check out the tutorial for Custom Hand Models.
Shadelessness and Outlines
Click here to expand
Preparation
Template Pack
Tutorial
Video Tutorial: https://drive.google.com/file/d/1c-9mcB_ltIph3HQNWpW2hYBBP_aSH_Yl/view?usp=sharing - Skip the part with the texture gamma adjust, that's no longer relevant with the improved shaders. Everything else is still valid
- Import the model you want to turn shadeless into a fresh Blender window
- The following steps are for making an outline for your model. If you only want the shadelessness skip to the separated section at the end
- Select everything in Edit, press Shift-D to duplicate and Right Click to drop the duplicated part in place
- Press P -> By Selection to separate the duplicated part into its own mesh
- In Object Mode hide everything but your duped mesh
- It is recommended you swap to Edit Mode and delete minor details like eyebrows and eyes that don't really benefit from having an outline and that might actually cause more problems with the outline
- Select everything, press Space -> search for Remove Doubles and run it
- Press Alt+S and input 0.003 for a nice default value or experiment with values of your own if you've done a couple already
- Press Ctrl+Shift+N to flip the normals
- N to open the side panel, toggle normals on with 0.01 size and check that nothing is sticking through the surface. Pay close attention to the area around the mouth and eyes and either flip or delete any offending faces if you want to get rid of all possible imperfections
- Map the UV to any black spot in the texture so the entire mesh is black (or the colour you want the final outline to be)
- Import the template hair_high.fmdl into a second fresh Blender window
- Swap your Viewport Shading to Solid (press Z until the mesh is not a wireframe)
- Use the lighter part for your actual model and the darker part for your outline when exporting so you get the correct settings for both
- Export your model, the texture for both head model and outline will be called head.dds. The model does not require any other textures
Static Models
Click here to expand
The kind that glide around on the field stuck in the pose they were exported from blender in. No preparation or anything for this but knowing how to get models out of blender and into PES is required.
- Have the model you want at least a part of as static in blender ready to be exported into an FMDL. The only thing that's going to be covered here is how to make a model or a part of it static
- Go to the Data tab and add a new vertex group. You can name this group whatever you want as long as it's not a valid PES bone name. Omitting the dsk/sk-prefix, calling the group static and so on are valid options for naming
- Change to Edit Mode and select everything you want to have as static. This can be the entire model or only a part of it, anything you have selected will become static and everything that's unselected will still move as normal
- Once you're happy with your selection make sure you have your new vertex group selected and press Assign in the Vertex Groups box
- Swap to Weight Paint Mode, press T to bring out the left sidebar and press Normalize All to normalize the weights and make sure that your entire selection really is fully assigned to the static bone
- Export your model and the parts you assigned to the static bone should be static ingame
Custom Hand Models
Click here to expand
Preparation
Template Pack - The FBM template now has files for hands as well
Tutorial
Video Tutorial
First of all, when working on posing your FBM to match the medical staff you should also copy both glove FMDLs from the template pack to your working window and try to line up your model's hands with the PES ones. There's a good chance you'll have to stretch out the arm and make your model's hands bigger to achieve this but some of the damage can be fixed later in PES with physique sliders. Just like how the rest of your model should be decently lined up with the medical staff to make weight painting that much easier and to enable it to move correctly in PES, lining up the hands is even more important because the hand has so many moving parts crammed into such a small space. The step-by-step part will focus on what to do with your custom hands after you're done posing your model.
- Swap to Edit Mode, select your model's hands and separate them into their own mesh with P -> Selection
- Swap back to Object Mode, select the mesh that now only has your hands, go back to Edit Mode, select only one of the hands this time and separate it further into its own mesh with P -> Selection
- Swap back to Object Mode, select only one of your hand meshes and import the corresponding glove file from the template pack into another blender window
- Copy your hand into the secondary blender window, make sure you have it selected, go to the Data tab, click the black downwards triangle to the right of the list of vertex groups and select Delete All Groups
- Swap to the Material tab and keep pressing the - button to the right of the list of materials until all of the materials have been deleted
- Select your custom hand model, then with Shift held select the template hand, swap to Weight Paint mode, press T to bring out the left sidebar and press Transfer Weights
- Change back to Object Mode, select the template hand, change to Edit Mode, select everything with A and drag the hand to the side so that it's out of the way for the next steps
- Change back to Object Mode, select your custom hand and change to Weight Paint mode
- Swap to the Data tab and select the first vertex group in the list to have the skh_ prefix
- For each vertex group take a close look at your mesh and where the weight paint is. If you notice the paint bleeding over to the neighbouring fingers set your weight painting Blend mode to Subtract and erase the paint from the fingers it doesn't belong to. DO NOT Normalize All after each modification, this is one of the few scenarios in the PES workflow where it's better to wait before normalizing
- Work your way down the list of vertex groups until you've fixed the paint bleeding on all of them. Once you're done with the last group select sk_forearm_r/sk_forearm_l in the list of vertex groups and click Normalize All
- Change to Edit Mode, make sure nothing is selected, press Spacebar and type in Select Underweighted Vertices. If no vertices got selected you can move on to the next step. The vertices the tool selected have 0 weight and blender wasn't able to normalize them so we have to paint them manually. Scroll through the list of vertex groups in Weight Paint mode until you find the one they should belong to and paint them to it. You might have multiple 0-weights and they might be in different fingers, make sure to fix all of them accordingly
- Change back to Object Mode, select your mesh and then with Shift held select the template hand you moved to the side previously and press Ctrl+J to join the meshes together
- Change to Edit Mode, select the template hand without having any of your custom hand selected and delete it with X -> Vertices
- The hand is now ready to be exported. If you want you can change the PES-related settings under the Material and Texture tabs
- Repeat the same steps for the other hand until done
Stadiums
The aesthetics compiler won't save you now.
Click here to expand
Model Settings
Also known as getting around pes-fmdl.
Click here to expand
Texture Settings
If you swap to the Texture tab in blender you'll see a list of textures your currently selected mesh uses. The values that matter for exporting are in the FMDL Texture Settings section, and each of them is detailed below:
- Role: The role of the relevant texture, such as Base_Tex_SRGB for diffuse maps and NormalMap_Tex_NRM for normal maps. There's usually no need to change this unless you're changing shaders in which case the textures and their roles for the new shader should be detailed somewhere.
- Filename: The filename of the texture the mesh will use. The file extension should be .dds always even if PES18+ textures are .ftex files.
- Directory: The location of the texture the mesh will use. Template models will have this set to a sensible value and the Aesthetics Compiler will change any player IDs in the path when needed so there's rarely any need to change this.
Material Settings
This is where the shader and technique of the mesh are defined. For a list of shaders/techniques and all the other settings required to use them properly can be found on the Fox Shaders page.
Transparency and Shadow
If you swap to the Data tab you should be able to find a section called FMDL mesh settings with two values. These control the shadow and alpha settings of the selected mesh. As with the shaders themselves, the alpha and shadow values that work with them are detailed on the Fox Shaders page.
Making your own head
Everyone has their own way of making stuff. Here is just one example.
Click here to expand
Video link
A video example on how to make a head
Starter Kit
A zip file that has everything you need to make your own head, including:
- A mirrored head model
- CM3D2 hair styles
- Head FMDL that hides the PES head
- Boot FMDL, the final product from the video
Link to zip file
Custom Character Models
How to make an entire character model from scratch
Click here to expand
Video link
Playlist with all 11 VODs
Resources
(Hopefully) everything used or referenced in the series
- Daniel Kreuter's 2014 character modelling tutorial #2 - Referenced several times and the way I learned how to 3D model. Great alternative if you want short-form piecemeal episodes instead of long VODs. Channel has newer tutorials for newer blenders as well but I haven't personally watched those
- Resources - Contains the final .blend shown in the VODs, both the character reference sheet and the hand reference used and all textures including .clip files in case someone happens to have Clip Studio Paint instead of using something like Photoshop or Substance Painter
- Just the hand reference - Taken from Daniel's video series above, used for this series because it's still the best hand reference I've found
Misc
Finding Models
The most difficult part of making aesthetics, finding the perfect source model. Be it for the cute girl from that niche anime about 3 people in Japan watched or for the main character from that one video game that is unrippable and nobody in the west can re-create 3d models for, chances are you will eventually run into problems trying to find a usable model for your next project. Sometimes they just don't exist, sometimes you're just not looking hard enough, so this page will list resources and hints to enhance your model-hunting capacities.
Here's how you generally want to go about looking for source models. I'll split everything into a couple sections so you can better focus on exactly what sort of models you want.
General
- Google - Just Google it, this is the universal rule for looking for 3d models. If it's a named character of any sort search for "<character name>" 3D as a generic search term, or "<character name>" MMD with both the English name and the Japanese name for anime characters or characters that might possibly have a big enough Japanese following to spawn MMD recreations. Keep the quotation marks, they make it so that exact phrase in that exact order has to appear in the search result which is what we want. For non-named characters and just about everything else just searching "<generic descriptor>/<generic name>" 3D should give you some results but checking specific sites listed further in this tutorial might be a better choice.
Anime
Even though the previous section mostly covered googling anime models, there's still some specific sites you can focus on. Googling is still recommended but if any of these pop up in the search results they're always worth checking first.
- nicovideo.jp - Some MMD video creators link their source models in the video description, and some password-protected models might even make you watch the video to figure out the password. The main nico site doesn't host the 3d models itself but it's a great way of finding models that wouldn't otherwise show up in your search results.
- 3d.nicovideo.jp - Completely different from the main nicovideo, this is their own 3D model repository that might have some cool MMD stuff easily accessible. You need a nico account to be able to download models and you need to navigate your way around a site entirely in moonrunes, but that's what looking for anime models really is.
- bowlroll.net - The main page has a nice collection of mostly MMDs, but realistically you'll end up straight to a model page either from Google or from a niconico MMD video. Probably the most used MMD dl site, good luck trying to figure out the passwords since most of the models are protected due to Nip paranoia.
- deviantart.com - Deviantart is a surprisingly robust source of weeaboo models. You might be able to find something using the site's own search function, otherwise use google with this search site:deviantart.com "<character name> 3d" and replace the 3d with MMD for another set of possible results.
- sketchfab.com - When you're starting to get desperate, Sketchfab has a small community of anime model creators but good luck trying to find someone willing to share their precious models.
- The Seven Seas - Get on nyaa or your alternative tracker of choice and search for MMD. Sort by filesize and you should find some model packs just fine. Also grab these two from personal collections and read the big pastebin courtesy of /e/'s MMD thread. /e/'s thread is also a good place to possibly find some models that have been pulled from distribution, just mind the rules and don't bother people too much if you end up spending time there.
Video Games
- Adams Archive - This sheet contains a ton of links for the rips of many popular games, in addition to extraction guides and useful software (check the tabs at the bottom).
- mega folder - This archive contains assets from a few other popular games, mainly FPS games.
- models-resource.com - Your go-to for game rips, the site is entirely founded on people posting models ripped from video games. It's pretty comprehensive and your best chance of finding anything especially for retro stuff, but might be lacking in more modern releases.
- p3dm.ru - Click the Russian flag and then the second option and you can actually read most of the site. In true Russian fashion most of it is army stuff ripped from vidya but if that's your thing this is a treasure trove.
- xnalara.deviantart.com - All hail Xnalara. In addition to a decent collection of MMDs Deviantart also boasts a huge amount of stuff in the Xnalara file format. Mostly game rips ranging from characters and vehicles to everyday props. Same google trick works here as well, just search site:deviantart.com "<model> Xanalara" or site:deviantart.com "<model> XPS". You'll need this plugin for importing XPS to Blender.
- PS1 games - Most 3D PS1 games utilize the TMD model format (sometimes packed within archives, much like PES CPKs). If you do find a .tmd model on a game disc, it can be converted using TMD2LWO (a command-line-only program) into an LWO model, which can then be converted into the format of your choosing. Your mileage may vary.
Everything
For sites that have a little bit of everything and don't specialize in anything, especially good if you're looking for CAD stuff or western models or props of some sort.
- grabcad.com - CAD model heaven, usually really high-quality stuff if you happen to find what you're looking for here. Beware though, most of the time you'll either have to bake the material colours into a texture or possibly even make your own texture from scratch, this is the downside of CAD but luckily solid-colour textures will work fine for these sorts of models.
- 3dwarehouse.sketchup.com - Probably the biggest dump of 3d models on this list, you can find absolutely anything here but the tradeoff is that everything's in the Sketchup format and mostly low-poly and really shit-looking. Good texturework can mitigate the low-poly look but that means you have to do extra work. Still, if you want an inanimate object as your model there's a 99% chance you'll find it here. You'll also need to download the Sketchup software to convert the models you download. With this version you should download SketchUp 2016 Model or older when prompted on the site.
- sketchfab.com - Already mentioned in the anime section, Sketchfab is another site where you have a bit of everything and in extremely high quality. Problem is people don't have to share their models and it's more like a portfolio than a model sharing site. There's a way to rip any model off the site though but that's a whole another topic.
- blendswap.com - Entirely for stuff made in Blender and as usual everything goes. Everything is licensed under a form of Creative Commons which to us means everything is freely downloadable as long as you make a blendswap account, giving credit be damned. Usually pretty high-quality as well since almost everything is made from scratch by either enthusiasts or professionals.
- About a million other sites - The above 4 are just my go-to picks. Google will give you several pages of results no matter what, and even though sites like turbosquid host paid models some might still be free and decently usable so if the first 4 fail go digging deep. One neat trick is using image search instead of web search on Google to get a sneak peek of the models themselves so you know what you're going in for.
Converting Models
Once you've found your model you're probably going to face another equally annoying problem. It's probably in a fuck-off weird format the creator for some reason prefers above literally anything else. The SketchUp software for converthing their models to something actually usable is already linked above but here's some pointers and software for other filetypes as well.
- Easy solution, get 3ds Max - Max is fully featured and a pain in the ass for someone who has only ever used Blender, but the one thing it does well is handling just about any filetype without a problem. This is the version I have, you might be able to find an alternative download off a site somewhere.
- Freecad - A CAD modeling software that can also convert some of the most used CAD formats to .obj
- Noesis - Download Documentation - A program that can import and export hundreds of different (3D model) file formats.
- Google - Your best friend once more, if you google "<format>" import Blender you'll probably find a result either in stackexchange or Blenderartists talking about an importer plugin and how to install it. Github is also a possible source. Otherwise there probably isn't a plugin for Blender and you're out of luck.
- Ask someone else - There's several people in /aesco/ who already have 3ds Max installed for this specific purpose and if you're nice and persistent enough someone will take your model and run it through the conversion machine.
Useful shortcuts in Blender
See Blender shortcuts.
More in-depth list
Recommended Reading
Things not fully covered here (at least yet) that are also worth reading for a better understanding of how some things work.
- Aesthetics Export - Learning how to make an aesthetics export is a basic skill anyone who plans on making a team or contributing aesthetics to a team should know how to do. Also includes a download link to the aesthetics compiler which will save you some time when testing aesthetics over manually compiling a full-path CPK every time.
PES 16/17
- Setting Up .model Files - Details the different parts and values of both the model-loading XMLs and the MTLs associated with them.
- FPC and APC - If you somehow made it all the way here without reading one or both, congratulations, go read them since even for someone who doesn't actually do FBM models or aesthetics at all at least learning how to apply the correct settings and hide bits of your players is important since every cup several managers fail to do this simple task, thus piling more work on /aesco/ who have to fix it all.

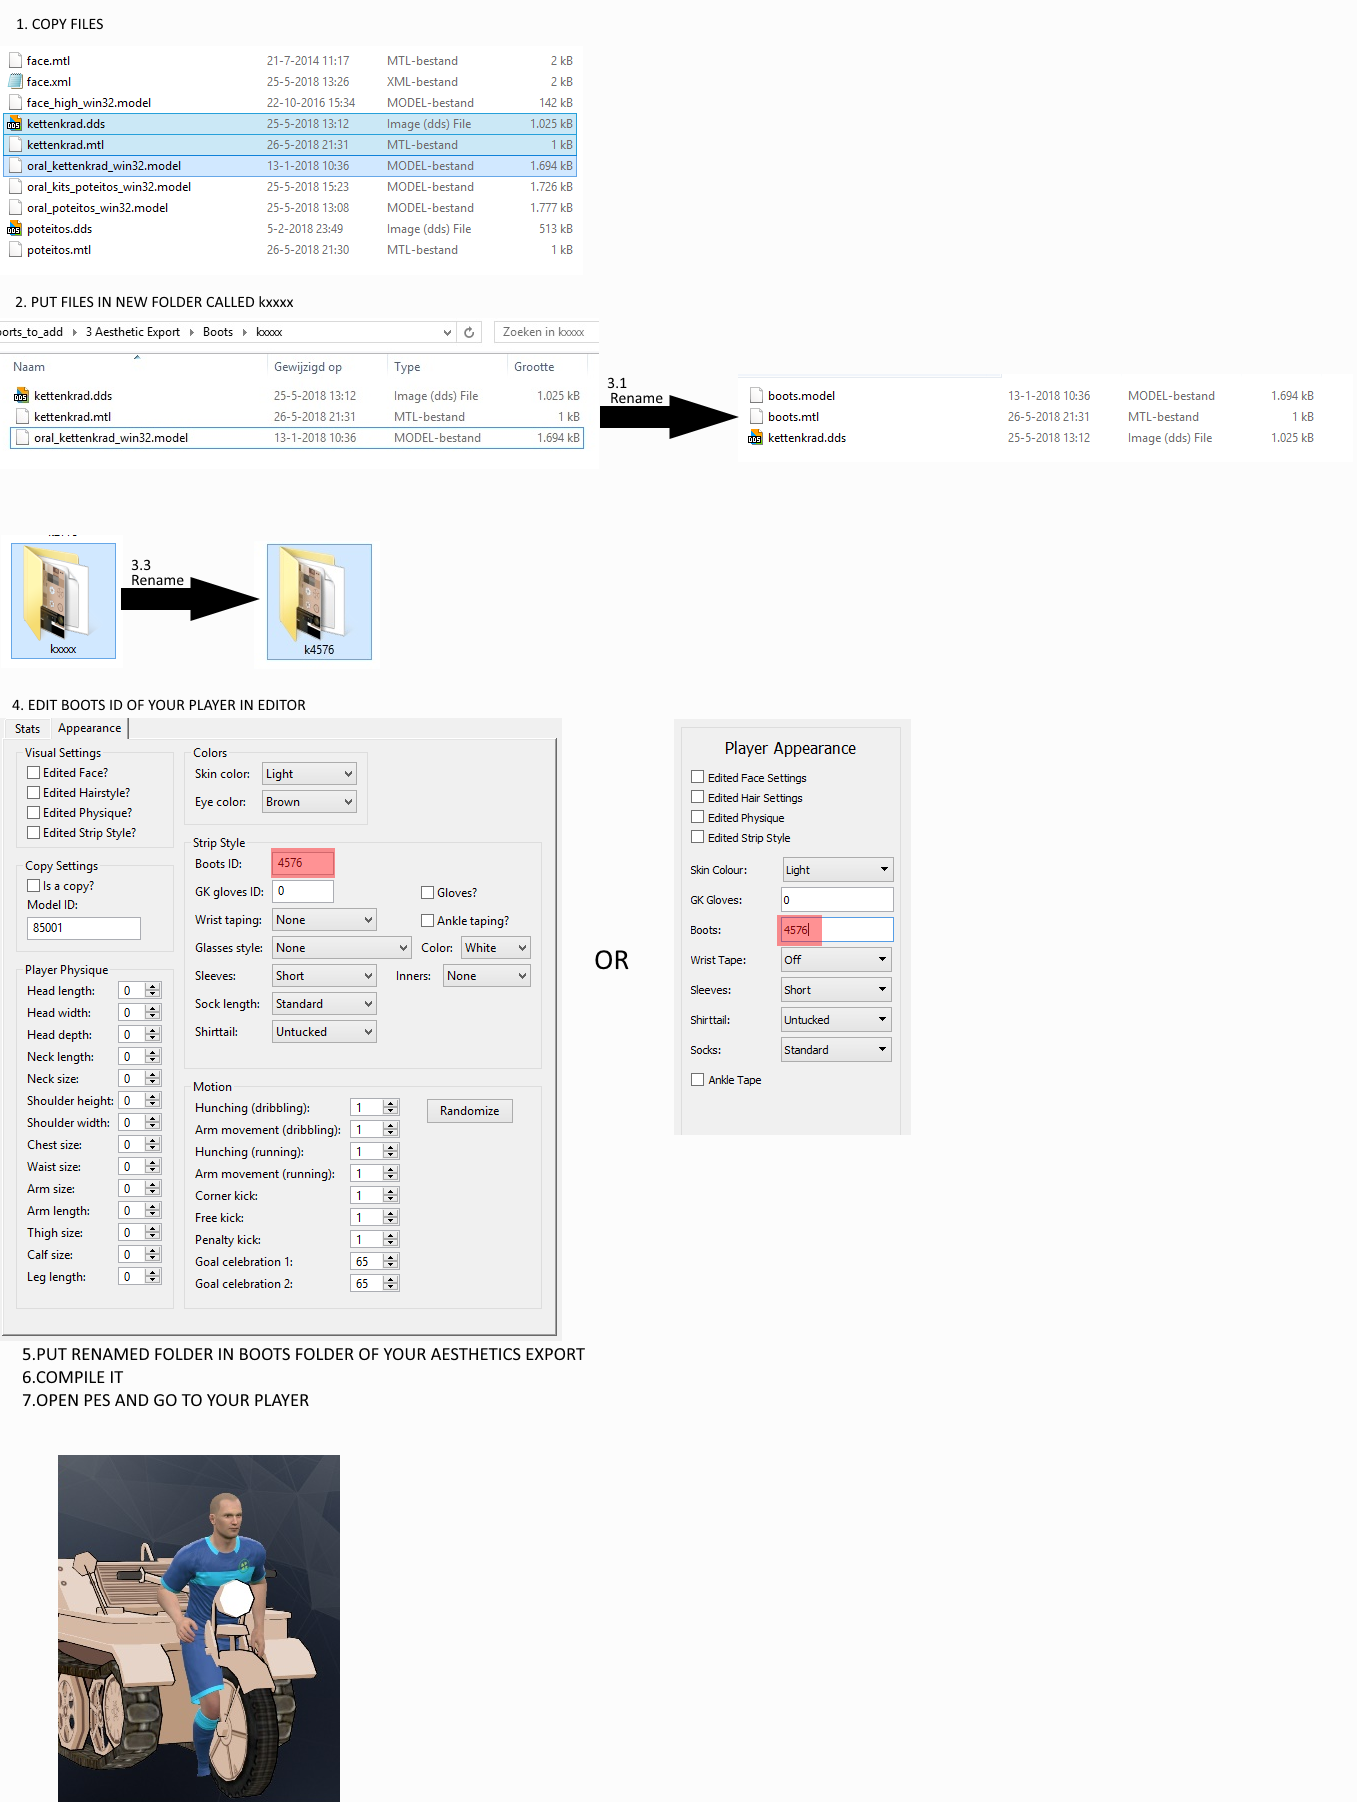