| The logo poll for the 2025 4chan Spring Babby Cup is now open. | ||
| You can vote here. Logos are in this gallery. | ||
|
| ||
Difference between revisions of "Pro Evolution Soccer 2015/Boots"
m |
(Just saving.) |
||
| Line 1: | Line 1: | ||
{{Template:Pes2015 TOC}} | {{Template:Pes2015 TOC}} | ||
''This page is currently under (re)construction.'' | |||
=Introduction= | |||
This page will explain how custom boots can be created and imported into PES15. The first section will contain where the boots and their textures are located and how these textures are built up. The second section will contain information on how new boots are put ingame. The third section is the Notes and Help section. The fourth section is the Tools/Download section. The fifth and last section is a list with allocated slots for new and existing boots. | |||
= | =Making your boots= | ||
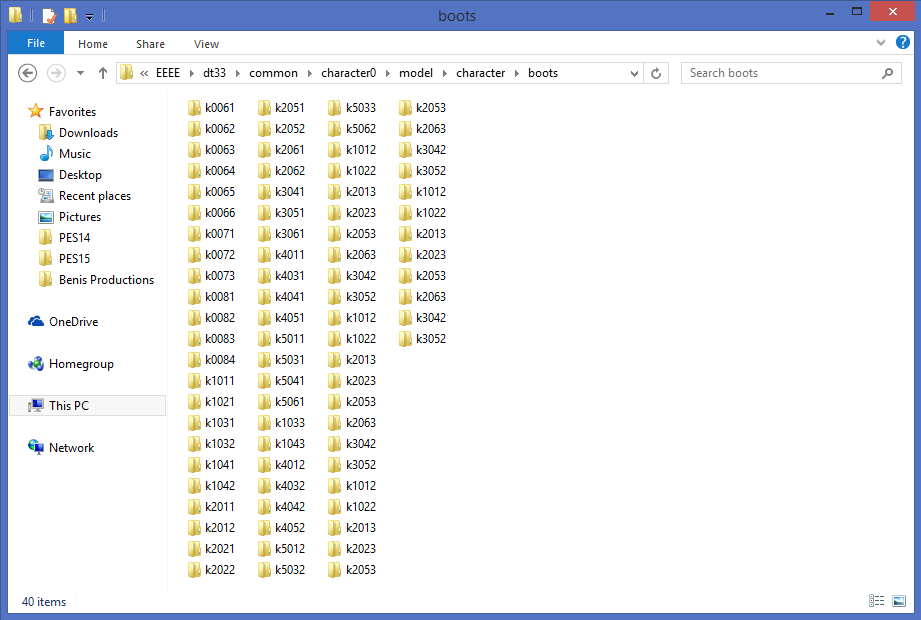
All boots in PES15 are located in ''(dt33.cpk)\common\character0\model\character\boots''. Newer boots can be found at the same location in the DLC. All boots have their own folder. Because it is (still) impossible to model your own boots you'll have to use existing boots to work from. So go into the game and try to find the boots you like and want to use as base for your new shoes. Now remember the preview image and look for it in the image below. | |||
= | [[File:Boots everywhere|framed|none|DLC 4.00]] | ||
Remember the first 5 characters and look for the boots folder with the same name starting with the newest DLC. As soon as you have found the folder, make a new folder somewhere and copy all the files from the original boot folder into the new folder. Your new folder should look something like this (it's also how a normal complete boots folder looks like): | |||
[[File:Boots folder|none]] | |||
=Getting the boots into the game= | |||
The image below is used as guide for the sections 'Previews' and 'Boots.bin'. | |||
''<image coming soon>'' | |||
==Previews== | |||
Although preview images are not a requirement it is still advised to make them to help yourself and others find it ingame. The boot preview images can be found in ''(dt15.cpk)\common\render\thumbnail\spike''. Newer boots can be found at the same location in the DLC. Unlike the boot models all the preview images are in one big folder. | |||
==Boots.bin== | |||
The ''Boots.bin'' is the file that contains all the boots in the game. Each pair of boots has an entry in this file with the boot ID, slot, name, materials and color. | |||
The Boots.bin can be found in ''(dt10.cpk)\common\etc\pesdb''. Newer Boots.bin can be found at the same location in the DLC. When you want to compile boots always look for and use the newest Boots.bin you can find. | |||
==Installing the boots== | |||
To test your new boots you'll have to put them into DLC to test them. For more information on how to install DLC please read [[Pro Evolution Soccer 2015/DLC]]. When you have done all steps above correctly you should have various files divided over 3 folders. These will go to the following locations: | |||
* Boots models, textures and the .mtl files will go into: ''\common\character0\model\character\boots\k<ID>''. | |||
* Boots preview images will go into: ''\common\render\thumbnail\spike''. | |||
* Boots.bin will go into: ''\common\etc\pesdb''. | |||
Now just pack everything into a .cpk and go ingame to test it. | |||
=Notes and Help= | |||
* To test your boots you don't have to necessarily make a new entry in the ''Boots.bin''. Just overwrite an existing pair of boots but make sure to update all the IDs afterwards for the [[Pro Evolution Soccer 2015/AET|Aaesthetic Export]]. | |||
=Tools= | |||
* PES 2013 Decrypter: https://drive.google.com/file/d/0B0TwHGHvKz8TcG5tb1cwZFpLUGs/view?usp=sharing | |||
* Jenkey's File Explorer: https://drive.google.com/file/d/0B0TwHGHvKz8TM2JVTkRkMGdaZjA/view?usp=sharing | |||
=Allocated boots= | |||
==New boots== | |||
{| class="wikitable sortable" | |||
|- | |||
! Ingame slot !! Boot ID !! Team | |||
|- | |||
| 8 || 1013 || Standard PES | |||
|- | |||
| 9 || 1012 || Standard PES | |||
|- | |||
| 10 || 1011 || Standard PES | |||
|- | |||
| 18 || 1023 || Standard PES | |||
|- | |||
| 19 || 1022 || Standard PES | |||
|- | |||
| 20 || 1021 || Standard PES | |||
|- | |||
| 27 || 1034 || Standard PES | |||
|- | |||
| 28 || 1033 || Standard PES | |||
|- | |||
| 29 || 1032 || Standard PES | |||
|- | |||
| 30 || 1031 || Standard PES | |||
|- | |||
| 37 || 1044 || Standard PES | |||
|- | |||
| 38 || 1043 || Standard PES | |||
|- | |||
| 39 || 1042 || Standard PES | |||
|- | |||
| 40 || 1041 || Standard PES | |||
|- | |||
| 47 || 2014 || Standard PES | |||
|- | |||
| 48 || 2013 || Standard PES | |||
|- | |||
| 49 || 2012 || Standard PES | |||
|- | |||
| 50 || 2011 || Standard PES | |||
|- | |||
| 57 || 2024 || Standard PES | |||
|- | |||
| 58 || 2023 || Standard PES | |||
|- | |||
| 59 || 2022 || Standard PES | |||
|- | |||
| 60 || 2021 || Standard PES | |||
|- | |||
| 67 || 2054 || Standard PES | |||
|- | |||
| 68 || 2053 || Standard PES | |||
|- | |||
| 69 || 2052 || Standard PES | |||
|- | |||
| 70 || 2051 || Standard PES | |||
|- | |||
| 77 || 2064 || Standard PES | |||
|- | |||
| 78 || 2063 || Standard PES | |||
|- | |||
| 79 || 2062 || Standard PES | |||
|- | |||
| 80 || 2061 || Standard PES | |||
|- | |||
| 88 || 3043 || Standard PES | |||
|- | |||
| 89 || 3042 || Standard PES | |||
|- | |||
| 90 || 3041 || Standard PES | |||
|- | |||
| 98 || 3053 || Standard PES | |||
|- | |||
| 99 || 3052 || Standard PES | |||
|- | |||
| 100 || 3051 || Standard PES | |||
|- | |||
| 109 || 3062 || Standard PES | |||
|- | |||
| 110 || 3061 || Standard PES | |||
|- | |||
| 119 || 4012 || Standard PES | |||
|- | |||
| 120 || 4011 || Standard PES | |||
|- | |||
| 129 || 4032 || Standard PES | |||
|- | |||
| 130 || 4031 || Standard PES | |||
|- | |||
| 139 || 4042 || Standard PES | |||
|- | |||
| 140 || 4041 || Standard PES | |||
|- | |||
| 149 || 4052 || Standard PES | |||
|- | |||
| 150 || 4051 || Standard PES | |||
|- | |||
| 159 || 5012 || Standard PES | |||
|- | |||
| 160 || 5011 || Standard PES | |||
|- | |||
| 168 || 5033 || Standard PES | |||
|- | |||
| 169 || 5034 || Standard PES | |||
|- | |||
| 170 || 5032 || Standard PES | |||
|- | |||
| 179 || 5062 || Standard PES | |||
|- | |||
| 180 || 5061 || Standard PES | |||
|- | |||
| 190 || 5041 || Standard PES | |||
|- | |||
| 200 || 0061 || Standard PES | |||
|- | |||
| 201 || 0062 || Standard PES | |||
|- | |||
| 202 || 0063 || Standard PES | |||
|- | |||
| 203 || 0064 || Standard PES | |||
|- | |||
| 204 || 0065 || Standard PES | |||
|- | |||
| 205 || 0066 || Standard PES | |||
|- | |||
| 210 || 0071 || Standard PES | |||
|- | |||
| 211 || 0072 || Standard PES | |||
|- | |||
| 212 || 0073 || Standard PES | |||
|- | |||
| 220 || 0081 || Standard PES | |||
|- | |||
| 221 || 0082 || Standard PES | |||
|- | |||
| 222 || 0083 || Standard PES | |||
|- | |||
| 223 || 0084 || Standard PES | |||
|- | |||
| 253 || ? || {{team away|pol}} | |||
|- | |||
| 254 || ? || {{team away|gd}} | |||
|- | |||
| 255 || 0042 || {{team away|mlp}} | |||
|} | |||
---- | |||
'''Old''' | |||
=Boot Textures= | |||
Firstly, you will want to download a generic boot folder to begin your design on. | Firstly, you will want to download a generic boot folder to begin your design on. | ||
| Line 68: | Line 261: | ||
'''Thumbnail files go here:''' ''[Your DLC Name]\common\render\thumbnail\spike'' | '''Thumbnail files go here:''' ''[Your DLC Name]\common\render\thumbnail\spike'' | ||
*'''IMPORTANT:''' You must rename your files so they match the folder name that you chose above. For | *'''IMPORTANT:''' You must rename your files so they match the folder name that you chose above. For , if you choose the folder named k0063, your thumbnail files must be renamed to k0063_l and k0063_t. | ||
[[File: List of Boot Files.png]] | [[File: List of Boot Files.png]] | ||
| Line 77: | Line 270: | ||
Will need to be discussed with {{anonymous|Test Pony}} before anything is final, but if you want feel free to reserve a spot in advance if you've managed to successfully import your boots. | Will need to be discussed with {{anonymous|Test Pony}} before anything is final, but if you want feel free to reserve a spot in advance if you've managed to successfully import your boots. | ||
Revision as of 20:51, 16 March 2015
| ||||||||||
This page is currently under (re)construction.
Introduction
This page will explain how custom boots can be created and imported into PES15. The first section will contain where the boots and their textures are located and how these textures are built up. The second section will contain information on how new boots are put ingame. The third section is the Notes and Help section. The fourth section is the Tools/Download section. The fifth and last section is a list with allocated slots for new and existing boots.
Making your boots
All boots in PES15 are located in (dt33.cpk)\common\character0\model\character\boots. Newer boots can be found at the same location in the DLC. All boots have their own folder. Because it is (still) impossible to model your own boots you'll have to use existing boots to work from. So go into the game and try to find the boots you like and want to use as base for your new shoes. Now remember the preview image and look for it in the image below.
Remember the first 5 characters and look for the boots folder with the same name starting with the newest DLC. As soon as you have found the folder, make a new folder somewhere and copy all the files from the original boot folder into the new folder. Your new folder should look something like this (it's also how a normal complete boots folder looks like):
Getting the boots into the game
The image below is used as guide for the sections 'Previews' and 'Boots.bin'.
<image coming soon>
Previews
Although preview images are not a requirement it is still advised to make them to help yourself and others find it ingame. The boot preview images can be found in (dt15.cpk)\common\render\thumbnail\spike. Newer boots can be found at the same location in the DLC. Unlike the boot models all the preview images are in one big folder.
Boots.bin
The Boots.bin is the file that contains all the boots in the game. Each pair of boots has an entry in this file with the boot ID, slot, name, materials and color. The Boots.bin can be found in (dt10.cpk)\common\etc\pesdb. Newer Boots.bin can be found at the same location in the DLC. When you want to compile boots always look for and use the newest Boots.bin you can find.
Installing the boots
To test your new boots you'll have to put them into DLC to test them. For more information on how to install DLC please read Pro Evolution Soccer 2015/DLC. When you have done all steps above correctly you should have various files divided over 3 folders. These will go to the following locations:
- Boots models, textures and the .mtl files will go into: \common\character0\model\character\boots\k<ID>.
- Boots preview images will go into: \common\render\thumbnail\spike.
- Boots.bin will go into: \common\etc\pesdb.
Now just pack everything into a .cpk and go ingame to test it.
Notes and Help
- To test your boots you don't have to necessarily make a new entry in the Boots.bin. Just overwrite an existing pair of boots but make sure to update all the IDs afterwards for the Aaesthetic Export.
Tools
- PES 2013 Decrypter: https://drive.google.com/file/d/0B0TwHGHvKz8TcG5tb1cwZFpLUGs/view?usp=sharing
- Jenkey's File Explorer: https://drive.google.com/file/d/0B0TwHGHvKz8TM2JVTkRkMGdaZjA/view?usp=sharing
Allocated boots
New boots
| Ingame slot | Boot ID | Team |
|---|---|---|
| 8 | 1013 | Standard PES |
| 9 | 1012 | Standard PES |
| 10 | 1011 | Standard PES |
| 18 | 1023 | Standard PES |
| 19 | 1022 | Standard PES |
| 20 | 1021 | Standard PES |
| 27 | 1034 | Standard PES |
| 28 | 1033 | Standard PES |
| 29 | 1032 | Standard PES |
| 30 | 1031 | Standard PES |
| 37 | 1044 | Standard PES |
| 38 | 1043 | Standard PES |
| 39 | 1042 | Standard PES |
| 40 | 1041 | Standard PES |
| 47 | 2014 | Standard PES |
| 48 | 2013 | Standard PES |
| 49 | 2012 | Standard PES |
| 50 | 2011 | Standard PES |
| 57 | 2024 | Standard PES |
| 58 | 2023 | Standard PES |
| 59 | 2022 | Standard PES |
| 60 | 2021 | Standard PES |
| 67 | 2054 | Standard PES |
| 68 | 2053 | Standard PES |
| 69 | 2052 | Standard PES |
| 70 | 2051 | Standard PES |
| 77 | 2064 | Standard PES |
| 78 | 2063 | Standard PES |
| 79 | 2062 | Standard PES |
| 80 | 2061 | Standard PES |
| 88 | 3043 | Standard PES |
| 89 | 3042 | Standard PES |
| 90 | 3041 | Standard PES |
| 98 | 3053 | Standard PES |
| 99 | 3052 | Standard PES |
| 100 | 3051 | Standard PES |
| 109 | 3062 | Standard PES |
| 110 | 3061 | Standard PES |
| 119 | 4012 | Standard PES |
| 120 | 4011 | Standard PES |
| 129 | 4032 | Standard PES |
| 130 | 4031 | Standard PES |
| 139 | 4042 | Standard PES |
| 140 | 4041 | Standard PES |
| 149 | 4052 | Standard PES |
| 150 | 4051 | Standard PES |
| 159 | 5012 | Standard PES |
| 160 | 5011 | Standard PES |
| 168 | 5033 | Standard PES |
| 169 | 5034 | Standard PES |
| 170 | 5032 | Standard PES |
| 179 | 5062 | Standard PES |
| 180 | 5061 | Standard PES |
| 190 | 5041 | Standard PES |
| 200 | 0061 | Standard PES |
| 201 | 0062 | Standard PES |
| 202 | 0063 | Standard PES |
| 203 | 0064 | Standard PES |
| 204 | 0065 | Standard PES |
| 205 | 0066 | Standard PES |
| 210 | 0071 | Standard PES |
| 211 | 0072 | Standard PES |
| 212 | 0073 | Standard PES |
| 220 | 0081 | Standard PES |
| 221 | 0082 | Standard PES |
| 222 | 0083 | Standard PES |
| 223 | 0084 | Standard PES |
| 253 | ? | |
| 254 | ? | |
| 255 | 0042 |
Old
Boot Textures
Firstly, you will want to download a generic boot folder to begin your design on.
You can download this here.
When you extract this .rar and open it and enter the Boots folder, then you will find these files below:
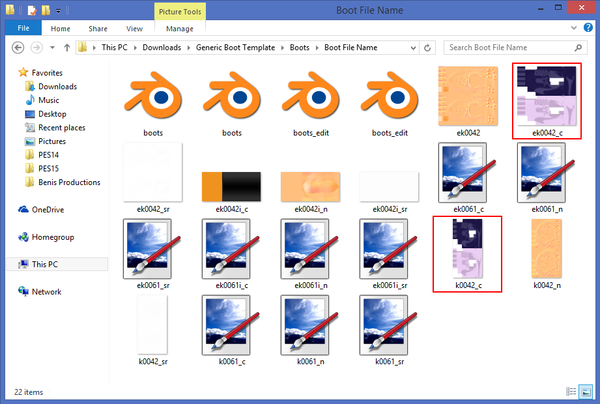
The only files you will need to touch are 'k0042_c' and 'ek0042_c'. k0042_c is the texture for the boot in game, whereas ek0042_c is the texture for the boot preview. ek0042_c is simply a stretched version of k0042_c, so you will only need to texture k0042_c. When you are finished, you can then copy and paste your k0042_c design over to ek0042_c and transform it into the correct dimensions, so we will worry about that later when the time comes.
Getting Started
k0042_c
To begin, open up the file k0042_c. Unless you plan on having asymmetrical boots like /mlp/, just focus on one boot for now. You can copy and paste it over later.
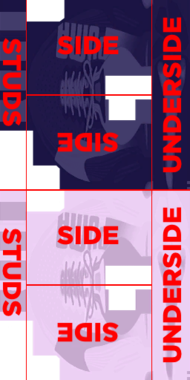
Below here is a diagram with all the different sections of the boot.
As you can see, there are certain parts of the image that are transparent. These parts are important, so you will want to start designing your boot on a different layer so you can go back to original image and use these transparent parts later. Since this is the case, don't be afraid to design over these transparent gaps in the meantime since we will edit them out in the end.
Once you have finished your design, copy and paste your boot over so you have two boots. Your image should now look like the one below, with your own design of course.
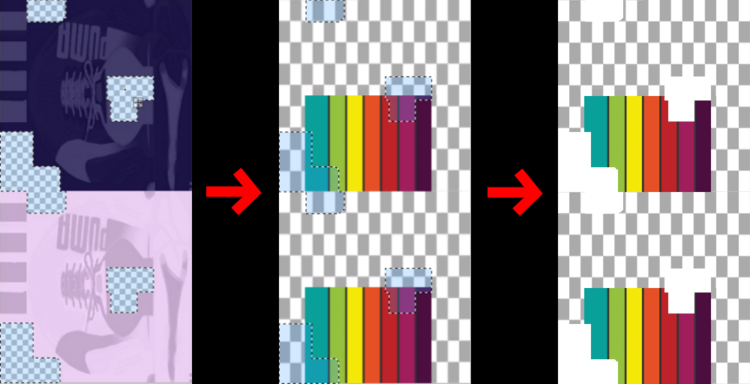
Now all you need to do to complete your design is add the transparency holes. If you left the original image in a different layer, then this step is incredibly easy. As you can see below, just bring up that original layer, use the magic wand tool on all transparent areas then bring the layer with your design back up and hit delete.
Remove any unneeded layers and save your file as a .png. Your design for the in-game shoe is complete.
ek0042_c
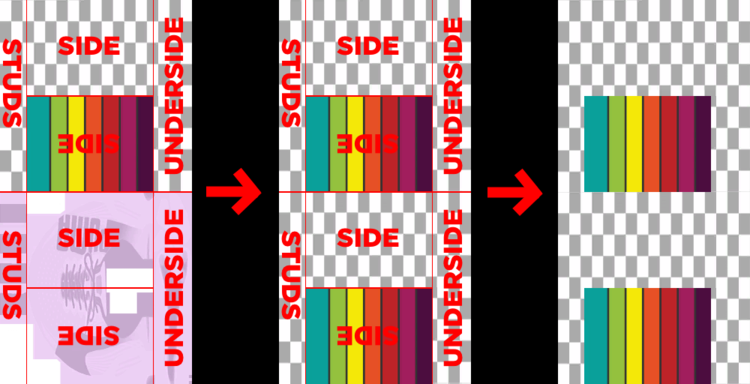
You now need to transfer your design over into the ek0042_c file, which is a case of copy and pasting your design from k0042_c over and fitting it to the correct dimensions.
the process can be seen below and it's really simple. just paste it in and stretch it across.
Remove any unwanted layers and save as a .dds and you now have your boots designed.
Icon and Namestrap
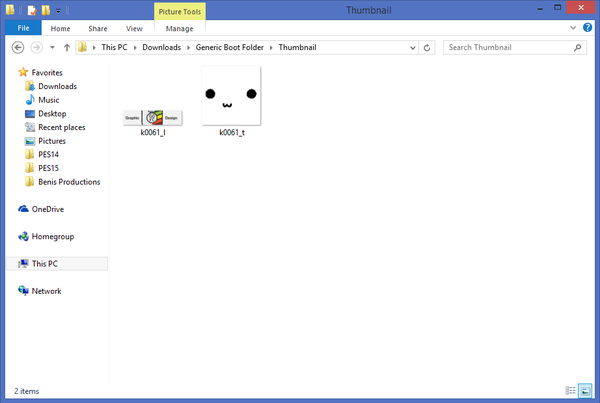
Navigate back through your folders and enter into the Thumbnails section and you will find two image files.
Edit these files in any way that you want as long as you keep it in the given dimensions and save as a .dds.
You have now completed you boot design and are ready to pack it into you aesthetics export or import them into your game via the DLC method.
Importing the boots into PES15
I'll complete this bit later.
If you're wanting to do it and I've not completed this section yet, look at the Installing DLC page on the wiki and create a new DLC file.
Boot files go here: [Your DLC Name]\common\character0\model\character\boots\[File of Boot]
- To find the name of boot folders, use the list in the image below and choose any folder that hasn't been already claimed. You can find the list of claimed folders on the table at the bottom of the page.
Thumbnail files go here: [Your DLC Name]\common\render\thumbnail\spike
- IMPORTANT: You must rename your files so they match the folder name that you chose above. For , if you choose the folder named k0063, your thumbnail files must be renamed to k0063_l and k0063_t.
Boot Allocations
Coming Soon.
Will need to be discussed with Test Pony before anything is final, but if you want feel free to reserve a spot in advance if you've managed to successfully import your boots.
