| The logo poll for the 2025 4chan Summer Cup is now open. | ||
| You can vote here. Logos are in this gallery. | ||
|
| ||
Pro Evolution Soccer 2019/CPK
Pro Evolution Soccer 2019 This is still a work in progress. Please be patient. | |
|---|---|
| Game | |
| Rules | |
| Info | |
| Tools | |
| Modding | |
This page will explain how to make and install custom .cpk files in PES19.
Making DLC
Before you can install DLC to PES19 you will need to create a DLC file. There are two methods of doing this although both rely on the same files. The first method is with the use of CRI Packed File Maker and the other method is with the use of batch (.bat) files, although this uses the files of the CRI Packed File Maker.
CRI Packed File Maker
You will have to download CRI Packed File Maker (CPFM) which is used to make the .cpk files PES19 uses to store its data. After downloading it (see Tools) you can unpack it anywhere, there is no need to install anything, and then start CriPackedFileMaker.exe. If done correctly you'll get something like the following window:
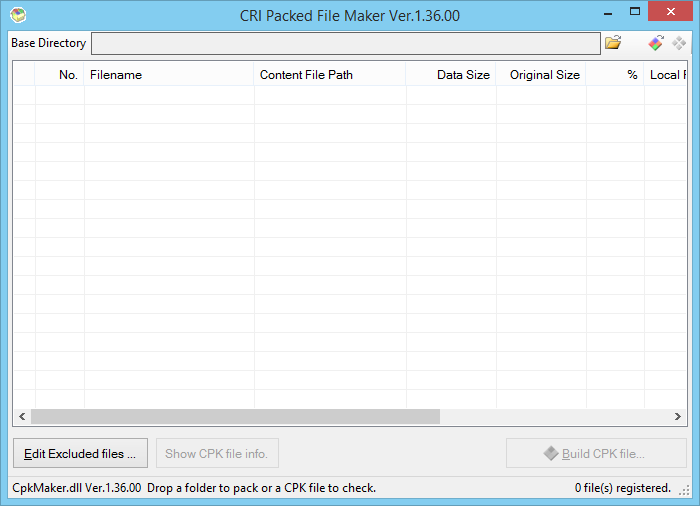
If for some reason the folder you want to turn into DLC is filled with random files you do not want in it, for example thumbs.db, you can edit the excluded files with the button Edit Excluded Files at the bottom left. Show CPK file info is not relevant for this page, but you can check some details of .cpk files you have loaded with CPFM.
To load and check the contents of a .cpk file, use the middle button of the three smaller buttons at the top or just drag the .cpk file into the window. When it is properly loaded you can extract the contents from it with the right button of the three smaller ones at the top. However, when you have everything extracted, keep in mind that some files might still be zlibbed (compression method used by Konami). For more information on zlib please read Pro Evolution Soccer 2016/zlib.
When you want to make a DLC file, press the left button of the three smaller ones at the top to select a folder to load into CPFM. Keep in mind that for a DLC file to work properly the folder structure needs to be correct. This is where Jenkey's File Explorer (JFE) comes in handy (see Tools). For example if you want to install a custom adboard for your stadium, you can open dt30.cpk with JFE (keep in mind some .cpk files can take a long time to load) and navigate to the stadium adboard you want to replace. When you find the correct adboard, recreate the entire tree of folders somewhere in a new folder and put (in this case) ad_007.dds at the end. So:
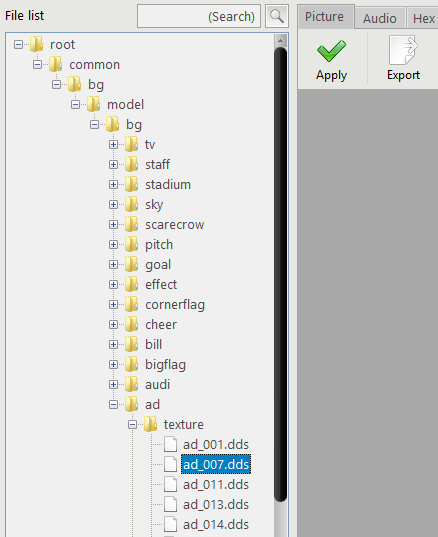
Will become:
\New DLC\common\bg\model\bg\ad\texture\ad_007.dds somewhere on your computer. (The name New DLC is just a placeholder, it can be anything you want)
Now select the folder New DLC with CPFM and make sure common becomes the root folder in the new DLC. If done correctly CPFM will look something like this:

In this case we have just a single file, but obviously you can add as many more as you like to a single DLC.
Now we can start to build our .cpk file. Do this by pressing the Build CPK File button at the bottom right and a new window should open. In this window you can set the path (or browse to with the ... button) where you want the .cpk file to be saved. PES19 saves its DLC in the download folder in your main PES19 folder. For this example we'll call the file 4cc_test.cpk. Now we can set the correct settings for the .cpk file, this is very important because there is only one combination of settings which makes the DLC work in PES19, these are:
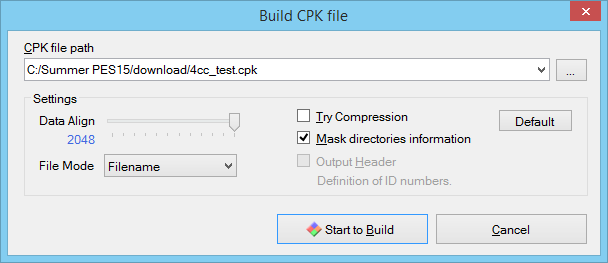
After this you can build the .cpk file by pressing Start to Build and press Complete when it's done. Now you only have to edit the DLC file list to make it work in PES19. (See next section)
With the use of batch files
Like faces, general .cpk files can also be made with the use of batch files. An archive can be downloaded below in Tools that contains all the necessary files and a(n example) batch file. Don't mind the fact that it says PES15, the format hasn't changed since then and the batch file still works perfectly fine. All you have to do is put all the files into the correct locations in the 4cc_test folder. To have this batch file work it has to be in the same folder as cpkmakec.exe and CpkMaker.dll. Now before you can run the batch file you will have to edit the location of the PES19 download folder. Just right-click the batch file and select edit. Now change the location in the second line (the one that starts with 'copy') to the location of the download folder of your PES19 installation. After that save it and you can run your .bat file. If done correctly the .cpk file should now be in your PES19's download folder. Compared to CRI GUI, batch files can be up to 100 times faster with 0% chance at corrupting your .cpk files. If you want to change the source folder or CPK name change the 1st and 3rd lines of the .bat to the source folder and CPK name you want. By default 4cc_test is the source folder and 4cc_test.cpk is the CPK file.
Installing DLC
To install DLC you need to make sure the .cpk file you want in PES19 is in the download folder, for PES19 this is in the main PES19 folder. For this section we will use the 4cc_test.cpk of the previous section.
To have PES19 recognize the DLC you will have to edit your DpFileList.bin. This can be done in two ways: with a hex editor or via an external tool.
With a hex editor
Open DpFileList.bin with any hex editor you like. For more information on hex editing, please read Working with a hex editor. When opened it will look something like this:
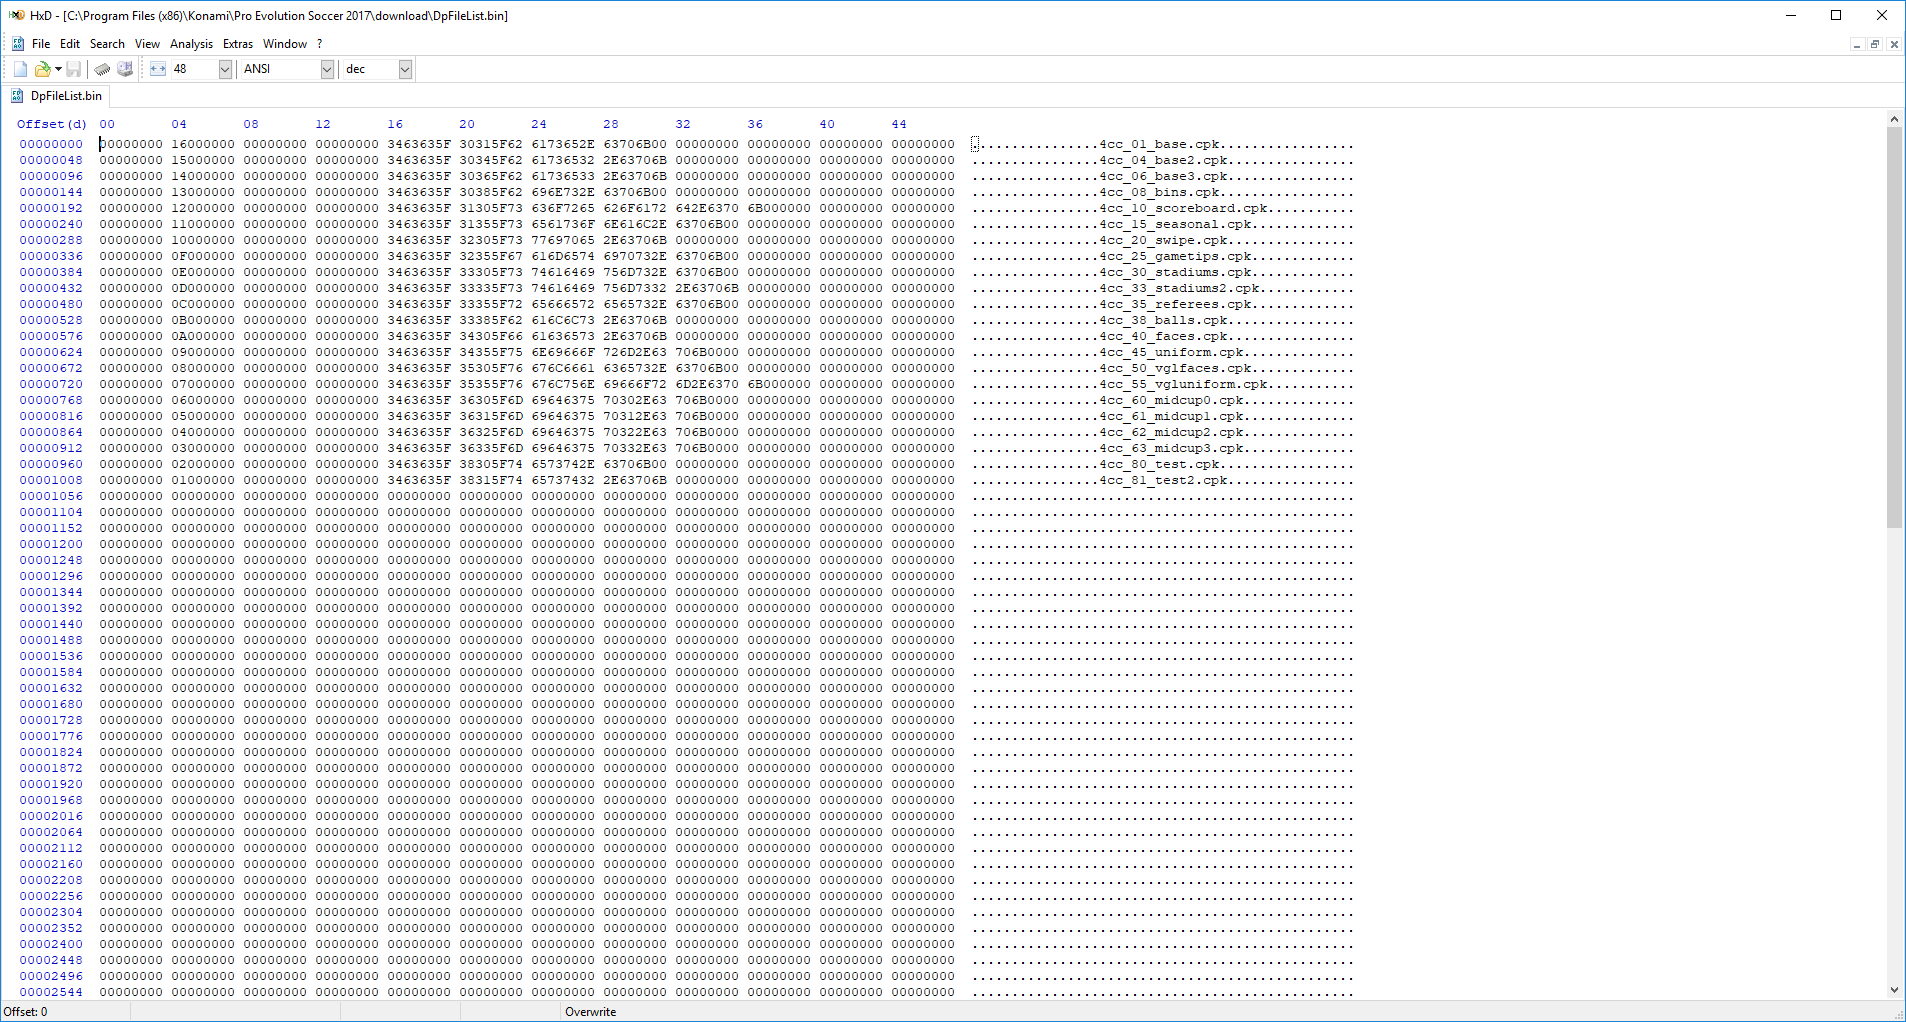
This DpFileList has the default 4cc DLC plus two test CPKs at the very bottom. Each new DLC you want to add will need a new entry in this file, in this example 4cc_80_test.cpk and 4cc_81_test2.cpk. Just looking at the image above should you give an idea on how each new DLC is added to this file/game. However there are some important values/hexes in this file that will be explained.
- The fifth byte, 16 in the image above, denotes how many .cpk files PES19 should load, so in this case 22. This means that PES19 will load all DLC from 4cc_01_base.cpk till 4cc_81_test2.cpk in this case. If this value was made 15 for example, 4cc_81_test2.cpk will not be loaded next time. This value should not be higher than the amount of DLC in the DpFileList.
Don't forget to save your changes and you can check in game to see if your new stuff/DLC works.
Keep in mind that the lower the DLC is in the list, the higher the priority. So if for example the file test.dds is in both 4cc_40_faces.cpk and 4cc_60_midcup0.cpk, the game will load the test.dds in 4cc_60_midcup0.cpk.
Also, if PES fails to find a file, it will skip loading any further DLC packages. So if the file 4cc_30_stadiums.cpk wasn't placed in the download folder in the example above, PES would not load 4cc_33_stadiums2.cpk or any DLC that comes after.
With Baris' DpFileList Generator
Download the tool and unpack it anywhere
The first thing you'll want to do before running the .exe is to go into 'DpFileListGeneratorData' and edit the .xml, now change the location between the <CpkDirectory></CpkDirectory> to your own PES17 download folder. Don't forget to save.
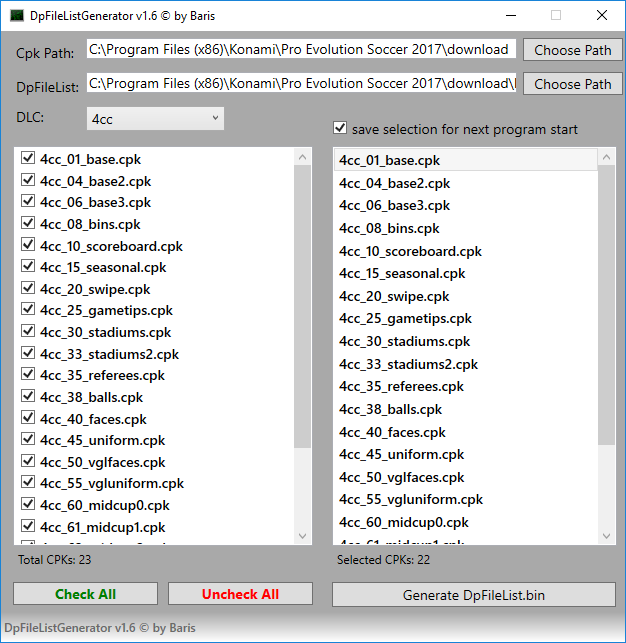
You can now run DpFileList Generator.exe. If you changed the CpkDirectory correctly all the basic DLC should already be correctly listed on the left. Something like in the image below.
The list to the left has all the .cpk files found in the download folder. The list to the right has all the .cpk files that are checked in the left list and thus will be registered in the to-be generated DpFileList.bin. The lower the file in the list to the right, the higher the priority. Now add your own DLCs to the bottom of the list, make sure the DLC at the top drop-down is set to 4cc, and then just hit Generate DpFileList.bin. You can now go ingame and test your new DLC.
Notes and Help
Keep in mind that if you want to replace or update a file that is already in the game, always check the latest DLC on the PES19 page first for the newest version of it. This is very important when editing certain files, for example stadium and team names .bin files.
JFE sometimes doesn't like .cpk files made by CPFM and will crash on loading the .cpk file or give a corrupted view.
There are various causes for your DLC not to work properly. Some of the most common causes (and solutions) are listed below.
- You did not choose the correct settings when creating the .cpk, check the image above for the right settings.
- The .cpk is corrupted. There is a low chance that CPFM will generate a corrupt .cpk file, these are usually 8 bytes bigger than the non-corrupt version of it. Just delete the old and corrupt .cpk, restart CPFM and try again. Usually the corrupts only start to happen when you have used CPFM multiple times in a row with never closing it in between. Overwriting an existing .cpk file also increases the chances of corruption.
- The file is not (properly) listed in DpFileList.bin or you forgot to change the hex that determines the amount of DLC to load.
- The folder structure is not correct. Make sure that common is the root folder in the .cpk file.
- A file itself in the .cpk file is corrupt or incompatible with the game. Always make sure to use the same texture format when replacing one, so a .dds replaces a .dds and a .png replaces a .png. Also watch out for adding files that the game would/should not load like a random texture not used by the game, sometimes PES won't care and will just continue working but sometimes the game will crash when attempting to load this .cpk file.
- If your save broke after installing a new DLC you probably messed up one of the DLC or Patch versions listed in the DpFileList.bin.
Tools
- File Explorer: https://drive.google.com/file/d/0B0TwHGHvKz8TM2JVTkRkMGdaZjA/view?usp=sharing (some virus scanners like to mark JFE as virus, just add it to your whitelist)
- CRI Packed File Maker: https://mega.nz/#!l8VwCAwI!Dx4XtdoW8iQz6enAeW3BLhJl5qxC5hKOGmdBKWeZpEY
- Baris' DpFileList Generator for PES19: https://drive.google.com/file/d/1Yf5IauGJmVUTfGf4wv2n-I2GF8XJwmuG/view?usp=sharing
- PES2019 cpk export tools and batch file: https://drive.google.com/file/d/0B0TwHGHvKz8TZVdTVWUzQkg3a2s/view?usp=sharing
