Difference between revisions of "Pro Evolution Soccer 2016/Faces"
m (→Creating Faces) |
(→Tools) |
||
| Line 246: | Line 246: | ||
=Tools= | =Tools= | ||
* PES2015 Blender Face Tool 2.0: | * PES2015 Blender Face Tool 2.0: https://drive.google.com/file/d/0B0TwHGHvKz8TMUZQUW9MbVBETmc/view?usp=sharing | ||
* PES 2014 Edit-Crypter 1.2: https://drive.google.com/file/d/0B0TwHGHvKz8TRGNmWDdmX1puenM/view?usp=sharing | * PES 2014 Edit-Crypter 1.2: https://drive.google.com/file/d/0B0TwHGHvKz8TRGNmWDdmX1puenM/view?usp=sharing | ||
* PES2015 Face Export tools and batch files: https://drive.google.com/file/d/0B0TwHGHvKz8TVlk1QXl2aVREeHM/view?usp=sharing | * PES2015 Face Export tools and batch files: https://drive.google.com/file/d/0B0TwHGHvKz8TVlk1QXl2aVREeHM/view?usp=sharing | ||
Revision as of 20:06, 19 January 2016
Pro Evolution Soccer 2016 | |
|---|---|
| Game | |
| Rules | |
| Info | |
| Tools | |
| Modding | |
Introduction
This page will explain how (simple) faces work and are imported into PES2016. The first section will explain very quickly how faces are 'made' in PES2016. The second section will explain how faces are installed in PES2016. The third section will contain information on how skin colors work (only the basic 6, please check the APC page for full custom skin colors). The fourth section will give some information about the generic 4cc head. The Example section will contain a slightly more extended guide on how to make faces in combination with APC and RigEx. The Notes and Help section will contain various tips and tricks to keep in mind as well as some troubleshooting. The Tools section will contain links to almost every tool mentioned on this page. Because PES2016 does not use LOD models when the game quality is set to High, this page will not explain how to do LOD models.
For information on how to add faces to your export please read the Aesthetics Exports page.
If you want/need more customization for your player, you will need these tools: Pro Evolution Soccer 2016/Advanced Player Customization and RigEx.
Creating Faces
Learning how to make custom faces for Pro Evolution Soccer 2016 is not something that can be done within a few days. Teaching someone how to use Blender is also something that is not done with just a few pages of text; it's really a process of trial and error. Everyone makes mistakes, don't give up, just see what you did wrong and try to learn from it. It is advised to look at existing custom faces to see how other people did their stuff. The Blender tools can be downloaded under Tools. To install the .py plugin please read this page. The tool is named PES Face/Hair Mod(ifier) Tool in Blender. You will have to copy the pes_temp folder in the download to C:\Program Files\Blender Foundation\Blender\ so you get C:\Program Files\Blender Foundation\Blender\pes_temp. For the very basics of the Blender face tools please watch the videos below:
{{#ev:youtube|OQG4HUepLns}}
{{#ev:youtube|EjwKZZGtFkA}}
{{#ev:youtube|rpEN-nyUV9M}}
{{#ev:youtube|TXkiGVXYg2U}}
Creating a hair from edithair files
If you have tried to apply an edithair ingame to a player with face skin color that is not one of the basic 6, you will notice that a large portion of the face will have a different skin color. To work around this you will to create a normal hair from the edit hair parts in PES16. This part is split into another 3 subparts. The first part will explain how to prepare your face folder if you have to use this method. The second part will explain how to get the hair working when you use a PES16 hairstyle. The third part will explain how to get the hair working when you want to use a PES15 hairstyle.
Preparing the face folder
It is advised to make a copy of the face folder before you start in case you accidentally delete a wrong file.
Deleting all hair files
The first step is to delete all files in the folder that start with hair.
Deleting standard face files
Delete the following files:
- face.dds
- face.mtl
- face.xml
- face_high_win32.model
- face_normal_detail.dds
- face_specular_roughness.dds
Renaming the face_edithair.xml
Rename this file to face.xml. Don't worry about the other edithair files, the paths in the .xml and .mtl files will still point at the edithair files. So renaming the other edithair files will just break stuff. You'll still need to use the face_edithair.dds as texture for the
Getting your PES16 hairstyle
First, make the complete hair in PES16. Because you will need all settings to determine what exact hair model and textures you need.
Getting the hair model
If you have all the settings, you can now find the folder which contains the hair model.
The first part of the folder name is the Length under Overall. The second part is the Style under Overall. The third part is the Style under Front. The fourth part is the Parted under Front. The fifth part is the Forehead Width under Front. If the folder name has an _acc suffix, it means it has an accessory. Do keep in mind some hairstyles do not have all the settings, so some parts might be missing in the folder name.
Find your hair model here: https://drive.google.com/folderview?id=0B0TwHGHvKz8TWktfWkFOZkFwVVE&usp=sharing#list
or here: https://drive.google.com/folderview?id=0B0TwHGHvKz8TeVBvdXlLQk91cWM&usp=sharing#list
Getting the hair textures
The next thing you'll need are the hair textures. You'll need 4 textures in total. 2 parts textures (if the hair is not a specific Special or Shaved) and 2 shell textures with each pair consisting of a diffuse and specular map.
Parts
This is dependent on only 2 settings if it is not a Special hairstyle. The first part of the texture name is the Wave Level of the hair and the second part is the Side / Back Style. For Special hairstyles just download the texture with the same ID. Shaven hairs do not have a Parts texture. Afro, Braided and Dreadlocks do not have a Wave level, so those textures can be found with the Style name. Do not forget to download the specular (_spe.dds) texture as well. The specular textures are independent of the Side / Back Style.
Find the hair parts textures here: https://drive.google.com/folderview?id=0B0TwHGHvKz8TRkpaaG50WFZJTFk&usp=sharing#list
Find the hair parts specular textures here: https://drive.google.com/folderview?id=0B0TwHGHvKz8TY1dZWlJZTHdxLTg&usp=sharing#list
After you have downloaded the right textures, name the first texture hair_parts_col.dds. Name the specular texture hair_parts_spe.dds.
Shell
This is dependent on 5 settings if it is not a Special hairstyle. The first part of the texture name is whether the texture is for a shaven head or not. The shaven hair shell textures are already split from the other textures. The Wave Level of the hair is the next part of the texture name. The part after that is the Front Hairline Type. After that comes the Forehead Width. The Cropped type is only when you have a Cropped Side / Back Style, otherwise just use Cropped Type 1. For Special hairstyles just download the texture with the same ID. Afro, Braided and Dreadlocks do not have a Wave level, however PES16 uses the Wave Level +5 texture for Afros and Dreadlocks, and +6 for Braided.
Do not forget to download the specular (_spe.dds) texture as well. These are only dependent on the Wave Level if it is not a special texture.
Find the hair shell textures here: https://drive.google.com/folderview?id=0B0TwHGHvKz8TdEhmekc4eDdzb0k&usp=sharing#list
Find the shaven hair shell textures here: https://drive.google.com/folderview?id=0B0TwHGHvKz8TTDQ3YVZfYzhxbEU&usp=sharing#list
Find the hair shell specular textures here: https://drive.google.com/folderview?id=0B0TwHGHvKz8TQjNmS0p5dXpYTDA&usp=sharing#list
After you have downloaded the right textures, name the first texture hair_col.dds. Name the specular texture hair_spe.dds.
Texturing the hair textures
Open the _col.dds textures in Photoshop or Paint.net, make a new layer below the _col.dds texture and fill it with the color you want for your hair. Then set the _col.dds texture layer as Multiply. Then save the texture as a .dds with DXT5 (Interpolated Alpha). The most right part of Parts textures is the texture for the accessory.
Installing the hair model
Now copy the hair .model and textures to the face folder of your player. Now the only missing file is the hair.mtl file. Dependent on the hairstyle you have chosen, you will need a different hair.mtl. Below you can find premade hair.mtl files that you can just copy into the face folder and it should work right away.
Very Short, Short, Medium, Long, Special 8-29 hairs: https://drive.google.com/file/d/0B0TwHGHvKz8TRm1JUkJ5TkRKRzA/view?usp=sharing
Shaven, Special 1-7 hairs: https://drive.google.com/file/d/0B0TwHGHvKz8TVERxY1BOdnowQXc/view?usp=sharing
Now just compile your face into a .cpk and go test it.
Getting your PES15 hairstyle
Getting all the textures and model
First of all determine what hairstyle you want from PES15. When you know what you want, visit this link: https://drive.google.com/folderview?id=0B0TwHGHvKz8TZjFLYkVHb1lKQ1U&usp=sharing#list
Each folder name has several abbreviations that point to exact hairstyle:
| Abbreviation | Hairstyle |
|---|---|
| boz | Very Short |
| ext | Special |
| lng | Long |
| mid | Medium |
| sht | Short |
| skn | Skinhead |
| Abbreviation | Hairstyle |
|---|---|
| d | Dreadlocks |
| p | Permed |
| s | Straight |
| w | Wavy |
A _c_ denotes that the hairstyle has an accessory. The number in the Folder Name is the Hair Variation minus 1, so Hair Variation 18 ingame would be 017 in the folder name.
Now download all the files from the folder to your face folder.
Texturing the hair textures
Open the _col.dds textures in Photoshop or Paint.net, make a new layer below the _col.dds texture and fill it with the color you want for your hair. Then set the _col.dds texture layer as Multiply. Then save the texture as a .dds with DXT5 (Interpolated Alpha). The most right part of Parts textures is the texture for the accessory if it has one.
Installing the hair model
If you have copied the textures and the .model to the face folder the only missing file is the hair.mtl file. Dependent on the hairstyle you have chosen, you will need a different hair.mtl. Below you can find premade hair.mtl files that you can just copy into the face folder and it should work right away.
If your hairstyle has _parts_: https://drive.google.com/file/d/0B0TwHGHvKz8TRm1JUkJ5TkRKRzA/view?usp=sharing
If your hairstyle has no _parts_: https://drive.google.com/file/d/0B0TwHGHvKz8TVERxY1BOdnowQXc/view?usp=sharing
Now just compile your face into a .cpk and go test it.
Installing faces
Unlike most files in PES16, the game uses separate .cpk files for each face, which are then put in another .cpk again. Faces will only work if the player has an ID of 199.999 or lower, however the Gamma 4cc DLC only features players with IDs below 100.000, so this should never cause any issues. Currently there are 2 different ways of installing faces: by hand and with the help of batch files.
By hand
First you'll have to put the face in a 'normal' face folder. Just make a new folder tree somewhere on your PC that goes \common\character0\model\character\face\real\<ID> with the ID of the player you want a custom face for. So a new face for Robben whose player ID is 3997 would be in the folder \common\character0\model\character\face\real\3997. PES2016 player IDs can be figured out relatively easy, either with the help of a save editor or or just doing it by hand. In this folder all the files you normally put in a face folder should be present, like face.xml and face_high_win32.model. An example of the first face folder is given below.

Now you can pack this face into a .cpk-file. For more information on making DLC packages yourself please read Pro Evolution Soccer 2016/DLC. When packing it the name of the new .cpk-file will have to be the player ID, so using Robben as example again his face .cpk will be 3997.cpk. All faces have to be in separate .cpk files and make sure that the root folder of the new .cpk is common.
Now make another folder tree somewhere on your PC that goes \common\character0\model\character\face\real\ again. Now put all your face .cpk files at the end of this tree. This means you should get something like \common\character0\model\character\face\real\3997.cpk. Now make another .cpk file of this folder tree with common as root. Now you can put the final .cpk file in the download folder, add an entry to the DpFilelist.bin and go ingame to test it.
By batch files
The 2.0 face tool download includes a basic .bat file that will convert all faces in the faces folder of the face tool into a single final .cpk file. All the batch files and supporting files and folders can be downloaded under tools.
face_test_cpk.bat
This is the standard batch file to compile a final (or for tests) .cpk with all faces separately compiled as .cpk in it. Before you run this file, make sure that the path in the third line (copy face_test.cpk "C:\Program Files (x86)\Pro Evolution Soccer 2016\download") points to the download folder of your PES2016 installation. You can change the face_test.cpk to any name you want, just make sure the entry in the DpFileList.bin is updated correctly along with it. To edit the .bat file just right click it and pick edit. To add faces to this .cpk make separate entries for all faces in the \faces folder. Use the existing 983 folder as an example. All face folders will have to look like this with the 2 numbers (at the beginning of the folder tree and the other at the end) being the player ID. To have this batch file work it has to be in the same folder as cpkmakec.exe, CpkMaker.dll and the faces folder.
export_cpk.bat
This batch file almost does and works the same as the build_cpk.dat except it does not compile the separate .cpk files into a final .cpk. Unlike the build_cpk.dat there is no need to edit anything in the .bat file, it will export all separate face .cpk files to the folder cpks. To have this batch file work it has to be in the same folder as cpkmakec.exe, CpkMaker.dll and the faces and cpks folders. Use the existing 983 folder as an example again.
pack_player.bat
This batch file will generate a single player face .cpk file. To have this batch file work it has to be in the same folder as cpkmakec.exe and CpkMaker.dll. Just run the batch file and the instructions will guide you through it. You will select the face folder first, but this step requires you to select the folder that has the face files directly. There is no need to make and/or select a whole tree of folders. If you have \common\character0\model\character\face\real\983 for example, you will select the 983 folder. In the third step you can enter the player ID you want, so if you have a folder named le toucan you can enter 12345 for example and the batch file will make sure the player ID of the face .cpk file will become 12345 (including in the folder tree on the inside).
Applying basic skin colors
For full custom skin colors please read the Advanced Player Customization page.
RigIt allows one to easily change the skin color of their players.
Check Pro Evolution Soccer 2016/Skin Colors for the 6 basic skin colors in PES. 0 and 7 will allow you to do custom skin colors.
Generic 4cc Head
Below the tools you can download a pack with generic human male and female head, and also a generic female anime head. Each head is in its own separate folder already. But the head guides in .psd format (Photoshop) are in their own folder. The overlap layer on both guides is the area of the texture of which both UV maps of the head and the face overlap each other, for the best result this layer should just be a single color, especially if you have a player with no to barely any hair.
It is really recommended to use the headguide to help make textures.
Inside the folder, the main files are going to be:
- face_edithair.dds - This is the file your texture goes into eventually. If you don't replace this file you will get a generic head with a message reminding you that you forgot to replace this file.
- face_edithair_high_win32.model - This is the model file if you want to import it into blender with the PES 14 import tool.
- face_edithair_normal_detail.dds - This is the normal map file if you want to mess with it. It's set to a generic flat value for use with the TGH.
- face_edithair_specular_roughness.dds - This is the specular and roughness map file. They are also set to generic flat values.
- face.dds - This is the test pattern file for making it obvious that you haven't selected a custom hairstyle.
It's not necessary to mess with any of the other files. The normal face and the specular textures can be saved with no alpha, all other textures require an alpha layer.
Note: This generic head is not updated for the edithair -> hair issue as explained above.
Advanced Head Example
In this part we are going to set up a player for PES16 using APC and RigEx. This example might contain some more complex stuff, but it is done to highlight the possibilities of APC in combination with RigEx, so you can also do a whole lot more than shown in this example.
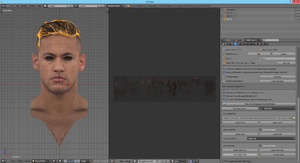
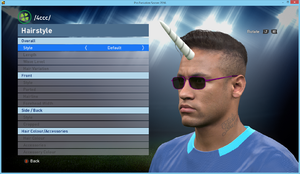
First we will need a Blender, for this example we'll just use the PES16 cover star: Neymar. For this example we are going to give him a horn and sunglasses.
So we set up a normal face folder for him and import his face with the standard PES Face/Hair Mod Tool. If done correctly we should get something like this below:
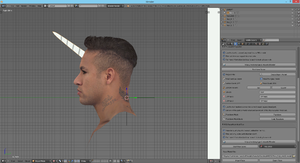
Now we will add a new mesh and model a horn. Because this is a newly created mesh, we will need to use the PES .model Exporter. So create the EXPORT Parent and set it as horn's parent. Also make sure the object has 2 UV maps and the names are correct. Now we should get something like this:
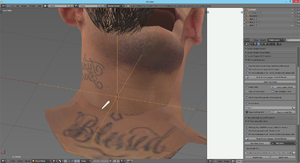
Now we select the horn and press Transform to move, rotate and resize the horn to the correct place and dimenstions. The horn is now here:
Now we select the EXPORT parent and browse to the location we want to export to. As shown in the image above to C:\test\. So now we can hit the Export .model File.
Now we browse to C:\test\, find the export.model there, copy it and paste it in the Neymar face folder. Now we can rename it to anything we want, as long as it has the oral_ prefix and _win32 suffix. For this example we rename it oral_horn_win32.model. Also copy all the textures for it, in this case horn.dds and horn_specular.dds.
The next thing we want to do is give him sunglasses. For this we will use existing glasses in PES16. We can find them in dt32.cpk and we copy the .model file to Neymar's face folder. Then we rename it to oral_glasses_win32.model. We also copy the texture to face folder.
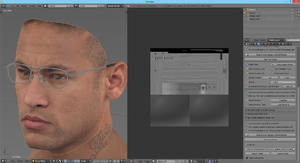
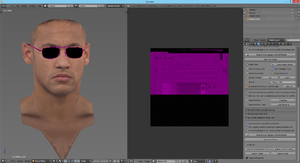
Now we start a new scene in Blender and import the face_high_win32.model with the PES .model Importer / Mod Tool first. Unlike the previous tool used, this tool will import the face at the size and location it's actually in the .model file. Now we delete eye parts and rename the Mesh names, this to prevent issues with exporting later. So we rename the meshes to Head_0 and Head_1. Because this tool does not import textures, we have to apply textures ourselves. After that we can import the oral_glasses_win32.model with the same tool and texture it with the glasses texture. If done correctly we get something like this:
Now we can move the glasses to the right position on his face (do keep in mind we cannot remove or add anything to the Mesh), but also texture the glasses to our liking:
When we have a result we like, we can just hit the Export .model of the PES .model Importer / Mod Tool.
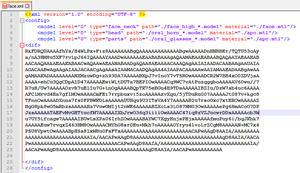
The next step is to add both .model files to the face.xml. So we open it with an Editor and add 2 new entries for the horn and glasses. Because the horn does not have a skeleton, we need to change its type to "head". But because the glasses do have a skeleton, we can choose a neutral type like "parts". When we're done we should have the following:
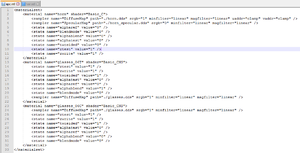
We can now save this and work on the apc.mtl. We have to add 3 entries to it: 1 for the horn, but 2 for the glasses. So after spending some time we found that these are the best shaders and settings:
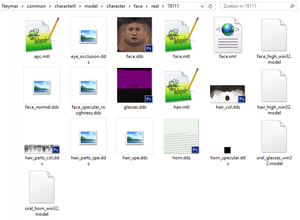
We can now compile the face folder, which looks like this now:
into a .cpk and DLC and then go ingame to test it:
Ta-da!
Notes and help
There are various reasons why your custom face doesn't work or is slightly broken, below various causes are listed with solutions.
Face doesn't work at all
- Player ID is wrong.
- Folder structure in the DLC is not correct.
- Make sure the face and hair are defaulted.
Tools
- PES2015 Blender Face Tool 2.0: https://drive.google.com/file/d/0B0TwHGHvKz8TMUZQUW9MbVBETmc/view?usp=sharing
- PES 2014 Edit-Crypter 1.2: https://drive.google.com/file/d/0B0TwHGHvKz8TRGNmWDdmX1puenM/view?usp=sharing
- PES2015 Face Export tools and batch files: https://drive.google.com/file/d/0B0TwHGHvKz8TVlk1QXl2aVREeHM/view?usp=sharing
- Generic Head models: https://drive.google.com/file/d/0B0TwHGHvKz8TV2QzZE4zTUlNNDg/view?usp=sharing
