| The logo poll for the 2025 4chan Summer Cup is now open. | ||
| You can vote here. Logos are in this gallery. | ||
|
| ||
Pro Evolution Soccer 2016/Full Player Customization/Retro
Pro Evolution Soccer 2016 | |
|---|---|
| Game | |
| Rules | |
| Info | |
| Tools | |
| Modding | |
Note: This system is currently only being used in VGL7, and will probably be used in the 2017 Winter Cup if everything went fine
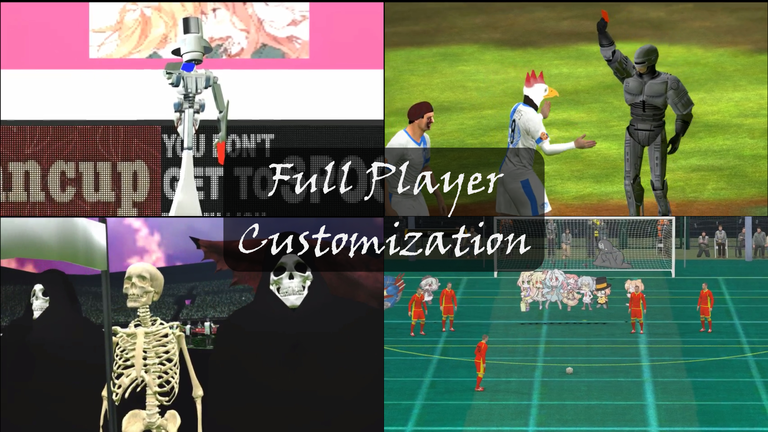
Full Player Customization (FPC, not to be confused with APC) is the name given to the system that allows removing the default PES body parts of a player that couldn't be removed previously. In the past only a player's limbs could be removed (via Rigit), but thanks to the FPC system removing shirts, pants, etc becomes possible, even giving the choice to remove a player's body completely.
Once a player's default body has been removed, there are no limits to what the void can be filled with. You can take advantage of FPC to give players custom kits which don't glitch, to replace players with flat images of characters, and even to set full body blenders for your players.
Since the FPC system is based on the removal of one model type for every body part, though, it introduces some small limitations to the customizability of all players, even those belonging to teams which don't use the system at all. For this reason reading the section relevant to your interests at least once is strongly recommended, at least to know what to do in case of missing parts in your players.
I'm out
The system was studied carefully to minimize as much as possible the impact on teams which are not using it, but even then there are a few points that should be kept in mind when customizing players in the ingame Strip Settings menu.
Applying the system
First of all, you should apply the system, so that you can check if any of your players have been influenced.
Download this cpk, put it in the download folder of your PES installation and add it to the end of your dpfilelist.
4cc_removeplayers2: Gdrive Mega
(If you don't know how to append stuff to the dpfl, try this quick tool: Gdrive Mega
Just put the cpk in the cpks_to_add folder, run the bat file and if everything went fine you won't have to do anything else, you can run PES right away)
What can't be used
Using any of these settings will make the relevant body part appear invisible:
- Kit configs (teamwide):
- Collar 105
- Pants 016
- Rigit (individual players):
- Glasses type 1, 4 or 5
- Ingame strip settings (individual players):
- Wrist taping
- Ankle taping
- Short undershorts
- Long sleeves (only if the kit config has shirt model 176 set)
- Short socks
- Tucked shirts
If your team's players are using none of these settings, you're fine and can leave this page.
How to restore missing parts
If you still want to use the models which appear invisible (for example if you want to restore a team's missing tucked shirts) you can either set them back with APC, or just use the replacement models which have been set in the place of the most rarely used accessories.
In the second case, you can either run a tool which scans all of your team's players and fixes them automatically, or set them manually using the ingame strip settings (and rigit in very rare cases).
The tool also allows you to check if there are any missing parts in your team without having to check every player individually yourself.
With the automatic tool
4cc FPC Checker v1: https://mega.nz/#!us1SzQBL!wVCIs0gEH5GmJD42QVZ2TSB43svJQ4vIQ1R9GKXRRtQ
Download, unzip, open the settings txt file and write your team ID as starting and ending team, then run it. It'll get a copy of your editfile directly from the savedata folder (which has to be properly set).
There are three versions:
- check_nokits
- check_withkits
- check_withkits_andfix
Use the first one only if you need to check teams for which you don't have the kit config files.
The latter two need you to copy your Kit Configs folder to the script's folder to allow them to make extra checks, but they check for all the possible problems you may have.
The last one fixes any problems found in addition to checking them. If you're not sure about which one to use, run this one.
After the tool has finished checking the players, a txt file with the results of the operation will be opened.
Manually
- Missing tucked shirts:
- If loose shirts is set in the kit configs: Set ankle taping to 'on'.
- If tight shirts is set in the kit configs: Set wrist taping to 'right'.
- Missing collar and lower pants:
Set wrist taping to 'left' (this will set a collar 001 model and a pants 001 model).
- Missing short socks:
Set undershorts to short/short.
- No type 3 long sleeves:
Set glasses to type 5 in Rigit.
- Missing spats, wrist taping, ankle taping and type 1, 4 and 5 glasses:
These can only be restored by including them in the player's face folder via APC. Feel free to contact me should you need any kind of assistance.
I'm in
If you want to use this system to fully personalize any of your players, follow these instructions.
Applying the system
First of all, you need to remove the dt35_win cpk from the Data folder of your PES installation. Either delete it or put it anywhere else.
Now download these two cpks, put them in the download folder of your PES installation and add them to the end of your dpfilelist.
4cc_removeplayers: Gdrive Mega
4cc_removeplayers2: Gdrive Mega
How to remove your players
Set the following settings in the kit configs and for every player you want to remove:
- Kit configs (teamwide):
- Shirt 176
- Collar 105
- Pattern 13*
- Winter Collar 105
- Pants 016
*Optional, only needed when using kit models with modified uvs which use the team kit texture.
- Kit configs - hex editing (only needed for removing the GK):
- Set the second byte (0x01) to FF
- Rigit (individual players):
- Skin set to Custom
- Ingame strip settings (individual players):
- Boots 55
- Gloves 11 (only needed if GK)
- Long sleeves (only needed if not GK)
- Tucked shirts
- Short socks
If you did everything correctly, PES should now show only the heads and necks for players that have been removed.
How to restore missing parts
Since the kit settings affect the whole team, if you want to keep the default body parts for some of the players you'll have to either restore them by including them in the player's face folder via APC, or more simply by using the replacement parts hidden in the slots of the least used accessories:
- Missing collar and lower pants:
Set wrist taping to 'left' (this will set a collar 001 model and a pants 001 model).
- Missing tucked shirts:
- If loose shirts is set in the kit config: Set ankle taping to 'on'.
- If tight shirts is set in the kit config: Set wrist taping to 'right'.
- Missing short socks:
Set undershorts to short/short.
- No long sleeves:
- If shirt model 144 is set in the kit config: Set glasses to type 1 in Rigit.
- If shirt model 160 is set in the kit config: Set glasses to type 4 in Rigit.
- If shirt model 176 is set in the kit config: Set glasses to type 5 in Rigit.
- Missing spats, wrist taping, ankle taping and type 1, 4 and 5 glasses:
These can only be restored by including them in the player's face folder via APC. Feel free to contact me should you need any kind of assistance.
Now what?
The sky's the limit!
You can make all kinds of blenders which won't be spoilt by the presence of the default PES body.
The following are some templates which make use of FPC to offer new possibilities of customization. More templates and guides (including a guide on how to make full body blenders like Robocop's) will be added in the slightly distant future (after VGL7).
To use these templates you need to have applied the FPC system to your team, and in particular to the players you're going to replace with flat players. That's the hardest part.
Templates for making flat team players
Once your players have been removed, get one of these two templates and use it as folder face for your players, editing the face.dds for each player as you prefer. All of the texture space gets used, and you can also change their size, as long as you keep it a square with a side length that is a power of two (512x512, 1024x1024, etc).
Anime-style shading: https://mega.nz/#!HwUjUbhL!FwZbXBL9E7f7-mUofsAKssey0HbKkfVL0t81AIUfxnE
Normal shading: https://mega.nz/#!KgtAhLBZ!PwRvfz4FBFXbEtvinrQ_3ZoEo_1YN0b7nidUj6baFdc
The two templates only differ on how the image is displayed: The anime-style shading makes the image appear always at the same brightness (probably the best choice for anime characters), while the normal shading allows the image to get darker depending on the stadium's lighting (probably the best choice for western characters). In case of doubt just try both and use the one you like the most.
Templates for adding custom kits to players
Once your players have been removed, get this template and use it as folder face for your players.
Follow the instructions in the readme txt to understand how to fill the face folder with the kit parts you want.
Custom kits Template: https://mega.nz/#!r19wnCZb!WXHyc-YLE38sYZoHDHbKaKzcdwOS5BbkQ9t0dXw-hTk

